Inspect your deck to keep family and friends safe this summer

It’s about that time of year when homeowners’ attention turns to summer and in which home maintenance tasks are the most pressing.

Typically, the list includes replacing HVAC filters, cleaning out the gutters, cleaning up debris around the property and more.

It’s not enough, however, to give your deck a good sweeping and maybe a fresh coat of varnish. If you’ll be entertaining on it this spring and summer you should also do a safety check.

Why?

A wood deck typically lasts between 10 and 15 years, claims the U.S. Consumer Product and Safety Commission. They also say that about half of the 40 million decks attached to U.S. homes are older than their life expectancy.

Sadly, ignoring repair or replacement of decks results in nearly 225,000 injuries and more than 30,000 of these were the result of a collapse or other structural failure.

Let’s walk through the type of deck inspection that the experts recommend.

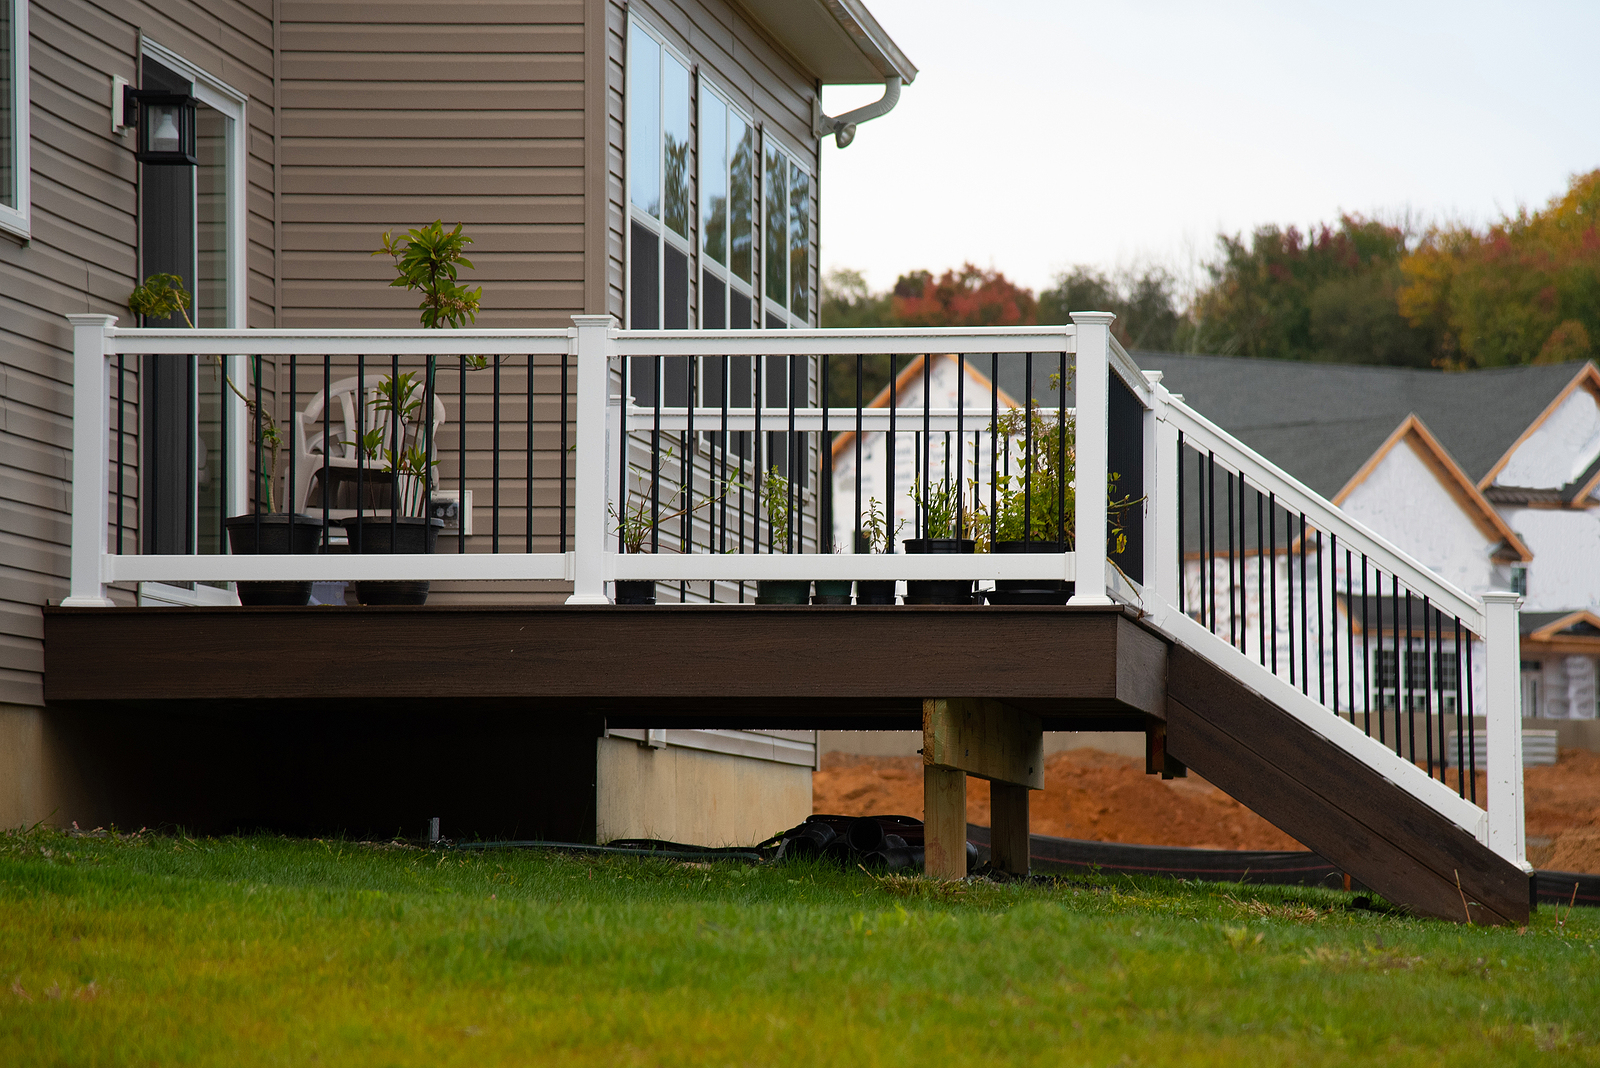
Inspect the condition of the wood

Weather does a number on wood, causing decay and splitting. Walk around and under the deck, paying close attention to the wood, especially those spots attached to the house.

This is where the ledger board is located. “The ledger provides much of a deck’s strength; it supports the joists at one end, and it provides stiffness to the framing,” according to the folks at Decks.com.

It’s the ledger board that is among the most common sources of deck collapse, according to the National Deck and Railing Association.

They also recommend checking “the support posts and joists under the deck (if you can reach them), deck boards, railings and stairs.”

Not all damage is visible, however, so take a screwdriver with you on your inspection tour. Poke the wood in various areas and if it feels spongy, it may be either decayed or have a pest infestation.

Then, insert the screwdriver into any cracks you come across. Natalie Rodriguez of This Old House magazine suggests that if you can push the screwdriver more than ¼-inch into a crack, or if the wood splinters, there is decay or rot.

Check the connectors

Next, tour the deck with a hammer in hand. Use it to lightly tap on bolts. A hollow sound indicates that the connector may need to be tightened. While you’re tapping, look for rust or corrosion.

Experts with the International Association of Certified Home Inspectors warn that corroding fasteners cause decay and deterioration of surrounding wood.

Inspect the banisters, balusters, railings and stairs

Many homeowners confuse the difference between the banisters and the balusters. The former is the handrail on a stairway while the latter are the vertical structures that support the banister.

Shake the banisters to ensure they don’t wiggle then visually inspect the balusters to be certain there is no decay and that they are securely attached.

Finally, measure the railing. It should be at least 3-feet high and the balusters should be no more than 4 inches apart.

Other risks to the deck

Is the home’s irrigation system hitting the deck? This is a major source of wood decay, so redirect the sprinkler heads to ensure they aren’t wetting the deck. Do the same with the home’s downspouts – redirect them so that no moisture reaches the deck.

Wet landscape plants in contact with the wood deck promote mildew, so keep it cut back during the growing season.

Wrap up the safety inspection by applying a fresh coat of weatherproofing.

Now you can relax into those spring and summer soirees, knowing that everyone who uses the deck is safe.

House Hunting: Decisions, Decisions, Decisions

Choices – it’s great to have them but challenging to narrow them down. Whether choosing between where to have dinner, which movie to see or something as important as where to live, making up our minds is sometimes quite difficult.

House hunting is either feast or famine: sometimes there are no homes that you like, other times, there may be too many that offer exactly what you want. So, how do you “say yes to one and let the other one ride,” as the Lovin’ Spoonful so aptly put it back in 1966?

Here are some factors to consider when weighing one choice against the other.

Mortgage Costs and Financial Considerations

One of the biggest mistakes people make when buying a home is assuming their monthly mortgage payment is the only financial outlay required when owning a home. The cost of homeownership includes more than the payment – sometimes much more. Consider these additional costs:

  • Association, neighborhood or condo fees
  • Electricity, water and other utilities
  • Homeowner insurance
  • Repair costs
  • Maintenance, such as landscaping, pool service, etc.

TIP: Compare the real costs of owning the houses in question. One may just price itself out of the decision-making process.

The Basics: Location, Structure and Design

Think back to when you first decided to buy a home. While price was most likely your biggest concern, location may have factored into your concerns as well. Many homebuyers end up compromising on location, veering away from their original intent.

TIP: Compare the locations of the houses in question. Which one fits your original intent? Are you compromising on location when you don’t have to? Go over this list and remind yourself of which aspects of location are most important to you:

  • Commuting distance
  • Future nearby development projects
  • Local crime
  • Local economy
  • Neighborhood age and cleanliness
  • Neighborhood traffic noise
  • Property values
  • Proximity to shops, hospitals and schools
  • Nearby features that may drag down property values, such as a landfill

The structural integrity of the house is also extremely important when you choose a home. While it may seem beautiful, if it isn’t well built, home maintenance costs could cripple a new owner’s finances. Here’s another opportunity to compare houses. Which one is more structurally sound?

Something has equally attracted you to more than one home and typically, that something is design.

TIP: What design elements do the two homes have in common and which house presents those elements better? Look at the floor plans and picture yourself using them. Is one more functional than the other? Are there odd shaped rooms that may end up driving you crazy?

Don’t Go Changin’. . .

Still stuck? Ask yourself what you would change about each house, if finances were not a consideration. Allow your imagination free reign on this one and you may find that one house edges out the other.

While we don’t advise you to go with your gut or flip a coin when deciding which house to buy, in the end, it may come down to emotion.

On one level you’re making an investment decision — but you’re also choosing something very emotional ― a home. When all the priorities are examined, and all the pros and cons of each choice are considered, whether or not a house feels like home is an important consideration.

We’re happy to help you find the perfect home in the ideal location.

How to grow better roses this summer

Roses aren’t as difficult to grow as many beginning gardeners assume. The key to growing better roses in the summer is to choose varieties that are proven to do well in our climate.

Keep in mind as well that some roses are more tolerant of cold while others can handle the heat better. There are even a few shade-tolerant varieties (floribundas in pastel colors is an example).

The most challenging time of year for roses is during the heat of summer. Knowing how to care for them during this period will keep them gorgeous and healthy all year long.

Keep the soil insulated

Mulch is like a wonder drug in the landscape. Spread a 3-inch layer of it around the rose (keep it from touching the plant to avoid rot) and you’ll not only insulate the roots from heat, but conserve soil moisture as well.

“The mulch will keep the roots 10 to 15 degrees cooler then the air temperature,” claims rosarian Leonard Trubisky.

How much water to give roses in summer

The biggest favor you can do for your roses is to water them deeply and keep the water off the foliage to avoid mildew.

To determine how much water to provide, stick a length of rebar into the soil. If you hit dry soil (you’ll know because it will become more difficult to push the rod into the soil), pull it out and measure how far it was inserted before it stopped. If it’s not two feet, keep watering and measuring until you hit that depth.

Then, wait until the top two inches of soil is dry to the touch before watering again. It is critical that you neither over- or under-water the roses during the heat of summer.

Get rid of faded blooms

Certain roses don’t require deadheading (the removal of dead or faded blooms) to continue blooming. Known as self-cleaning roses, this group includes the popular The Knock Out® family of roses.

If you need to deadhead, do it consistently throughout the summer. Cut the stem with a faded flower back to a cluster of five leaves, making the cut so that the cluster remains on the plant. Choose a cluster that is facing the direction you want the stem to grow.

Fertilizing roses in summer

Heat and fertilizer don’t mix and you may end up with a burnt rose bush if you fertilize in the middle of a hot day.

Since many rosarians suggest that July 31 should be the final fertilization for the year, many gardeners run into trouble. It’s hot in July!

If this is the case for you, apply fertilizer to your roses early in the evening or morning, before the weather heats up.

Use half the amount you normally do. If you’re new to roses, a 10-10-10 or 5-10-5 general purpose fertilizer is fine. Never apply fertilizer to dry soil and thoroughly water the soil around the roses after fertilization.

This is basic summer rose-growing advice and if you need more information, turn to the experts of the American Rose Society.

Mortgage terms every first-time homebuyer needs to know

Like anything you do for the first time, you’re about to encounter a whole new vocabulary when you purchase a home.

Sure, you’ve likely heard some of these terms, but whether or not you know what they mean is an entirely different matter. We’ve broken down some of the most commonly confused terms you’ll encounter when pursuing a mortgage.

Closing Costs

Closing costs are just what they sound like – the cost to close the purchase process.

These fees range from origination fees, notary fees, local taxes and others and some are negotiable.

Your lender will send you a form, known as a Loan Estimate, within three days of receiving your application. This form contains important information, including estimated closing costs. Use this form to compare this lender’s costs to other lenders when shopping for a mortgage.

Down payment

Most first-time homebuyers understand that unless they’re paying cash for a home they will need a down payment. The confusion centers around who is making this requirement.

Hint: it’s not the home seller.

Indeed, this is a lender requirement and the amount you’ll need to pay varies according to the risk factor you present to the lender. USDA Rural Development and the Veterans Administration require no down payment for the loans they guarantee.

FHA offers low down payment options to certain borrowers.

You may also find that you qualify for municipal, state and federal down payment assistance programs. Work closely with your lender to find all the help you’re entitled to.

Escrow

Think of “escrow” as a special type of account administered by a disinterested third party (typically an escrow officer) in which all the documents and monies pertaining to the real estate transaction are kept until closing.

Some of the items kept in an escrow account include the buyer’s earnest money deposit and the deed. There is also commonly a second escrow account in which the lender keeps your tax and insurance payments until they are due.

P.I.T.I.

This is your monthly loan payment and it stands for what is included in your payment: principal, interest, taxes and insurance.

Points

You may hear people refer to “buying down” their mortgage rate. What they are referring to is the payment of points, or percentage points of the loan amount.

If you plan on living in the home for a long time, paying a point up front will save you money.

Security

You may hear this referred to as “collateral,” and the words mean the same thing but “security” is more often used in mortgage transactions. The home you are purchasing is the security for the loan.

In other words, if you go upside down in your mortgage payments, the lender reserves the right to take the security (your home).

Title insurance

Since the home is the security for the loan, the lender will want to ensure that nobody else has a claim on it.

A title insurance company will research the chain of title to make sure there are no liens or heirs that may pop up down the line with a claim to the title. The title insurance policy is a guarantee against this occurring.

We aren’t lenders, so if you’re confused about any mortgage terms, don’t be afraid to ask your lender for an explanation. Most are happy to help.

Spruce up your patio this weekend

Whether you beckon your summer guests outdoors for alfresco cocktails or an entire meal, if your patio isn’t up to snuff, they’ll notice.

This is the ideal time to give the spot a refresh or transform it into something worthy of starring on a magazine cover. And, the good news is that doing so only takes a day or two and if you shop carefully, the project won’t break the bank.

Get rid of everything

No, we aren’t talking about dragging it all out the curb for the trash guys to pick up.

Move everything off the patio so you can start the process with a clean slate. And, “clean,” by the way, is the operative word. Get rid of cobwebs, leaves and other trash that blew in over the winter and hose down or power-wash the area.

Then, take a look at the items you removed and determine what you’ll return to the patio and what goes away.

Under foot

Designing your patio décor is a lot like determining how you’ll decorate the interior of the home. Some of the same elements should be considered:

  • Lighting
  • Color
  • Texture
  • Accessories

“Ground your space and give it an instant dose of personality with an outdoor rug designed to withstand the elements,” suggests the experts at Wayfair.com. Geometric prints, bold colors provide “maximum impact against outdoor greenery,” they conclude.

Patterns and colors shouldn’t be your only guide, however. Try to tie all of your décor elements together. For instance, a round rug looks best under round tables. If you have other types of seating, choose a rectangular rug.

“Around an outdoor dining table, you should be able to pull out all of the chairs and have the chair legs remain on the rug,” according to Wayfair.com’s rug-buying guide. A rule of thumb is for the rug to be a minimum of 2-feet wider than the table, on all sides.

Overhead

Al fresco entertaining is even more interesting in the evening. Make your patio glow with attractive lighting, such as lanterns, candles, torches or, our favorites, string lights.

If you go with the latter, the pros suggest you take into account the total space of your patio before settling on a particular string of lights.

“Larger bulbs have a bigger presence and higher wattage,” according to the pros at yardenvy.com, so are better suited to a large patio. The smaller light strings help create a cozy vibe on a smaller patio.

What better way to get ready for summer than with some budget-friendly do-it-yourself projects that will take just a weekend (or less) to achieve? Your patio will be summer-ready, and as a bonus, you may just fall in love with it all over again.

Add life to the space

Greenery and flowers add the final touch to your patio makeover. The pros at lowes.com offer five ways to decorate the patio with container-grown plants.

Our favorite is the grouping method. “Group containers — tall, medium and small ones — to make a stunning deck focal point.” With the taller containers, use the “thriller, filler, spiller” theme.

The thriller— plants with height—go in the back of the container. Fillers go in the middle, while spillers, or trailing plants, spill over the front of the container. Get tips and ideas at provenwinners.com.

A few accessories, such as a fountain, lanterns or candles on the table and perhaps some statues and you’re all set.

Find additional inspiration online at:

3 Ways to get your credit ready for buying a home

Probably the least fun part of buying a house are those first steps. Shopping for a lender, applying for a mortgage and waiting to find out how much you can afford to spend on that new house is tedious – especially when all you really want to do is look at houses for sale.

Unfortunately, this is a task that must be taken care of upfront, before looking at what’s on the market. If your credit is ready before taking the step, you’ll be far more successful in obtaining a mortgage with an attractive rate, saving you money on your house payment.

Take the following steps as soon as you decide you’d like to buy a home.

1. Make bill payments on time

One of the worst things you can do is pay bills late or, even more disastrous, not at all. Both will impact your credit score and thus your ability to obtain a mortgage.

“Your FICO Score considers late payments using these general criteria; how recent the late payments are, how severe the late payments are, and how frequently the late payments occur,” caution the experts at myfico.com.

Don’t allow any bills to be sent to a collection agency; “… it is considered a significant event with regard to your score and will likely have a severe negative impact.”

If an unexpected financial emergency comes up, contact the creditor. Let them know your situation and ask if there is a way you can avoid a late payment on your credit.

Your payment history accounts for 35% of your FICO score, so be diligent in paying your bills.

2. Don’t apply for new credit

Keep credit card balances low and pay all credit card bills before they’re due. If you can, make additional payments to bring down the balances.

Avoid applying for a new credit card. Why? Lenders are wary of borrowers who take on additional debt and if you apply for credit, the signal that you’re sending is that you will use it and, thus, rack up additional debt.

While FICO only considers new credit applications for the past 12 months, they account for 10% of your credit score.

New accounts also have an impact on “… your length of credit history.” FICO uses your “… oldest account and the average of all your accounts.” Opening a new account decreases the average age.

The exception to this rule is for the consumer with a spotty credit record. “If you can prove to lenders that you can pay your bills on time, this will help increase your score in the long run,” claim the experts.

And, by the way, credit inquiries remain on your credit record for two years.

3. Lower your debt-to-income ratio

When your mortgage application gets to the underwriter, he or she will examine your debt-to-income ratio (DTI).

Simply, this is a calculation of your income and debt that tells the underwriter how much money comes in and how much goes out every month. Borrowers with a high DTI (more than 43%) present a bigger risk to lenders.

Calculate yours with these tips from the Consumer Financial Protection Bureau. To lower your DTI, either decrease your debt, raise your income or do both. Find some additional tips on how to lower your DTI at credit.com.

AC on the blink? How to hire a HVAC company

How’s your HVAC system? Specifically, the cooling aspect of it?

Checking your air conditioning system now is a good idea; you’ll have a chance to remedy any problems before the weather starts heating up this summer. Even if all that’s needed is a tune up, the time for action is now.

Why?

“The cost to replace an HVAC system averages $7,000, with a typical range of $5,000 to $10,000,” say the pros at homeadvisor.com.

And, as you can imagine, the most expensive time of year for hiring HVAC technicians is when they’re busiest: the summer.

Be prepared

Check your system for labels that list the model number. Jot that number down for the contractors that you interview.

Next, learn about state requirements for HVAC contractors, including licensing and insurance.

Finally, run the system for about an hour (if it’s in working condition) and check each room of the home, making note of rooms that don’t appear to be cooling as well as others.

Find contractors to interview

Referrals are always the best way to find a good contractor. Ask neighbors, people you work with, friends and family who they recommend.

You might also find referrals if you’re a member of your neighborhood at nextdoor.com. Create a post asking specifically for referrals to good AC contractors.

Finally, don’t waste time interviewing companies with bad reviews. Check each one on your list by reading the reviews at Yelp and, on Google, search for “HVAC companies” or “air conditioning technicians” in your town and those reviewed by Google appear in three boxes at the top of the search results page.

Finally, head on over to the Better Business Bureau’s website to see if there are complaints against any of the companies on your list.

Make appointments with A/C technicians

When making an appointment with AC company representatives to visit your home, ask them to bring with them the following:

  • List of references
  • Copy of their state license
  • Proof of bonding and insurance
  • Proof of certification to handle refrigerants

During the home visit

The experts at energystar.gov suggest that “… the contractor should spend significant time inspecting your current system.”

This includes checking the duct system for leaks and inspecting your current system’s “… airflow to make sure it meets manufacturers specifications.”

Finally, request that the itemized estimate be in writing and that it should include not only the cost of the work to be performed, but model number of the equipment they will be installing (if applicable).

Request as well that the estimate include a schedule for the project and any warranty information for equipment to be installed.

Making the final decision

Before deciding on a company, call the supplied references for each one. Ask each customer the following questions, in addition to any that you may have after the interview:

  • Was the job completed on time?
  • Did the project go over budget?
  • Was the completion of the project to your satisfaction?
  • Were there any significant problems?

When you finally choose a HVAC contractor, go over the proposal or contract thoroughly, ensuring all of your requests are included.

Summer is almost upon us, so ensure that your home will offer shelter from the heat by fixing air conditioning problems now.

Selling a Home is NOT a DIY Project

No, I’m not going to tell you that “You’ll never be able to sell your home without a real estate agent.”

And, yes, the topic of this blog post may seem self-serving. After all, helping homeowners sell their properties is what I do for a living.

What I will explain is what goes into a home sale—especially its unique qualities that, unlike selling a car or anything else—make it entirely unsuitable for a DIY project.

The DIY process is tainted

If you’ve ever purchased a used car from the owner, instead of from an automobile dealership, you are familiar with some of the same fears many of your potential buyers will have. Especially if you refuse to pay a buyer’s agent commission, homebuyers will be reluctant to work with you.

Their fears are that because you aren’t a professional, but a complete stranger, you lack the ethics that a REALTOR is bound by.

Is the home a “lemon?” They’ll wonder if you’re disclosing everything you know about the home and the neighborhood.

Your inexperience may frighten off some of the best buyers for your home.

DIY home evaluation

There are two critical aspects of every home sale, presentation (how your home is presented to potential homebuyers) and price. Do you know how the market value of a home is determined? And, if so, where will you get the data required to figure out how much your home is worth?

Many homeowners mistakenly turn to the large online real estate portals, which is a big mistake. Sites such as Zillow and Trulia don’t have access to all MLS listings.

Instead, they rely on the use of public records fed into an algorithm that spits out results that have a median error rate of about 8 percent, according to Zillow’s CEO.

That doesn’t sound too bad, right? Consider this: March’s median sale price, nationwide, was $344,625. Suppose you list your home for that but the real estate portal is telling your potential homebuyers that your home is worth 8 percent less.

That’s more than $27,000

Imagine how many people won’t even look at your home, assuming it’s overpriced. Or, worse, the lowball offers you’ll get because of it. It happens all the time.

One economist, by the way, found the error rate of Zillow’s “Zestimates” to be much higher—as much as 20 percent too high or too low.

To determine the current market value of a home requires access to information about recently sold homes near yours. The MLS has this data and one must be a member to access it.

DIY marketing

Unless you work in advertising or marketing, how your home is presented to potential buyers is better left to a professional.

How will your description of the home and your photographs compare to the competition, being marketed by professional real estate agents with all of the tools and expertise they possess?

Since we do this for a living, we are able to analyze your property to determine who your likely buyer will be and focus our marketing to that pool of buyers. We also know which advertising and marketing platforms work best for each type of buyer.

A multitude of details

Do you know how to pick a closing date that meshes with your current financial or homebuying objectives? Especially if you are aiming to close on another home simultaneously, some days, and some parts of the month are better for the seller. This is yet another of the many details to be aware of.

As real estate agents, we juggle what seems like a million and one details for every transaction. Everything from keeping track to when contingencies are supposed to be removed, to scheduling the home inspection and ensuring the appraiser gets his or her work done in a timely manner, we make sure nothing falls through the cracks.

Doing it by yourself means you don’t have anyone in your corner

If the homeowner who goes it alone decides to pay a small commission to the buyer’s agent, the playing field is lopsided.

The buyer has professional representation and the seller doesn’t. And, no, the buyers’ agent will not help the seller with the paperwork or anything else.

How will you hold up in negotiations against someone who negotiates for a living?

We understand that it’s tempting to try to go it alone when you sell your home and we’re happy to offer you advice. But we would be remiss in our duties to not explain to you the many things that can, and often do, go wrong.

Is spring the BEST Time to List My Home for Sale?

Have you noticed that there’s a study for just about anything you can think of?

In 2004, for instance, a Swedish study determined that “Chickens Prefer Beautiful Humans.” A study out of the UK let us know that yawning isn’t contagious among red-footed tortoises.

And, an online real estate portal swears that the best months to list a home for sale are from the middle of March to the middle of April.

But they dug deeper into the data and added a caveat: in regions where it remains chilly into early spring, “waiting until mid- to late-April is your best bet.”

Then, along came a super-hot sellers’ market and upended that study’s findings. The truth is, at least right now, there should be plenty of buyers for your home in this spring and summer real estate market.

That’s not all

According to a Wall Street Journal study, the day of the week you list your home can have an impact on not only the eventual selling price, but the time your home spends on the market as well.

The best day? Friday. Not surprising when one considers that homes that hit the market on Friday show up as fresh MLS listings for eager weekend homebuyers to view.

Friday listings sell for more than 99 percent of the original list price, while those listed on Sunday garner only 98.4 percent, on average, at least according to that study.

In other words, if you listed your home at $375,000 on Friday instead of Sunday, the statistics say you’ll have a good chance of walking away with an additional $2,625.

People must be in a hurry on Fridays as well, because homes listed then sold faster than homes listed on other days.

Coming in right behind Friday, however, is Tuesday – a head scratcher for sure. Why Tuesday?

According to the report, Tuesday-listed homes are the most attractive for home tours, getting almost 2.5 requests for a tour, on average, on that day.

Remember, all real estate is local and this was a nationwide study, so our mileage may vary.

That’s not to say that if you decide on a Thursday that you want to list your home, we shouldn’t wait until Friday to put the listing in the MLS. It might be a tactic to try, especially if you need to sell your home quickly.

What to expect when you list your home in this market

As mentioned earlier, the market is red-hot for sellers right now. With schools expected to reopen nationwide in the fall, folks are trying to get settled into their new homes before then, so there are lots of buyers in the market.

In fact, now may be the only time in the foreseeable future when you may have a chance to receive multiple offers on your home.

Homes are selling quickly as well. According to the National Association of REALTORS®, the nationwide average amount of time that a home is on the market (from listing to accepting an offer) is currently 20 days.

Furthermore, the median home price has increased more than 14% over this time last year. Homeowners are sitting on an amazing amount of equity right now.

Now, all of this good news for sellers will vanish if mortgage rates rise significantly or if there is a sudden downturn in the housing market, as we unfortunately learned during the housing crisis.

These are all good reasons to consider selling your home this spring or summer. Questions? Reach out to us. Advice is always free.

House feeling a bit cramped?

When the house is full of friends and family visiting over the summer, any home can feel a little smaller than usual.

But, if your home is small to begin with, that cramped feeling persists even when company leaves. If you aren’t planning on buying a larger home in the near future, there is a way to get more room in the one you have.

The basement. Think about all that “unused” space and consider finishing it to get maximum value.

If you are planning on selling, although you won’t recoup 100% of the money spent, the ROI is better than many other remodeling projects.

Cost vs. Value

The folks that compile Remodeling Magazine’s Cost vs. Value report assign a 70% ROI to a basement finishing project.

This is based on several specifics, including:

  • Transforming the basement into a “… 20-by-30-foot entertaining area with wet bar and a 5-by-8-foot full bathroom …”
  • An enclosure for the mechanical area
  • Insulated exterior walls
  • “… five six-panel factory-painted hardboard doors with passage locksets”

Plus, a few other common-sense items (wiring to code is one).

The truth is, you can transform that space into an additional bedroom with bathroom which will add value to the home as well.

If you are going to be selling in the near future, plan on a roughly 70% return of your money invested in the basement project. Consider that as lumber prices continue to increase, however, the ROI will decrease. 

See the entire breakdown at remodelinghw.net.

 Planning Is Everything

When you move the kids from one bedroom to another, you can usually make the switch with very little planning. You can even rearrange the furniture or add new windows to the living spaces with little hassle.

But, when it comes to finishing a basement, you need to think it through thoroughly before you begin.

Consider what you can do on your own before hiring pros

Many of the jobs included in finishing a basement are best left to experts. Electrical wiring comes to mind. Oh, and plumbing as well.

But others may be within your talent set. Some of these include:

  • Flooring
  • Installing insulation
  • Painting
  • Hanging drywall

If you decide to take on any of these projects as DIY, ensure you have the proper permits before starting.

Home Systems – Although your basement may be a storage dumping ground, there are usually some seriously important functions that the area already performs.

Many of the pipes and drainage systems, along with the electrical components of your home, line the walls and ceilings of your basement. You will need to ensure you maintain access while still having a finished appeal when revamping this area.

You may want to bring the finished living area in to accommodate access without jeopardizing the look of this space.

Living Spaces – Most basements don’t have a lot of light. That’s great for cinema rooms, but it does make it difficult for living areas.

Most architects suggest centering living areas around the small pockets of existing light and working from those points outward.

Windows – When you finish your basement, you may find that your insurance company requires an additional exit. Typically, this can be solved with large egress windows that can serve as an emergency exit, as well as an additional source of light to your new, usable space.