Alternatives to granite kitchen countertops

Thinking of upgrading the kitchen countertops in your home? While granite is still quite popular, several other surfaces are gaining on it.

If you’re tired of the ubiquitous granite countertop, read on to learn about some stunning alternatives.
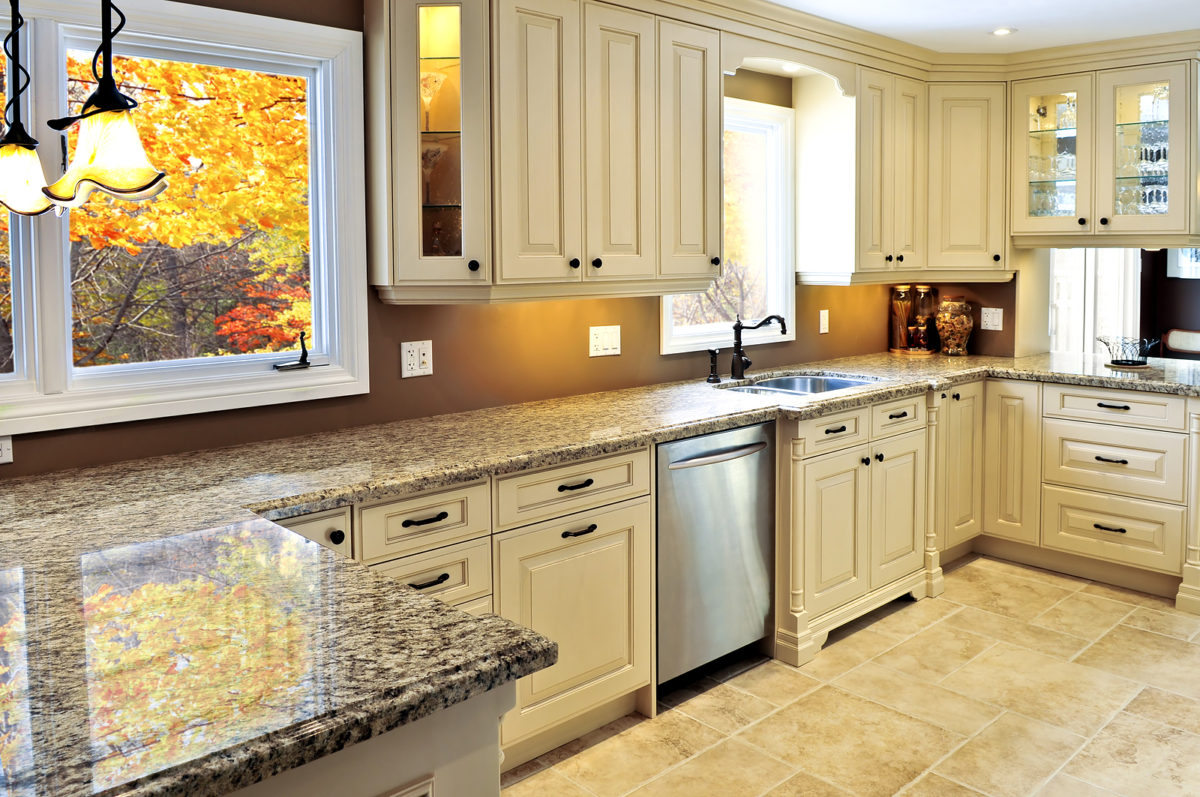
Quartz

The most popular countertop material going into 2023 is quartz. Not only is it in-demand, but it also performs the best, according to tests performed by Consumer Reports.

Many designers have been hailing quartz as the new granite for countertops. It’s attractive, durable and easy to maintain. No sealing is required and it comes in a variety of colors. And, it provides a glossy finish, which many homeowners find attractive.

Because these countertops aren’t made of natural stone, they don’t have the porosity of natural stone counters, lending them an antimicrobial feature. The downside to quartz countertops is that they are sensitive to heat.

The cost? “$50 to $200 per square foot to install and about $125 per square foot on average,” according to the experts at AlphaStoneUSA.com.

Quartzite

Prefer natural stone? Consider quartzite, which is all natural. It does, however, have its drawbacks:

  • You will need to seal it annually.
  • It cannot be customized, “. . . which limits design and color options,” advises the pros at Alpha Stone.
  • It costs more to install.
  • Scratches easily

The advantages of quartzite countertops include:

  • They are environmentally friendly
  • UV resistant
  • Heat resistant

Caesarstone

While Caesarstone has been around for some time, it’s experiencing a bit of a surge in popularity. A manufactured countertop, Caesarstone typically contains around 90 to 94 percent quartz and the rest is polymer resins and other additives for color.

Again, because it’s not a natural stone countertop, it doesn’t require sealing and maintaining it is easier than maintaining a natural stone countertop.

Finally, you’ll find Caesarstone in a variety of designs, many mimicking other surfaces, such as marble.

Concrete

No, concrete countertops don’t look like the stuff you walk on outdoors. In fact, manufacturing is so versatile that you’ll find designs to fit kitchens from rustic to modern.

And, no, they aren’t a green alternative. Creating concrete countertops is energy intensive, but that hasn’t seemed to cause a reduction in the material’s popularity.

Disadvantages of concrete countertops include:

  • They are quite costly.
  • Concrete countertops need to be sealed once a year and waxed twice a year to keep up their durability.
  • These countertops are prone to staining and chipping.

Learn more about concrete countertops online at the Concrete Countertop Institute’s website.

Bamboo

Bamboo countertops are ideal for those seeking a “green” alternative to manufactured countertops. Bamboo is not only a renewable resource, but it is completely formaldehyde-free. Best of all, bamboo is tough – stronger than steel, as a matter of fact.

Here are some additional reasons to consider bamboo countertops:

  • They are mold and mildew resistant.
  • Bamboo contains anti-bacterial properties
  • Bamboo countertops are durable.

Yes, there are some drawbacks to bamboo countertops:

  • Bamboo countertops are not heat, stain and moisture resistant.
  • You’ll need maintain the sealant.
  • Bamboo is not scratch or chip resistant.

You’ll need to reapply the mineral oil or beeswax finish more frequently than you would reseal other countertops, however. Learn more about bamboo countertops online, here.

Soapstone

If your aim is for a low-maintenance-yet-attractive countertop consider soapstone. A natural stone material, it is non-porous and heat-resistant, according to Janet Hall at remodelista.com.

Soapstone is less brittle than granite, “… so it won’t crack unexpectedly from stress or weight,” according to the editors at CountertopGuides.com. Other advantages of soapstone countertops include:

  • No sealing required.
  • Less likely to absorb materials that stain slate, granite and sandstone.
  • Naturally resists bacteria.

Learn more about soapstone countertops online at Forbes.com.

The pros and cons of gas vs. electric ranges (and the best time to buy them)

When a homeowner needs a new range (or stove, whichever you choose to call it), he or she typically buys a replacement that fits the fuel source of the old appliance. In other words, they’ll replace a gas stove with another gas stove or an electric one with an electric stove.

It’s easier and less expensive this way, right?

If you’ll be starting a kitchen from scratch or if you don’t mind the expense of swapping out gas for electric (or vice versa), you’ll need to make a decision.

As usual, we’re here to help.

Here’s what you need to know about gas ranges

Currently, 35% of Americans cook with gas in their homes, according to the U.S. Energy Information Administration (EIA).

A February 2022 Morning Consult survey asked respondents what type of range they would purchase, if they needed one, in the next decade. While half the respondents stated they would choose a gas stove, slightly more than 60% chose electric.

Professional chefs prefer gas ranges both at work and at home. “Flames are at the heart of what makes cooking visceral and fun,” chef Andrea Reusing told Tom Philpott at MotherJones.com.

Even the everyday cooking enthusiast with a gourmet kitchen at home would balk at giving up the gas stove.

Why?

  • They heat up immediately
  • Cooks have more control over a flame than an electric coil
  • Gas stoves are typically easier to clean
  • “Gas stoves are easier to maintain and troubleshoot,” according to Sarah Kellner at TheDailyMeal.com
  • Gas is typically less expensive to use than electric

The disadvantages to using a gas range

Gas stoves create nitrogen dioxide which has been linked with childhood asthma, according to Wynne Armand, MD at the Harvard Health Publishing website.

He goes on to admit, however, that “While observational studies can’t prove that cooking with gas is the direct cause of asthma, data also show that the higher the nitrogen dioxide level, the more severe the asthma symptoms in children and adults.” Additional ventilation in the home can prevent these elevated levels.

Let’s compare the gas stove to the electric stove

Currently, Americans prefer electric stoves. And here’s why:

  • Electric stoves cost less than comparable gas stoves.
  • Installing an electric stove is typically easier and cheaper than installing a gas stove.
  • Electric ranges don’t heat up the kitchen as much as gas ranges.

The disadvantages of electric ranges

Here are some of the potential and most commonly noted downsides to cooking with electric stoves.

  • Food cooks slower than it does over a gas flame.
  • The burners remain hot for a longer period of time than those of gas ranges.
  • Electric stoves won’t function during a power outage.
  • Electric ranges use more energy.

The best time of year to buy a new range

“The best time to buy appliances is when new models roll out: washers, dryers, and dishwashers in September and October, refrigerators in May, and ranges/ovens in January,” according to Manasa Reddigari at BobVila.com.

That means that the best time to get that new gas or electric range at a decent price is right now.

Happy shopping!

14 tips to keep you safe during fireplace season

Home fire statistics are scary. Knowing how not to be among these statistics, however, is critical.

Let’s take a look at some of these statistics and then dive in to some safety tips to ensure your home’s fireplace keeps on cranking out that toasty heat while ensuring its occupants are safe.

Statistics you need to know

  • “Home heating equipment is the leading cause of U.S. home fires during the months of December, January and February, when nearly half (48 percent) of all U.S. home heating equipment fires occur.” (National Fire Protection Association, or NFPA)
  • While space heaters cause the most home fires, fireplaces and chimneys rank second, causing three in 10 residential heating equipment fires. (NFPA)
  • Fires considered “confined” (those in chimneys, flues and flue burners), make up 87% of heating fires in homes. (US Environmental Protection Agency)

The anatomy of a fireplace

“Fireplaces rely on the simple technology of air being drawn in from your home to feed the fire and then rising up and out of your chimney thanks to the heat generated by the fire,” according to the pros at Fluesbrothers Chimney and Fireplace in Kansas City, KS.

They go on to list the basic parts of the unit:

  • Hearth: The floor of the fireplace and the extension to the area in front of the fireplace (made of non-flammable material, such as tile or brick).
  • Firebox: The part of the fireplace in which the fire is contained.
  • Lintel: “The fireplace lintel … is a horizontal beam that runs across the length of the fireplace and supports the chimney,” according to the experts at Burlington Fireplace and Solar in Burlington, WI. Although it may look decorative, it’s most important purpose is to support the chimney’s weight.
  • Damper: Most homeowners are familiar with the fireplace damper. It consists of a flap that, when adjusted, allows smoke to rise up the chimney and exit the home. When closed, it will reduce drafts and heat loss.
  • Smoke Chamber: Located above the firebox, the smoke chamber starts wide and narrows to the chimney’s opening. Its purpose, rather like a funnel, is to direct smoke from the firebox to the chimney.
  • Flue: The passageway for exhaust gasses to the outdoors. “A flue may be a duct, pipe, vent, or chimney,” according to High’s Chimney Service in Gaithersburg, MD.

All of these parts work together to draw the air into and out of the fireplace and chimney.

Fireplace safety tips

  1. Ensure your home has working smoke and carbon monoxide detectors/alarms. Test each one on a monthly basis and change out the batteries annually.
  2. Purchase a fire extinguisher and service it at least once a month during fireplace season. You’ll find tips on the process online at NFPA.org.
  3. Don’t use a fireplace without a screen in place.
  4. Never use an accelerant (acetone, Coleman fuel, kerosene, gasoline, etc.) to start a fire in a fireplace.
  5. Keep all combustible materials (fabric, wood, paper, plastics etc.) at least three feet away from the fireplace.
  6. Dirty fireplaces and chimneys account for 25% of all home heating equipment fires. Ensure that both are routinely cleaned. Never allow more than 1 inch of ash from a previous fire to accumulate.
  7. The NFPA recommends that you hire a chimney professional to inspect the fireplace and chimney annually and have everything cleaned by a chimney sweep.
  8. Repair any cracks found during the chimney inspection.
  9. Shine a flashlight up the chimney before lighting a fire to ensure there are no critter nests or other blockages.
  10. Burning small pieces of dry and well-aged wood contributes less soot in the chimney.
  11. Hot ash and coal can remain hot for several days after a fire. Dispose of the material safely by transferring it to a metal bucket or other container. Pour water over the ash and coal then dispose of it.
  12. Don’t close the chimney damper until the fire’s embers are completely extinguished.
  13. Never retire for the night while a fire is still burning in your fireplace.
  14. The experts at the American Academy of Pediatrics urge parents to “Talk with children as early as possible about the dangers of fires and the heat coming from them.”

Post-holiday storage and cleaning hacks

With the winter holidays in the rearview mirror, all that remains is the cleanup. Depending on how festive your get-togethers were your home may need just a light going-over or you may be feeling the need for a full-on hazmat suit.

From the grease-spattered range to drips on the backsplashes, the kitchen typically takes the brunt of the holiday messes.

But, today we focus on all that decorative stuff that needs to be taken down and stored and the needle-dropping tree to de-trim and dispose of.

We’ve checked with some of our favorite organization experts and scoured the internet to bring you some brilliant post-holiday hacks to get your home back to its old self again.

Wrapping and ribbons and ornaments, oh my!

If you haven’t yet taken down the holiday décor, it’s best to do so before tackling any other cleaning jobs.

We found a brilliant hack for storing tree ornaments. Here is what you’ll need:

  • Large plastic storage bin
  • Tissue paper or newspaper
  • Large red Solo-brand cups
  • Cardboard, cut to the interior dimensions of the bin

Fill the bottom of the bin with the plastic cups, standing with the open side up. Wrap each ornament individually in the newspaper or tissue paper and place each in a cup. When you’ve filled all of the cups, lay a piece of the cardboard over the cups and start another layer.

Add a wrapped ornament to each cup and repeat the layers as needed. For extra protection, add fabric ornaments and accessories (such as the tree skirt) to the top of the bin.

If you lack the plastic bin made exclusively for rolls of wrapping paper, no problem!

Head to the nearest Dollar General Dollar Store, or its equivalent, and pick up a tall, plastic trash bin. The rolls can be stored in it, upright and out of the way.

What to do with all those rolls of ribbon? We found a genius hack at Clutter.com. Use an old (or buy one at a discount store) paper towel holder. “Pick up your largest spool of leftover ribbon and toss it onto …” it, instructs Molli Carlson.

“Repeat the process in order of largest spool to smallest spool, and then tape the ribbon ends to their spools to keep them tidy until your next gift-wrapping marathon.” Check out the photo at Clutter.com.

The folks at HouseBeautiful.com suggest winding your tree lights around empty wrapping paper tubes. “Loop the cord around the roll, starting with the side opposite to the plug, then insert the plug into the tube’s opening.”

The cleanup

Cleaning up the tree debris is often a death knell for a vacuum cleaner. Instead, use a rubber broom to sweep needles and other debris into a dust pan. They are also, by the way, amazing for picking up pet hair from carpet.

You can purchase inexpensive rubber brooms at Amazon.com, Lowe’s and Home Depot.

Glitter has a tendency to land and stick to anything upholstered. Use that rubber broom to remove from carpet and a lint roller to remove it from other fabric items – even from lamp shades!

The truth about air duct cleaning

A friend recently had the air ducts in her home cleaned. When the technician finished the job he called her over, proudly showing her what was removed.

It amounted to about a tablespoon of fluff, and the friend claims that was a generous estimate.

While not a complete scam, air duct cleaning may be more hype than necessity. “Duct cleaning has never been shown to actually prevent health problems,” according to the experts at the U.S. Environmental Protection Agency (EPA).

They go on to claim that “Neither do studies conclusively demonstrate that particle (e.g., dust) levels in homes increase because of dirty air ducts.” The reason for this, the experts claim, is because most of the ‘stuff’ in the air ducts sticks to the surfaces of the ducts and doesn’t readily enter the room in which it’s located.

So, should you have the air ducts in your home professionally cleaned?

Perhaps, but only under the following circumstances:

  • If you see visible signs of mold in any components of the HVAC system in the home, including ducts.
  • If critters, such as rats, mice or bugs, have taken up residence in the ducts.
  • If you see large amounts of dust coming from the system’s supply registers.

The EPA experts caution that if any of these conditions exist, there is an “.. underlying cause ..” that needs to be remedied before the ducts are cleaned.

They also mention that there is no harm in having the ducts cleaned, if they are cleaned by a professional, but the benefits are overblown.

Arguments against routine cleaning of the air ducts

Visit the websites of companies that perform duct cleaning and you’ll be told that:

  • “Duct Cleaning Helps Improve HVAC Efficiency”
  • “How Duct Cleaning Improves HVAC Efficiency”
  • “How Duct Cleaning will Extend the Life of Your HVAC System”

Each of these statements were found on air-conditioning and heating contractors’ websites.

The EPA claims, however, that “… little evidence exists that cleaning only the ducts will improve the efficiency of the system.”

Some of the advertising materials for duct cleaning companies also state that one of the benefits of the process is that it helps a home’s occupants remain healthy.

“Some ads even use language like, ‘Studies have shown . . .’ but no data back up these claims,” suggest Mike Knezovich and Kevin Brasler at WashingtonPost.com.

“In fact, the little independent research performed on duct cleaning indicates that the process stirs up so much dust that it creates a bigger problem than it solves,” they conclude.

The EPA agrees. “Duct cleaning has never been shown to actually prevent health problems. Neither do studies conclusively demonstrate that particle (e.g., dust) levels in homes increase because of dirty air ducts.”

Still considering getting the air ducts cleaned?

The average cost to clean air ducts in the U.S. is $377, with an average price range of between $268 to $490, according to HomeAdvisor.com. They also claim, however, that the process “… definitely affects system performance and efficiency.” Therefore we take their advice with a grain of salt.

The EPA, on the other hand, finds that cleaning the whole duct system in a home will cost the homeowner from $450 to $1,000.

The second consideration involves hiring a technician. Use the same precautions as you do when hiring any other service:

  • Check the company’s reviews online, such as at Yelp.com.
  • Check the Better Business Bureau’s website for complaints against the company.
  • Find out if the company is licensed, insured and bonded.
  • Interview representatives from several companies.
  • Ask for references of other customers and call these references.
  • Steer clear of companies that want to apply chemical biocides or sealants. “No chemical biocides are currently registered by EPA for use in internally-insulated air duct systems,” according to the EPA’s website.

Need more information before deciding? View the consumer checklist at EPA.gov.

It’s winter – Here comes the mold

As a living organism, mold requires food and water to maintain life. Add warmth to the mix, and it thrives, growing outdoors as well as indoors.

With winter comes the need for heat and, often, the intrusion of moisture into our homes – the ideal conditions for mold growth.

Let’s take a look at ways to avoid a moldy home and what to do if you find an infestation.

Mold isn’t just ugly

Although various types of mold are present in outdoor air and soil, it’s the mold in our homes that makes us sick.

Common health symptoms caused by a mold infestation are similar to those one exhibits with the flue and allergies:

  • Headache
  • Asthma and other respiratory symptoms
  • Fatigue

Scientists have learned that mold in a home may cause asthma in adults and children who previously didn’t suffer from it.

The effects of black mold (Stachybotrys chartarum, also called “toxic mold”) may be even more harmful if you are asthmatic or otherwise sensitive to mold

Prevent mold in the home

Keeping excess moisture under control is the name of the game in mold prevention in the home. Before winter arrives, conduct a home inspection:

  • Gutters and downspouts – Ensure they drain away from the home’s foundation.
  • Siding – Look for cracks that may allow moisture intrusion.
  • Washing machine, dishwasher—Check that there are no leaks.
  • Under the sinks – Again, check for signs of leaks and fix any you find.
  • Check the ceilings and walls for water stains.
  • Check the basement for signs of water intrusion.
  • Does condensation form more heavily on certain windows? 

After you’ve remedied the obvious sources of moisture in the home, take some additional preventive measures.

  • Use the fan in the bathroom during every shower and ensure the rest of the family develops the habit as well.
  • Consider installing additional insulation in the home. “Well-insulated walls can prevent condensation and mold, as well as cut down on your heating and cooling bills,” according to the mold experts at Servpro.
  • They also suggest that you consider purchasing a dehumidifier for the basement and that you keep the humidity level in the home below 40 percent.
  • Finally, “cover the soil in the crawl space with waterproof polyethylene plastic, also called a vapor barrier,” they suggest, adding that if the space is vented, keep the vents closed in the summer and open in the winter.

How to detect mold

One of the most common symptoms of a mold infestation is a musty odor, akin to that of old books, according to the pros at ProClean. You might also find spotting on fabrics, “… allergy or asthma flare-ups and a persistent cough or cold symptoms.

Follow your nose to find the mold. Check anywhere in the home that has been exposed to water leaks, such as near the water heater.

How to remove mold in the home

When you locate the source of the mold, it’s time to decide if you can safely kill it yourself or if you need to hire a professional.

The Centers for Disease Control recommend bringing in a pro if the infestation covers more than 10 square feet.

If you decide to take the DIY route, you’ll need the following:

  • Rubber boots, an N-95 face mask, goggles and gloves
  • Household bleach solution (1 cup in 1 gallon of water)
  • Bucket
  • Sponge, mop and, possibly, a stiff-bristled scrub brush

Keep the following safety tips in mind:

  • Never mix bleach and ammonia or products that may contain ammonia – the combination produces a toxic gas.
  • Ensure that windows and doors are open to ventilate the bleach fumes.
  • Use the scrub brush for mold growing on cement or outside walls.
  • When finished, remove your clothing and immediately launder in hot water.

Don’t attempt to clean upholstered items or any others that won’t dry quickly. Throw them away if they have any signs of mold. The same goes for carpet (including the padding), cautions the editors at WebMD.com.

Company coming? 4 must-do easy home improvements to get done now

The countdown to the late-fall through the new year festivities is on. If airline ticket prices remain as high as they are currently, traveling to gramma’s house will be a challenge.

In fact, according to a recent NerdWallet survey, 37% of Americans are choosing to drive instead of fly during the holidays. With gas prices so high, however, that, too, can be challenging.

Where family and friends can save money is by staying with friends and family instead of a hotel and, according to the aforementioned survey, 36% of them plan on doing just that.

If your home will be host to friends and family this holiday season, we suggest you get busy on preparing with the following tips.

1. Are the grandparents coming?

While the majority of grandparents in the U.S. are still relatively young and mobile, if your guest list includes an elderly relative who doesn’t get around very well, start your preparation by ensuring there are no accidents in your home.

  • Consider adding motion-activated nightlights to light the path to the bathroom.
  • Install better lighting in areas of the home that are currently a bit dim.
  • If your floors are hard, such as hardwood, laminate, tile or vinyl, consider purchasing non-skid throw rugs. If you currently use rugs, purchase non-skid backing material for them. You can purchase them online at Amazon.com and HomeDepot.com.
  • Add a non-slip mat in the bathtub.
  • Give up the downstairs bedroom for Gramma so she won’t have to deal with the stairs. In the bathroom, “… clear out your or your family’s toothbrushes and other bathroom items and relocate them,” suggests the pros at Neighborly.com.
  • Place extra blankets on the guest bed and drape one on a comfy chair in the living area to be used while watching TV and chatting with the family.

2. Make the home warm and cozy

When was the last time you changed the HVAC system’s filters? Not only will the system work harder with dirty filters but this added work raises your heating bills.

In addition, “If a filter isn’t working properly, dust and allergens can circulate throughout your home and cause allergies and respiratory illnesses,” cautions the reviews team at ThisOldHouse.com. HVAC specialists recommend that filters should be changed once a month, especially during the heating season.

Another way to ensure the home remains warm and cozy is to fill any gaps or cracks around the doors and windows. You may want to consider replacing worn caulk instead of filling what is already there.

3. Transform the guest room into an oasis of comfort

When thinking of readying the guest bedroom, think of a swanky five-star resort. Check out these photos for inspiration. A lot of this can be done even on a tight budget, using items you have on hand.

Start with the bed, adorning it with crisp linens and two blankets—one light and one heavy.

If you depend solely on an overhead fixture for light, consider adding more, such as a reading lamp next to the bed or wall sconce fixtures on either side of the bed.

Your guests will rave about your hospitality when they want for nothing in the guest quarters. And, again, fulfilling this won’t cost you an arm and a leg. Head to the department store and stock up on travel sizes of the following products:

  • A notepad and pen
  • A small flashlight (for power outages)
  • Band-Aids
  • Disposable razors
  • Feminine hygiene products
  • Hair spray
  • If kids will be sharing the room, stock some coloring books, crayons and small but fun toys and games.
  • Pain medications, such as aspirin and acetaminophen
  • Shampoo and conditioner
  • Shower cap
  • Toothbrushes
  • Toothpaste

Write a note to be left in the room that tells your guests how to access the Wi-FI, disable/arm the security system and any other particulars they need to know about your home.

4. The most important thing to ready the home for holiday guests

Cleaning. Yeah, not very many of us like to do it. Cleaning for guests should be the deep kind of cleaning, especially in the guest bedroom and areas in which the family congregates.

If you need inspiration on how to get your guest room ready for the holidays, you’ll find plenty online. Pinterest has lots of brilliant ideas as does HGTV and Elle Décor .

Uh-oh – not the foundation! What to look for, who to call and what you’ll pay

“The support upon which something rests,” is how Merriam Webster Dictionary defines ‘foundation.’ Think about that for a minute. Your home rests on its foundation, which, when functioning properly, provides structural stability, safety and value to the home.

If it’s not in peak condition, you may end up paying a fortune to repair it and/or the damage to the home that has occurred because of it.

So, how do you know if there might be a problem with the foundation of your home? Read on and we’ll share with you what we learned from the experts.

Cracks in the foundation

Not all cracks indicate a foundation problem. The following types of cracks may be signs of trouble:

  • A crack that is one-quarter of an inch or more
  • Cracks that resemble stair steps located between cement blocks
  • Cracks that run horizontally
  • A crack that runs diagonally at a 30 to 75-degree angle. Although it may be thin, it “… will likely be wider at one end than the other,” according to the experts at EdenStructural.com.

Windows and doors may indicate a foundation problem

Check your windows and doors for any cracks that may be above them. Check the upper corners of these areas for cracks that start there and extend upward to the ceiling. While these cracks may just indicate settling, it they measure more than one-quarter of an inch wide, they might indicate problems with the foundation.

Sticking windows or door is often caused by humidity. A shifting foundation, however, may be the culprit.

If the problem occurs in only one door or window there is likely no cause for concern. If, on the other hand, you’ve found other signs of a foundation problem, seek help from a professional as soon as possible.

What are the walls saying?

Warped, bowing and bending basement walls are signs of dangerous structural issues. “Everything else in the home is resting- directly or indirectly- on top of your basement walls.  If one of them weakens, it compromises the stability of your entire structure,” according to the pros at Acculevel.com.

Who to call for help with foundation problems

Foundation repair or even the diagnosis of a problem isn’t a DIY project. While a structural engineer can certainly help with the problem, you might also look into interviewing foundation repair contractors.

“… look for one who is certified, has glowing reviews, and offers a great warranty,” cautions D.P. Taylor at Angi.com.

Ask the repair person if he or she is certified by the National Foundation Repair Association and “… the International Code Council Evaluation Services (ICC-ES), a nonprofit organization,” according to Taylor.

In fact, the pros at Foundation Repair Network caution consumers to not “… do business with a contractor that does not have their foundation repair methods evaluated by ICC-ES.” This ensures that the building materials used “…meet code compliance.”

To round up contractors to interview, ask your colleagues, neighbors, family and friends who they would recommend. Check Nextdoor.com and Yelp.com in your area for reviews and consult the Better Business Bureau to learn of any complaints against the contractors and/or engineers. Ensure that whomever you hire is licensed and insured and, ask for references. Then, finally, check those references.

How much does foundation repair cost?

“The cost of foundation repair ultimately depends on the type of foundation used, the size of the home, soil stability, and more,” according to Nick P. Cellucci at Angi.com (formerly Angi’s List).

The site estimates a national average cost of $4,913, and a range of between $2,154 to $7,737. They offer a calculator to find the cost of foundation repair in many areas across the country. Just enter your ZIP code at Angi.com.

Katie Flannery and Evelyn Auer at BobVila.com state that “Foundation repair cost ranges from $2,010 to $7,717, with the national average at $4,714.”

You may also want to visit the Foundation Repair Network’s website for their ballpark estimate of costs.

Whatever you do, if you suspect a problem, don’t put off hiring a pro to inspect the foundation.


Financial aspects to consider before deciding to rent out your house

Sometimes it makes financial sense to hang on to your old home when you buy another. Of course, you’ll want to talk it over first with your financial advisor, but if he or she crunches the numbers and they come up in your favor, you may consider renting out the home.

In fact, renting it out to someone else may be the perfect way to keep ownership while the home gains value. And, as you’ve no doubt read in the media, rents are at record highs.

Here are a few financial aspect to think about before making the leap to becoming a landlord.

Can I afford it?

After speaking with your financial advisor, it’s time to visit a lender. A loan officer can give you a definitive answer on how much you can afford to spend on your next home.

Although it’s not likely in the current housing market, take into account that there may be periods of time when the rental sits vacant. Consider as well that you may end up with tenants who either don’t pay on time or just quit paying.

At that point you’ll have two mortgage payments on your hands. Can you afford that?

Again, run the figures by your financial advisor before making a decision.

Look into the costs of renting out the home

The easiest course of action for the first-time landlord is to hire a property manager to take care of the business end of the rental. This may be the most expensive aspect of renting out the home.

Property manager fees vary widely and often depend on what you want them to do. “As a baseline, expect to pay a typical residential property management firm between 8 – 12% of the monthly rental value of the property, plus expenses,” claim the pros at AllPropertyManagement.com.

Then, there may be an increase in your homeowner insurance, which will, in turn, raise your mortgage payment.

“… renting out the home changes the owner’s status from primary occupant to investor,” warns Margarette Burnette at Bankrate.com.

“As a result, it costs more money to insure the home with a special landlord insurance policy. According to the Insurance Information Institute, the premium is about 25 percent more than with typical homeowners insurance,” she concludes.

Maintaining the home for tenants may be a bit more expensive than it was when you lived in the home. While we often overlook things in our own homes, tenants expect and typically have a right to certain repairs.

Landlords receive from their tenants, on average, six repair-related calls  a year, according to the experts at MoneyGeek.com.

“… a lot of problems that need to be addressed are the same 10 repairs, over and over again,” according to Brandon Turner, real estate investor and podcaster. He goes on to list, at BiggerPockets.com, the most common repairs that landlords are called on to make:

  1. Major appliance breakdown
  2. Water leaks
  3. Faucets dripping
  4. Lack of hot water
  5. Insects and rodents
  6. Inoperable garbage disposal
  7. Leaky, clogged or running toilet
  8. Furnace in need of repair
  9. Inoperable smoke detectors
  10. HVAC problems
  11. Electrical problems
  12. Drywall repair

Finally, consider the legal fees you will incur as a landlord. These may run the gamut, including fees for help with constructing rental applications and leases, deal with evictions and other aspects of owning a rental. All of these costs can add up quickly.

For the financially sound, renting out their home when they purchase another can be a brilliant financial strategy. Pursue professional legal and financial advice to ensure that you don’t lose money in the end.

3 critters that invade homes in fall and winter

Ants on the porch or insects in the garden are annoying but tolerable summer staples. With cooling weather, however, many pests go on a hunt for a nice, warm place to hunker down over the fall and winter.

Unfortunately, our homes beckon these critters. There are ways, however, to discourage them from taking up residence.

1. Roaches

“Cockroaches can’t migrate during the colder months, so they need to find a warm hiding spot to survive,” according to Jack Andersen at CockroachZone.com. In your garden, they will hibernate under leaf piles, rocks and other areas.

The problem for these outdoor roaches is that they are unable to regulate their internal temperature. Many perish during periods when the air temperature is 15 degrees Fahrenheit or colder.

Obviously, the warmth emanating from our homes acts as a beacon, drawing roaches inside.

How do they get in? Andersen offers up the following possibilities:

  • Cracks in walls
  • Vents
  • Chimney
  • Pipes and drains

He recommends keeping the home clear of moisture, such as from leaks, since it’s “… one of the top attractants of cockroaches.” They’ll also be attracted by crumbs, food spills and grease on the stovetop, food in the pantry that isn’t securely closed and even dirty dishes left in the sink overnight.

Discourage these pests from taking up residence in the home by cleaning up any debris behind your appliances, such as the refrigerator and stove. Smaller appliances, such as the coffee maker, microwave oven and toaster may harbor crumbs and, thus, cockroaches. Clean the areas behind and beneath these appliances.

Finally, seal any cracks in the walls, around plumbing pipes and baseboards.

2. Mice

Mice are the rodents that you’ll most likely find in your home during fall and winter. Ridding your home of an infestation is important because they do so much damage. They’ll gnaw through paperwork, wires and even clothing.

Their saliva, urine and droppings can cause asthma attacks in sensitive individuals and children are their most likely bite victims.

In their mission to escape cold temperatures, mice can squeeze into incredibly small areas to gain access to your home. “Mice can fit through a crack or hole one-fourth of an inch or larger – or about the width of a pencil,” according to the pros at Terminix.com.

They also offer tips on how to dissuade these critters from making themselves at home:

  • Store stacks of firewood well away from the home and up off the ground.
  • Leaf piles are attractive to mice, so discard those that are near the home’s foundation.
  • Remember the “one-fourth of an inch” access warning and seal all holes and cracks of that size or larger in your home. “Large holes or cracks should be stuffed with steel wool or wire mesh before sealing with caulk or foam, otherwise rodents could chew through and enter,” warn the Terminix pest control experts.
  • Weather strip the bottom of doors, especially the door from the garage into the home.
  • As with roaches, keep the home free from food crumbs and other debris.
  • If you see a mouse in your home, call a pest control company immediately. Don’t give it time to breed or cause destruction.

3. Spiders

In fall, spiders begin the hunt for a mate. That, in turn, can work up quite the appetite.

“To discourage them from settling in your house, remove webs promptly, and turn off exterior lights at night. Lights attract insects, which in turn attract spiders searching for food,” suggests Andréana Lefton at BobVila.com.

Another solution to keeping these critters out of the home is to “Mind the Gaps and Seal the Cracks,” according to Lefton. The fewer insects in the home, the fewer spiders you’ll encounter.