4 shrubs that shrug off winter’s chill

Landscapes don’t have to be barren from late fall until spring. Hardworking, evergreen, cold-hardy shrubs can lend color and texture to your yard. Some will even offer you gorgeous flowers when the weather warms up.

CC BY-SA 3.0 via Wikimedia Commons
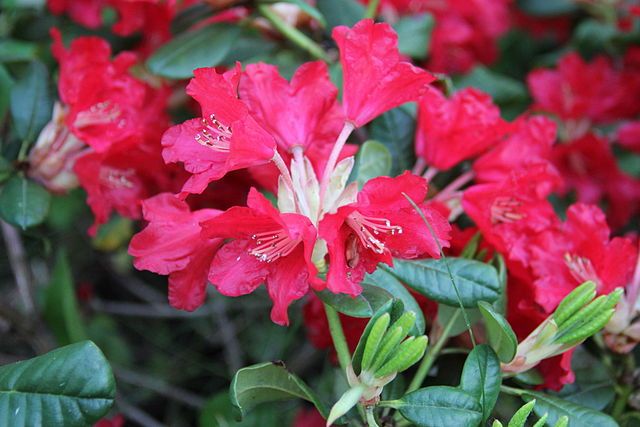
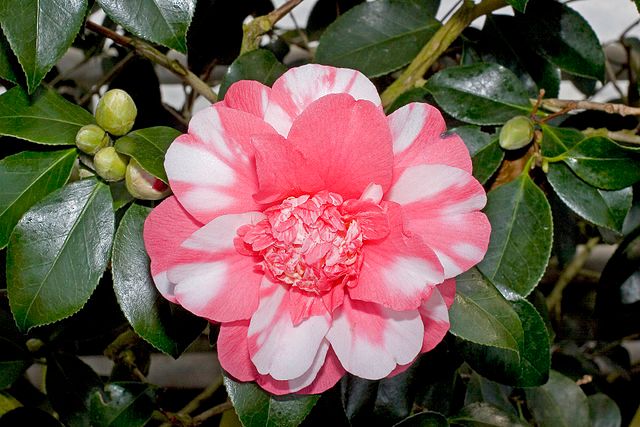
Rhodendron

With more than 1,000 species, the Rhododendron genus has a lot to offer. They can be deciduous or evergreen, depending on species.

One of the most popular types of rhododendron is the azalea. These too are either deciduous or evergreen.

When looking for cold-tolerant evergreens to take you through the winter and explode into color in spring, consider Rhododendron ‘Elviira,” (Rhododendron x ‘Elviira’) pictured above.

Hardiness: Hardy to USDA zones 4 through 8. Elviira can tolerate temperatures to minus 25 degrees Fahrenheit. Find your zone here.

Size in maturity: 3 feet in height and 3 feet wide. A very compact, showy shrub.

Light and water requirements: Partial shade. Water when the top 3 inches of soil is dry.

By Olaf Feillinger, via CC BY-SA 2.5

Camellia

You’ll fall in love with the camellia’s glossy green leaves and then go head-over-heels when it blooms. Some call the camellia the “perfect” flower.

With hundreds of species and thousands of hybrids, you’ll have no problem finding one that is perfect for your landscape.

The most common for home gardening are C. sasangua and C. japonica.

Hardiness: Depending on species, camellia is generally hardy in USDA Zones 6 through 9. Some C. japonica species and hybrids can tolerate temperatures between 0 and minus 5 degrees Fahrenheit.

Size in maturity: Height: 10 ft. to 13 ft. Width 5 ft. to 10 feet.

Light and water requirements: Plant your camellia in shade or partial shade and protect it from winds. Keep in mind, however, that flowering may be curtailed in deep shade. Keep the soil moist, but not soggy.

Learn more about camellia care from the American Camellia Society.
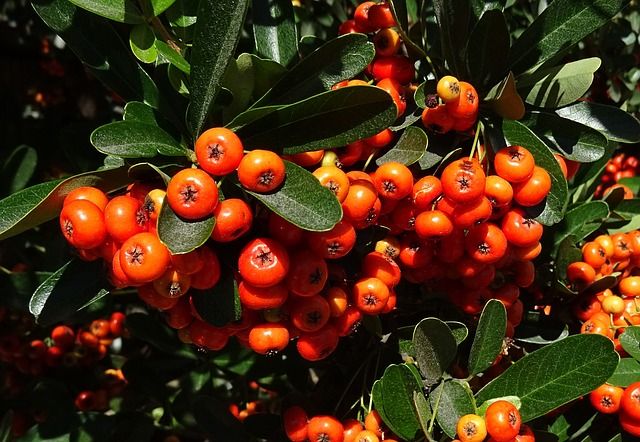
Pyracantha

Pyracantha and the winter holidays just seem to be made for one another. Also known as firethorn, this evergreen shrub bears small berries all winter long. Although the varieties with red berries are the most common, you can also find pyracantha that boast orange, white and yellow berries.

One of the questions many homeowners have is about the toxicity of the berries. “The berries have not been shown to be toxic to animals or humans, although swallowing large amounts might cause some mild stomach upset,” according to webpoisoncontrol.org.

Hardiness: Depending on species, pyracantha is generally hardy in USDA Zones 6 through 9 and temperatures as low as negative 10 degrees Fahrenheit.

Size in maturity: Pyracantha can grow to a height of 15 feet and 6 to 8 feet wide.

Light and water requirements: Grow pyracantha in full sun to partial shade and provide water to keep the soil consistently moist in spring through fall. Allow the top of the soil to dry in winter.


By Joshua Mayer from Madison, WI, USA, CC BY-SA 2.0 via Wikimedia Commons
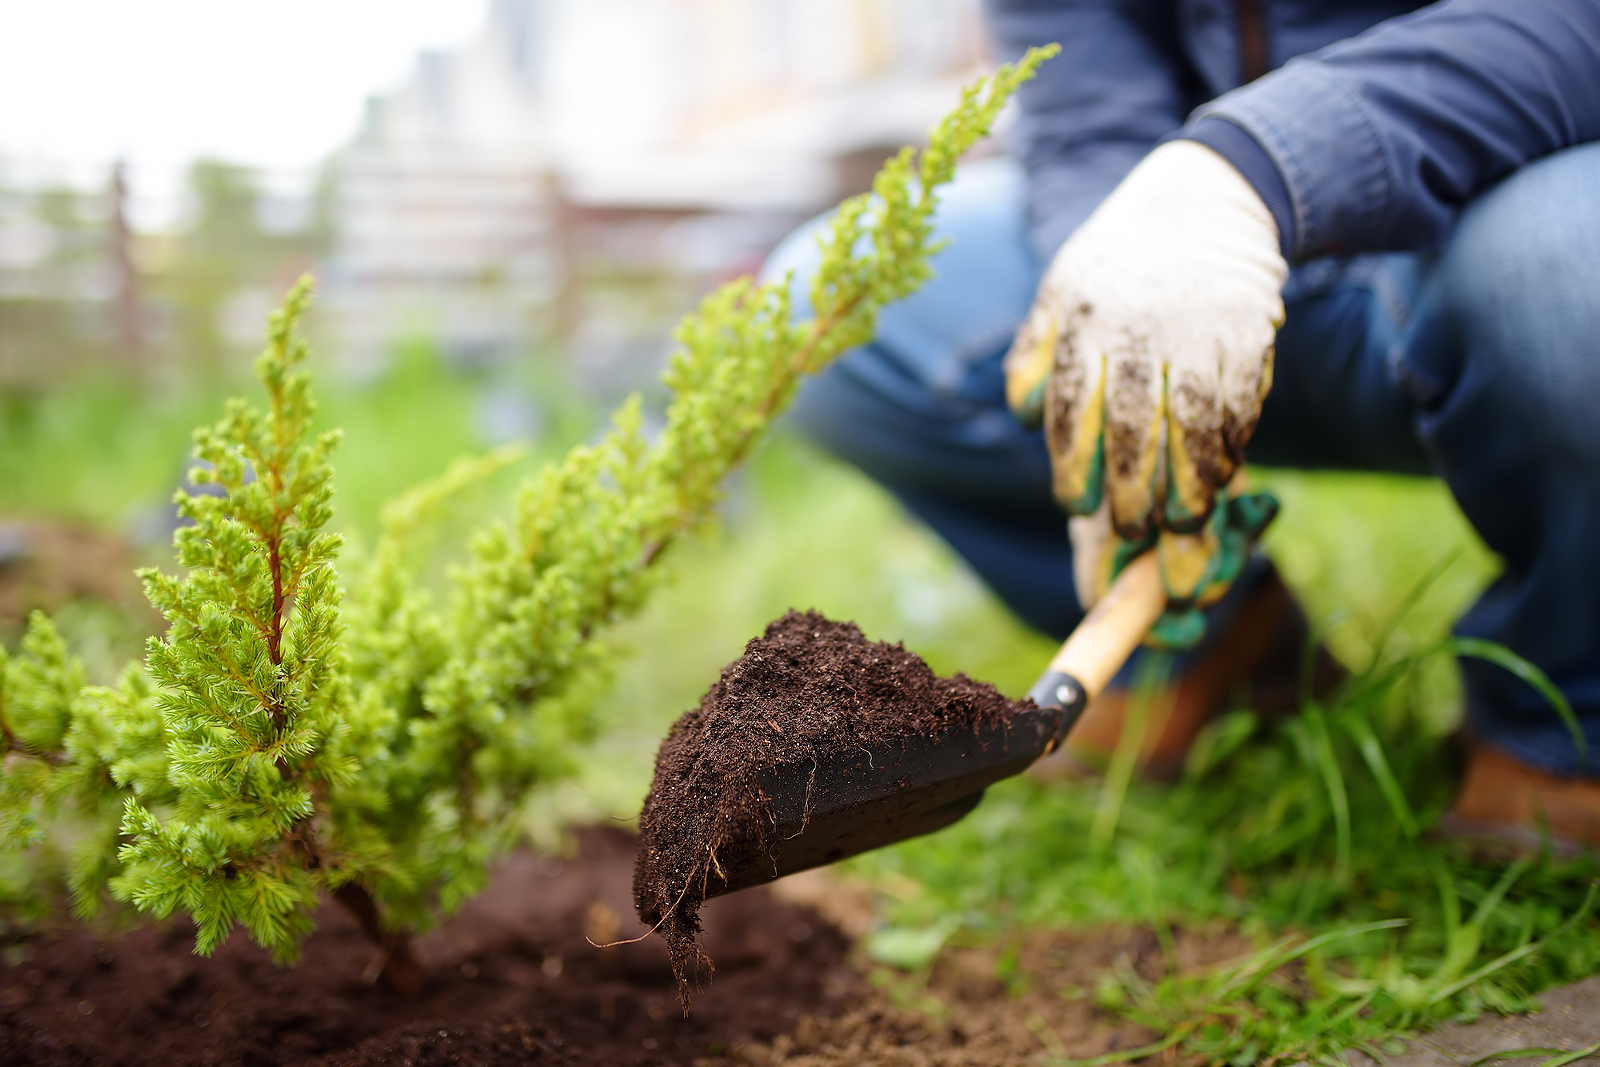
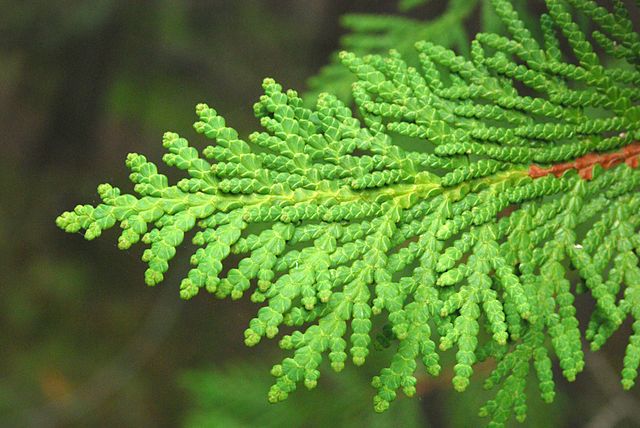
Arborvitae

Most gardeners are familiar with the common, pyramid-shaped arborvitae (Thuja occidentalis) Although they’re lovely and solve a number of landscaping problems, we prefer the compact, “globe” types.

In fact, the dwarf, evergreen varieties are so versatile, you can use them just about anywhere. Gardening experts at Southern Living magazine suggest you take a look at the ‘Tater Tot’ and ‘Mr. Bowling Ball’ cultivars.

Hardiness: Cold tolerance is cultivar-dependent, but in general, you’ll find globe arborvitae hardy to USDA zones 3 through 7. According to the experts at Missouri Botanical Garden, ‘Danica’ and ‘Hetz Midget’ can be grown in zone 2.

Size in maturity: Dwarf arborvitae grow from 12 to 24 inches in height and are intolerant of dry soil. Keep the soil evenly moist, but not saturated.

Light and water requirements: For the fullest shrub, grow the arborvitae in full sun. For the first few weeks after planting, keep the soil consistently moist. Once established, keep in mind that it’s better to underwater than overwater the arborvitae.


Final Walk-Through Checklist

Although it bears an ominous-sounding name, the final walk-through is actually a blessing for homebuyers. It typically occurs in the days leading up to closing.

This is your final chance to inspect the home to ensure that it is in the same condition as when you agreed to purchase it, that the seller has completed all requested repairs, that all personal items included in the sale are, indeed, in place and that there is no new damage to the home.

This is not an opportunity to discover issues that you hadn’t seen during past visits.

Two tips to make sure the inspection goes off without a hitch:

  • Your real estate agent should remind the buyers’ agent to ensure that all the utilities remain on. Feel free to call your agent to determine if this was done.
  • Bring along a smart phone or camera to document any issues.

Check Repairs

  • Have all requested repairs been made according to the purchase agreement? Tip: Bring along a professional to inspect the repairs.
  • Did the seller leave all permits, warranties and receipts for you?

Check Appliances and Major Systems

  • Start the dishwasher and allow it to complete the cycle while you check the rest of the home.
  • Switch on the driveway heater and allow it to warm up during your inspection.
  • Turn on the air conditioner and set the thermostat. Does the unit shut off when the room reaches that temperature?
  • Is the air conditioning unit pumping out cool air?
  • Turn on the heater and check the thermostat as you did with the air conditioning system.
  • Turn on ceiling fans and test the various speeds.
  • Turn on the hot water on all faucets. Does the water get hot?
  • Test the doorbell.
  • Test the alarm system.
  • Open and close the garage door using both the remote and the button on the wall in the garage.
  • Turn on all burners on the stove and check that the oven is functioning.
  • Test the microwave.
  • Does the gas fireplace work?
  • Flick the switch on the garbage disposer to ensure that it works.
  • Check all electric outlets to ensure they are getting power. Tip: Bring a small electrical appliance or desk lamp with you to test the home’s power outlets.
  • In California, check to make sure the water heater is properly strapped.

Is personal property included in the sale present and functioning?

  • Is the refrigerator cold? Does the freezer work?
  • Start the washing machine and allow it to cycle
  • Turn on the dryer and allow it to work long enough to determine that it gets warm
  • Check all lighting
  • Test window coverings
  • Check furnishings
  • Turn on the jets and the heater in the hot tub/spa.
  • Ensure that the play equipment or structures were left (if agreed to in the contract) and that they are in the same condition as when you made the offer to purchase the home.
  • Ensure that the seller left all the owner’s manuals for appliances and home systems (air conditioning, heating, fireplace units, alarm systems, etc.)

Windows, walls and doors

  • Are any windows cracked or broken?
  • Do the windows operate properly?
  • Do all windows have screens?
  • Are there rips, tears or other damage to the screens?
  • Do the doors open and close properly?
  • Are there any missing storm windows?
  • Check the walls from ceiling to floor for gouges, scrapes and other defects that weren’t there when you made the offer to purchase.

Mold

  • Do the windows have signs of mold?
  • Are there signs of mold or water damage under the kitchen sink?
  • Are there signs of mold or water damage in the bathroom?
  • Are there signs of mold or water damage around appliances, such as the refrigerator, washer/dryer and water heater?
  • Check the basement thoroughly for any signs of mold

Check the Home’s Exterior Features

  • Visually inspect the roof, shutters and siding on the home’s exterior. Are there any changes since you agreed to purchase the home?
  • Turn on the irrigation system and follow it around the yard to ensure there are no leaks.
  • Do all exterior lights function?
  • Did the driveway heater turn on and remain warm?
  • Test the lights and electrical outlets in the garage.
  • Shake the railings on decks, porches and stairs to make sure they don’t wobble.
  • Is all the landscaping intact?

Miscellaneous

  • Did the seller leave the remote-control devices for pool heater, ceiling fans, alarms, and garage doors?
  • Is the home clean? In most regions, homes should be left in “broom swept” condition and sellers must remove all garbage and personal property.
  • Before you leave the house: did you turn off the irrigation system, HVAC system and driveway, pool and spa heaters?
  • Has the seller left all the keys to every lock in the house, basement, garage and shed, as well as mailbox, pool, clubhouse and other miscellaneous keys if you purchased a condo.

Happy closing!

Winter brings out bargain hunters in the real estate market

Maybe it’s Black Friday, Small Business Saturday and Cyber Monday that leads shoppers to believe that winter, in its entirety, is bargain-shopping time.

It certainly opens the door to a season of frenzied buying and that penny-pinching spills over into the housing market as well.

The media doesn’t help, when every year we read stories of how much more money a homebuyer saves when buying in winter than any other time of the year.

The winter advantage for home sellers

If you’re like many homeowners thinking of selling in winter you’ve no doubt read the gloom and doom from the media and from real estate amateurs.

It’s true that fewer homes sell in winter than in spring. This makes sense when we consider that fewer homeowners list their homes in winter.

The brave homeowners who do decide to sell find less competition from other sellers and their home is more likely to sell than at any other time of the year.

Best of all?

Winter-sold homes sell for more money and they sell quicker

How can this be?

Homebuyers are more motivated in winter

Think about it: what would motivate someone to buy a house in the dead of winter, especially in areas with wicked weather?

Job transfers are high on the list of reasons, so if you live in an area that receives large influxes of transferees, winter is a brilliant time to sell.

Back to dealing with bargain hunters

So, how should you react when you, as a home seller, receive a ridiculously low offer on your home? First, be prepared that it probably will happen.

Your response to the offer, however, depends on several things, chief among them is the type of market we’re in at the time.

Right now, we’re still in a seller’s market. This means, regardless of the amount of snow on the ground and ice on the driveway, you’re in the driver’s seat. Here are some of your options:

  • Entertain the low-ball offer by remaining firm on the price. In other words, counter the buyer’s offer stating that you want full price.
  • If you really need to sell the home sooner rather than later, counter the offer by lowering your price by a small amount.
  • Ignore the offer. We are in a seller’s market after all and there is still competition for homes in good shape and in desirable areas. If your home is in good condition and in an in-demand area, hang tight for a better offer.
  • If the buyer is requesting concessions, grant them but demand full price.
  • Accept the offer.

There are other ways to counter an offer to purchase as well, including countering the contract terms.

But, before you choose any of the responses, and depending on how long your home has been on the market, we may want to run a new check of the comparables to ensure that the market value hasn’t changed since you listed the home.

We’re happy to answer any questions you may have about selling your home in winter.

4 Ways to ace 2020 holiday shopping on Amazon

When we think of holidays, “relax” isn’t a word that readily comes to mind. There is so much to do with shopping, cooking, cleaning, visitors and more.

This year, however, we’re all pretty exhausted from trying to maneuver this “new normal” that the COVID-19 pandemic has thrust upon us. We don’t know about you, but we are making a concerted effort to take the “hectic” out of the 2020 holiday season.

And that starts with shopping. Will there be the same crowds at department stores? We don’t know and we suggest not waiting to find out.

Shopping online is the way to go this year. It’s safe and convenient (if you start early).

In fact, nearly 60% of “… consumers say they plan to purchase holiday items online this year,” according to a National Retail Federation survey published in late October, 2020.

More than 40% of U.S. shoppers “… plan to buy most of their holiday gifts on Amazon this year, and 11% say they plan to buy all of their holiday gifts on Amazon,” according to another survey from Episerver.

Will you be joining them? Here are a few tips to ace your Amazon.com holiday shopping experience.

1. Don’t “wing it”

Just as we’ve been taught not to shop for groceries without a list, so it goes for holiday shopping as well.

Start with a list of names–those people that you want to gift this year.

Next comes your budget. Know the total amount you will spend on gifts this holiday season. For instance, that NRF study we mentioned earlier finds that “… consumers plan to spend $997.79 on gifts, holiday items such as decorations and food, and additional ‘non-gift’ purchases for themselves and their families …”

So, decide how much you will be spending on those items and jot down your gift budget on the shopping list you’re creating.

Take it a step further and decide how much to allocate to each person’s gift.

2. The holiday shopping season has already started

Black Friday has come and gone so you’ll want to switch into shopping mode if you haven’t done so yet.

Last year, Amazon was inundated with unhappy customers who didn’t receive their orders on time – some waited for weeks after Christmas before finally receiving them.

The company chalked up the ‘Shipageddon’ to “… winter storms as well as increased demand,” according to Nat Levy at geekwire.com.

While we did search for whether the company has plans in place to avoid last year’s problems, we were unable to find anything. So, shop early. As in right now.

Start by taking a look at Amazon’s Holiday Dash deals which they promise will offer “Black Friday-worthy deals dropping daily …,” according to Kelly Tyko at USA Today.

You can also access the deals on the Amazon app (amazon.com/holidaydash) or ask Alexa “What are your deals?” Don’t have voice shopping set up? Learn how, at Amazon.com.

3. Need gift ideas?

Check out Amazon.com’s gift guides. Or, ask Alexa for help. CNET.com offers a guide on “How to use Alexa to buy holiday gifts.”

Other places to look for ideas include:

4. Save money while shopping on Amazon

Who knew that Amazon offered coupons? It’s true and you may just find the perfect gift at a discount by checking the site’s coupon section.

You might also want to check out Amazon Renewed, where you can shop for “Like-New Refurbished Products.” You’ll find bargains on everything from smartphones to tools, gaming and more.

If you haven’t started your holiday shopping yet, what are you waiting for? These tips should help you get it all under control.

How to sell your home quickly and for top dollar

Nobody wants to be forever at the mercy of homebuyers that want to drop by after work, at dinner time, or on the weekends during family time.

Homeowners considering selling their homes also want and need to get the most amount of money possible.

So, what’s the trick to getting a home sold quickly and at the top of the market value range?

Actually, there are several things you as a homeowner can do to speed up the process and make your home irresistible to buyers. Here are the top three.

Price

The main reason a home sits on the market, getting little interest from buyers, is price. One of the truths in real estate is that an overpriced home take longer to sell.

Some homeowners want to “test the market,” by entering it with  a house that is priced over market value. They feel they’ll get offers and can then negotiate.

It’s a huge mistake. Buyers’ real estate agents know, at least roughly, what each home in the market is work. They can also run a comparative market analysis to ensure that their buyer isn’t paying too much.

The truth is, no buyer is going to pay more for a home than what it is worth. And, no lender will approve a mortgage for such a home unless the buyer brings in additional cash.

Sadly, homes that languish on the market become stigmatized. Potential buyers assume there is something wrong with it and real estate agents wait for the seller to accept reality. Eventually, many of these homes end up selling for less than market value.

If you want to sell your home quickly, price it right from the minute it hits the market.

Condition

Dirty houses don’t sell for top dollar. Homes with deferred maintenance don’t either and both tend to sit on the market for longer than they should.

If you don’t have the time or the inclination to clean the house yourself, it is worth the money you’ll spend to hire professionals to do it for you.

But wait – cleaning isn’t enough. Remove all the clutter from the home, store oversized furniture and consider hiring a professional stager.

Staging the home can mean the difference between getting bombarded with low offers and receiving top dollar for the home.

Marketing

Marketing is your real estate agent’s job so it’s important to look at several real estate agents’ marketing plans before hiring one of them to help you sell your home.

Find an agent whose list-price-to-sales-price ratio is close to 100 percent and one that provides you with a professional-looking listing presentation and a solid marketing plan.

Online marketing is especially important when trying to attract today’s buyers so ask the agents you interview about their online marketing techniques.

Once the home is listed, ask for a copy of the MLS listing. This is what other agents use when determining which homes to show their buying clients.

If the description of the house isn’t intriguing, if there are few photos, or if the photos are blurry or unattractive, ask your agent to redo them.

Finally, follow up on the agent’s marketing plan by checking in with him or her weekly to determine what’s being done to sell the home. Most professional agents are happy to share this information with their clients.

Homes that are priced right, clean and staged and marketed appropriately generally sell quickly and for top dollar.

Give us a call. We’d love to show you how we market homes for sale.


What to know about fire prevention – Be safe in the kitchen

The pandemic has wrought many changes to life for the average American. More people are gardening, swimming pool installations have skyrocketed, certain household items, such as sanitizing wipes, are still hard to find at the supermarket.

Cooking at home has increased by 54% and, with it, kitchen fires have too. A recent report by the National Fire Protection Association (NFPA) finds that cooking fires are the biggest cause of fires in the homes. They rank second when it comes to fire deaths.

“The leading cause of fires in the kitchen is unattended cooking,” according to the experts with NFPA.

We thought this would be the perfect time to remind you of some basic kitchen and cooking safety tips.

How to avoid kitchen fires and injuries

  • Never cook when you are overly tired or intoxicated.
  • Nearly 15% of kitchen fire deaths are the result of clothes catching fire while cooking. Avoid wearing long, loose sleeves and reaching into the cupboard above the stove while cooking.
  • Remain in the kitchen while you are cooking on medium to high heat.
  • Check on slow-cooking food frequently.
  • Keep flammable items, such as kitchen towels and hot pads, away from the stove.
  • Wipe up spilled food and grease so that it doesn’t catch on fire.
  • Keep children and pets away from the stove and never hold a child while cooking. The NFPA suggests creating a “kid-free” zone of at least 3 feet around the stove.

If you have a cooking fire

  • Leave the kitchen immediately.
  • If there is a door to the kitchen, close it behind you.
  • Gather others in the home and move outdoors.
  • Dial 911 once you are safe.
  • If the fire is in the oven, turn it off and keep the door closed to smother the flames.
  • The experts at NFPA suggest that you “Keep a lid nearby when you’re cooking to smother small grease fires. Smother the fire by sliding the lid over the pan and turn off the stovetop. Leave the pan covered until it is completely cooled.”

As we head into the holiday season, keep in mind that most home cooking fires occur at Thanksgiving and Christmas, according to the NFPA survey.


5 Easy to care-for indoor trees

Although houseplants are seeing a resurgence in popularity, especially with our millennial generation, growing plants indoors is an ancient practice.

In fact, it dates back to the early Romans and Greeks, according to Encyclopaedia Britannica. But it was during the Victorian period that we Americans went nuts for growing plants indoors.

Today’s holy grail of indoor growing is the tree. It adds height, texture and drama to indoor décor.

Thankfully, one doesn’t necessarily need a green thumb or a conservatory to be successful with indoor-grown trees. Shopping for those that are easy-growers is the trick.

We’ve rounded up five of the easiest-to-grow indoor trees.

Ponytail Palm

Serious houseplant gardeners know that every home needs a palm. While some are too finicky for the casual grower, anybody can be successful with the ponytail palm (Beaucarnea recurvata or Nolina recurvata).

Ponytail, however, isn’t a true palm, but it’s appearance is close enough to get away with faking it.

Well suited to a more modern interior, the ponytail palm thrives in normal household light levels and won’t up and die on you if the only spot you can find for it offers low light.

This is the ideal plant for the busy indoor gardener because it stores water in its trunk, saving it for those days when you forget or don’t have time to water it. This plant is so water-efficient, in fact, that overwatering it is the most common cause of its demise.

For best results, plant the ponytail palm in a loose potting soil. Cactus mix is ideal. When you water, do so deeply and then don’t water again until the mix is completely dry.

Learn more about the ponytail palm from the master gardeners at the University of Wisconsin-Madison.

Rubber tree

It’s a testament to a plant’s popularity when the likes of Frank Sinatra, Doris Day, Sammy Davis, Jr., Bing Crosby, Dinah Shore and a host of other popular singers put their voices to a song about it.

When you grow the rubber tree plant (Ficus elastica), you may just be singing about it too – it’s that easy to care for.

The rubber tree offers large, shiny, colorful leaves and lots of height (able to grow to 10 feet indoors).

Grow the rubber tree in bright light, although it won’t die if you offer less. In fact, “they grow best with the morning light from an east window,” according to the experts at Clemson University Cooperative Extension.

This is another houseplant that tolerates the forgetful owner, requiring infrequent watering. Learn more about rubber tree care at the aforementioned Clemson University website.


Corn plant

Virtually indestructible, about the only problem encountered by most corn plant (Dracaena fragrans ‘Massangeana’) growers is the brown leaf tips caused by a lack of humidity.

They’re not terribly unsightly and a small price to pay for a practically set-it-and-forget-it houseplant.

The bonus is that corn plant is one of those studied by NASA and found to help clean indoor air of various pollutants.

Don’t overwater the corn plant; it is quite drought-tolerant and may die if overwatered. Allow the soil to dry completely before watering.

Most experts suggest bright indoor light for the corn plant, although personal experience finds that the plant’s leaves fade with too much direct sun and it thrives even in dark corners of the home.

Avoid the brown leaf tips mentioned earlier by placing a humidifier in close proximity to your corn plant.

Learn more about this air-cleaning, statuesque indoor houseplant at the University of Florida IFAS Extension website.


Fiddle Leaf Fig

The current darling of houseplant collectors, the fiddle leaf fig (Ficus lyrata) can grow to 25 feet in the landscape (within its USDA hardiness zones 10B through 11). Find your growing zone at Gardenologist.org.

Most are grown indoors, as houseplants, where they can grow to 6 feet in height. And, by the way, don’t expect to harvest figs from the fiddle leaf – although it hails from the same biological family (Moraceae) as the fig we love to eat, it’s strictly ornamental.

Fiddle leaf thrives in bright but filtered sunlight. It will start leaning toward the sun, so rotate the pot occasionally.

While not as forgiving as some houseplants when it comes to forgetting to water, do allow the top of the soil to dry completely before watering the fiddle leaf fig.


Umbrella Plant

Not only is the umbrella plant (Schefflera arboricola) easy on the eyes, but it’s one of the least-demanding houseplants you can grow.

We must warn you, however, that, if chewed on, the leaves can be harmful to pets and children.

The umbrella plant thrives indoors, where it can grow from 8- to 10-feet in height. Give it bright, filtered sunlight for at least three to four hours per day.

Like most houseplants, the umbrella plant is tropical in nature and requires somewhat warm temperatures. In winter, for instance, temperatures lower than 50 degrees Fahrenheit may cause the foliage to turn black and fall from the plant. Sixty degrees is the umbrella plant’s sweet spot in winter.

When you water the umbrella plant, do so deeply and don’t allow the excess water to sit in the saucer under the plant. Water again when the top ½ inch of soil is dry.

“Schefflera is much more forgiving of too little water, than too much,” according to Dr. Leonard Perry, horticulture professor emeritus with the University of Vermont.

What you need to know about discrimination in mortgage lending

Despite what the media wants us to believe, the U.S. has come a long way since the days of the rampant and blatant discrimination in lending practices we witnessed in the 1930s.

Unfortunately, we still have a rather large patch of ground to cover.

According to a 2016 study published in the Journal of Urban Economics, mortgage loan discrimination often begins well before the acceptance or rejection of a loan application – often during the preliminary stages.

For example, a 2016 study, published in the Journal of Urban Economics, showed that loan officers ignored emailed questions from African Americans 1.8 percent more often than those from white applicants, which is “equivalent to the effect of having a credit score that is 71 points lower.”

The truth is, despite landmark court decisions and studies, there is still discrimination in lending against Americans of color, in some parts of the country.

What is discrimination in lending?

When lenders violate one of two federal laws, the Fair Housing Act or the Equal Credit Opportunity Act (ECOA), they are guilty of discrimination.

The Fair Housing Act lists seven methods of discrimination that are illegal:

  • Familial status
  • Race
  • Color
  • Religion
  • Gender
  • National origin
  • Disability

Some Americans are exempt from the law. These include:

  • An owner who lives in a building with four units or less.
  • Any owner of three or fewer single-family homes who does not use the services of a licensed broker when a property is sold or rented.
  • Any dwelling owned or operated by private clubs or organizations to which one must be a member to live there.

The ECOA, on the other hand, is specific to those who offer credit. It forbids discrimination against not only the Fair Housing Acts protected classes but also on the basis of whether an applicant receives public assistance, marital status and age.

Lenders are free to ask you for some of this information, but only under certain circumstances and never are they allowed to ask your religion.

The laws apply to any lender who loans the money to a consumer to purchase, repair, build or improve a dwelling. It also applies to selling, renting, appraising and brokering real property.

The anti-discrimination laws must be applied equally to all mortgage applicants and the lending industry, more than others, is tasked with ensuring that their policies do not exclude or burden those in protected classes, according to the Federal Fair Lending And Credit Practices Manual.

How to protect yourself against mortgage discrimination

Many Americans are confused about their rights and the laws that protect these rights. Discrimination in lending practices, although sometimes blatant, can be evidenced in more subtle ways.

In fact, according to the FDIC, U.S. courts have indicated three types of proof of mortgage discrimination:

  • Overt discrimination
  • Disparate treatment – Described as “when a lender treats applicants differently based on one of the prohibited factors”
  • Disparate impact – “when a lender applies a practice uniformly to all applicants but the practice has a discriminatory effect on a prohibited basis and is not justified by business necessity”

The disparate treatment and disparate impact proofs are so subtle that you’ll need to know the warning signs. The Consumer Financial Protect Bureau has some tips for you:

  • The lender tries to discourage you from applying for a mortgage.
  • You notice different treatment in person than on the telephone or in emails.
  • You are qualified yet the lender rejects your application.
  • The lender doesn’t supply you with a reason for rejecting your application.
  • You are treated differently in person than on the phone.
  • The interest rate you are offered is higher than that for which you originally applied and you are certain you qualify for the lower rate.

Then, shop among several lenders. Not only will this help you find the best rates and terms, but any offer that is blatantly discriminatory will stand out among the others.

What to do if you think you’re a victim of mortgage discrimination

The first step to take if you feel you’ve been discriminated against is to bring it to the attention of the lender, claims Nikitra Bailey of the Center for Responsible Lending, at nerdwallet.com.

Then, start filing complaints. Your state’s attorney general should be notified and you can find out how to do that at naag.org.

Then, file complaints with the Consumer Financial Protection Bureau and with the U.S. Department of Housing and Urban Development.

Sure, it’s easy to take the best lending offer and ignore the lender who is discriminating. By filing a complaint, however, you are helping to protect others from illegal lending practices.