Garden flowers that thrive in summer sun

If you have a garden patch of soil that gets six or more hours of sun per day, consider yourself very fortunate; you have your pick of a vast array of flowers that will thrive in your summer garden.

As an added bonus, most sun-loving flowers are also easy-care and somewhat drought tolerant. From tropical to woodland flowers, the full-sun gardener will have no problem finding color for her garden.

Coreopsis (Coreopsis spp.)

This plant lives for sunshine. The coreopsis is, after all, related to the sunflower. The yellow and red flowers look a bit more like daisies than sunflowers, attract butterflies, and grow on stalks that can reach 4 feet in height.

Coreopsis loves warm weather and is generally drought-tolerant. It is hardy to USDA zones 3 to 9.

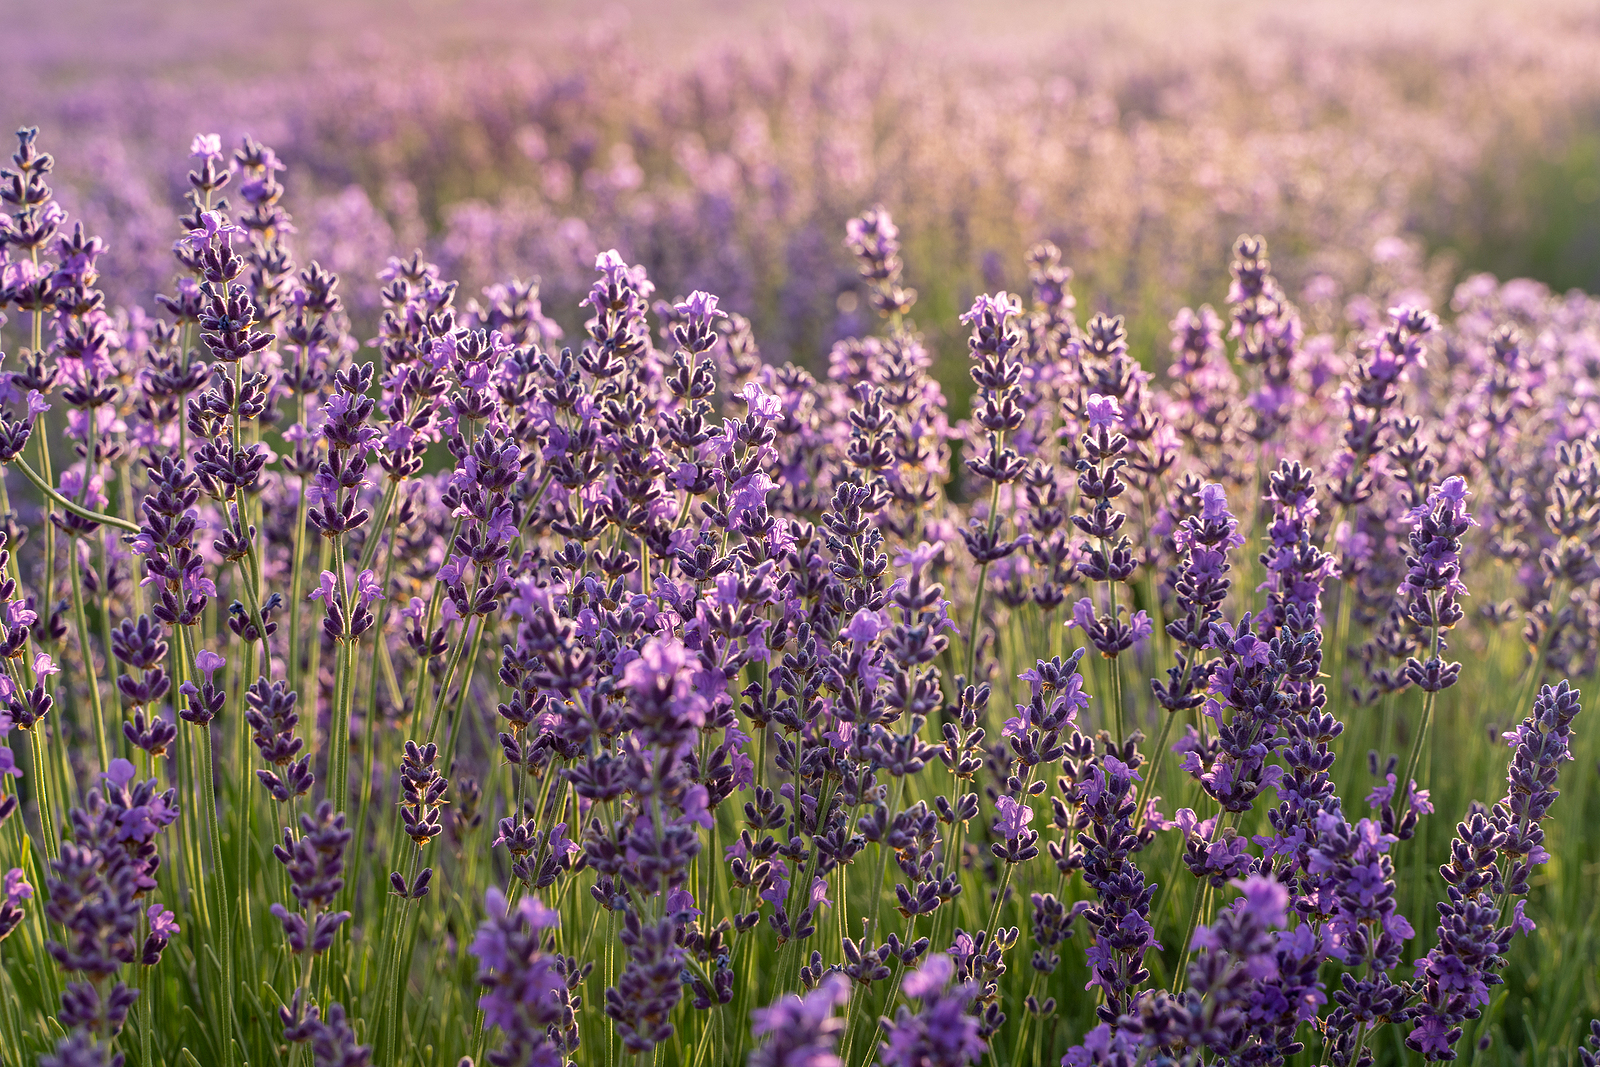
Lavender (Lavandula spp)

Growing lavender, either in the garden or in pots on the patio, is like living next door to a perfumery. Lavender boasts a highly fragrant flower, and the more alkaline the soil, the stronger the aroma will get.

Lavender thrives in full, warm sun, isn’t particular about the soil and, once established, it is drought-tolerant. You can grow lavender in USDA zones 5a to 9b.

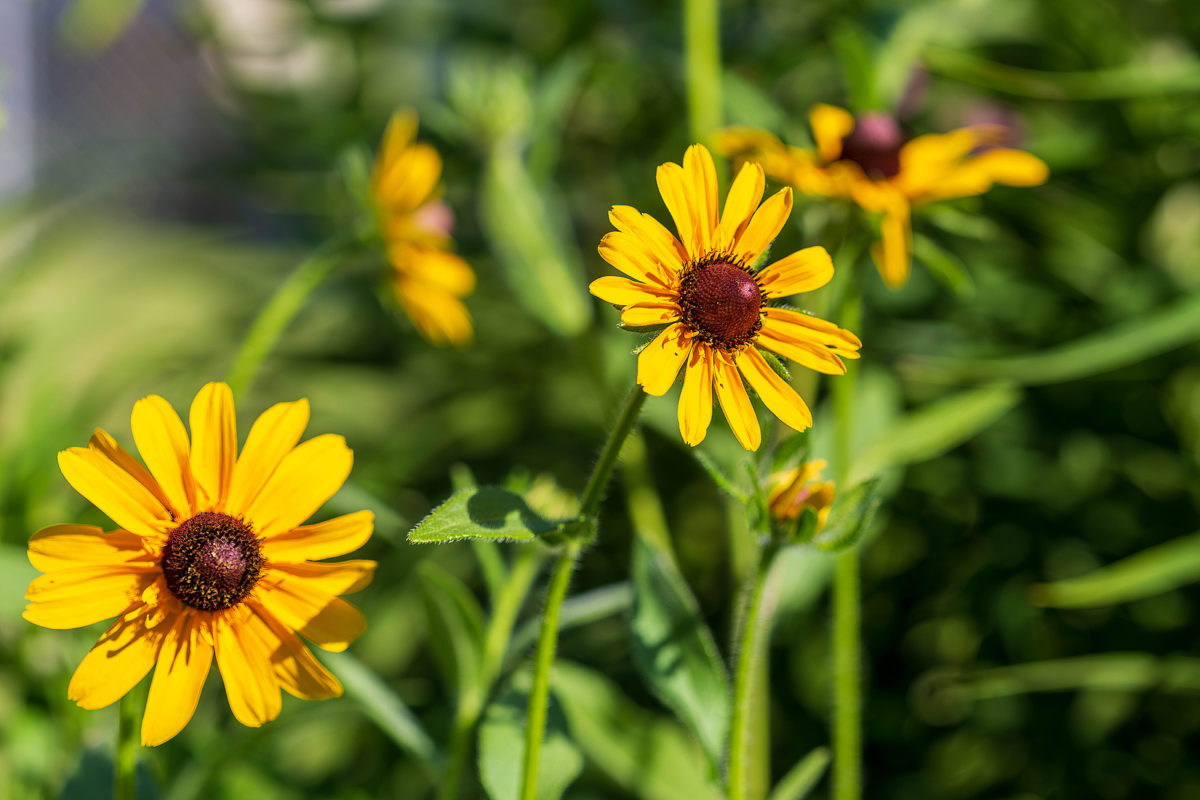
Black-Eyed Susan (Rudbeckia hirta)

When you plant black-eyed Susan you will also get the bees, butterflies and birds who are highly attracted to this plant. The yellow, daisy-like flower has a dark, almost black center.

The black-eyed Susan needs full sun, will grow to 36 inches in height and blooms profusely in mid-summer to early fall. Hardy to USDA zones 5a to 10b.

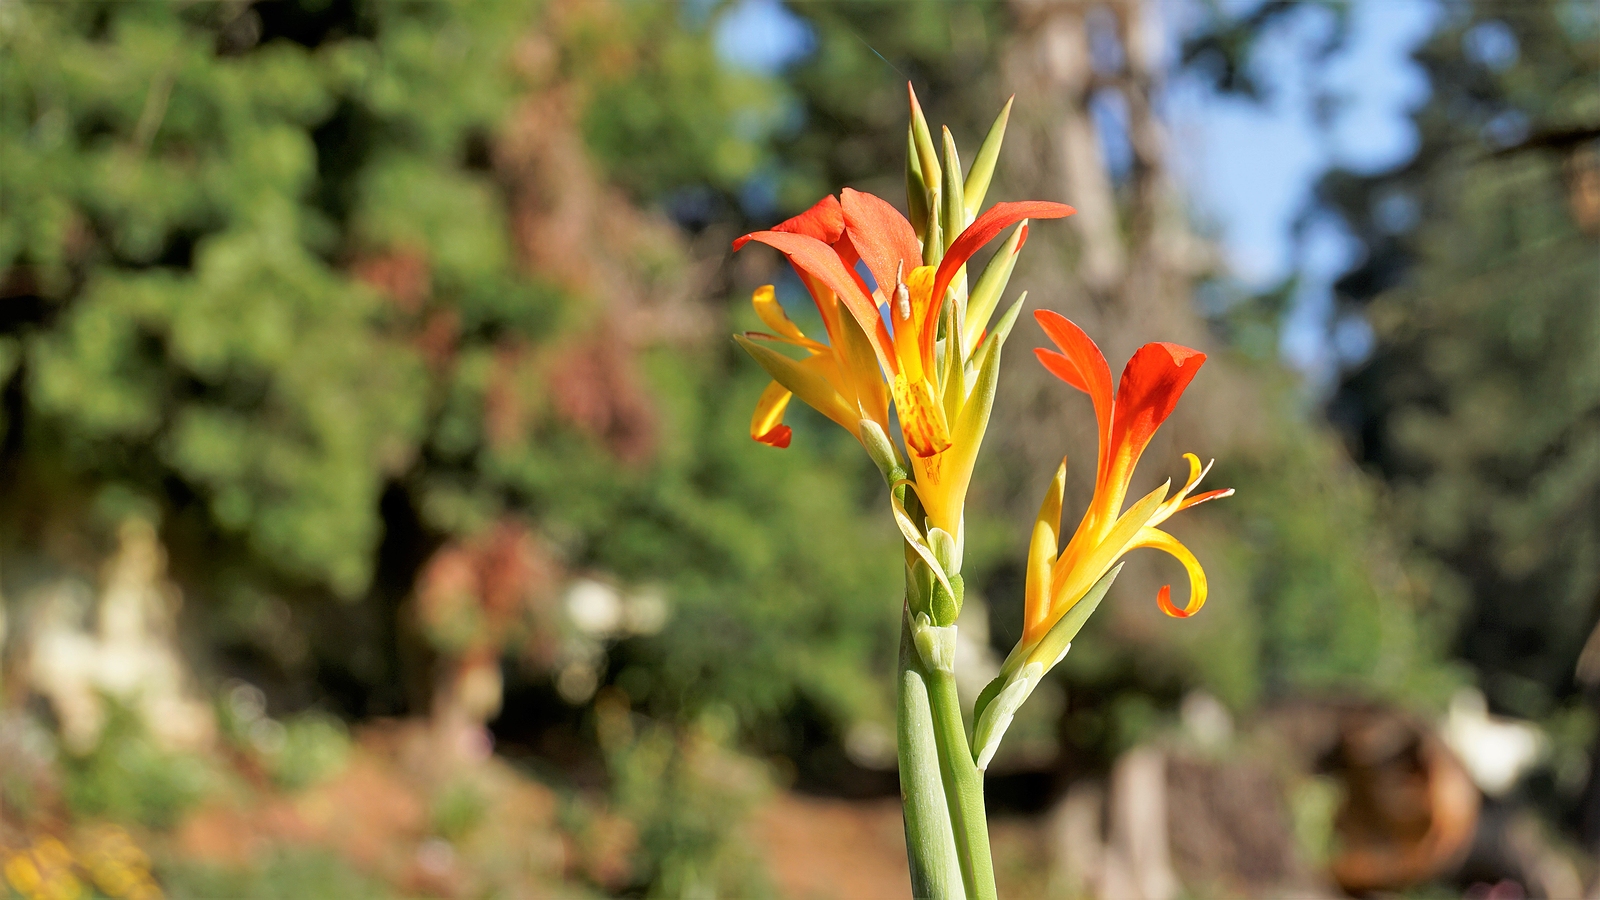
Canna lily (Canna spp.)

If you long for a more tropical-looking vibe for your garden, you can’t go wrong with a canna lily or two.

With banana-like leaves and an abundance of tropical colored flowers from which to choose, the canna is a true showoff. And, by the way, despite its name, it is not a true lily.

In regions with cold, icy winters, canna rhizomes  are typically planted in the garden after the last frost date. Gardeners in warm regions often leave them in the soil over the winter.

Canna lilies thrive in USDA hardiness zones 8 through 11.

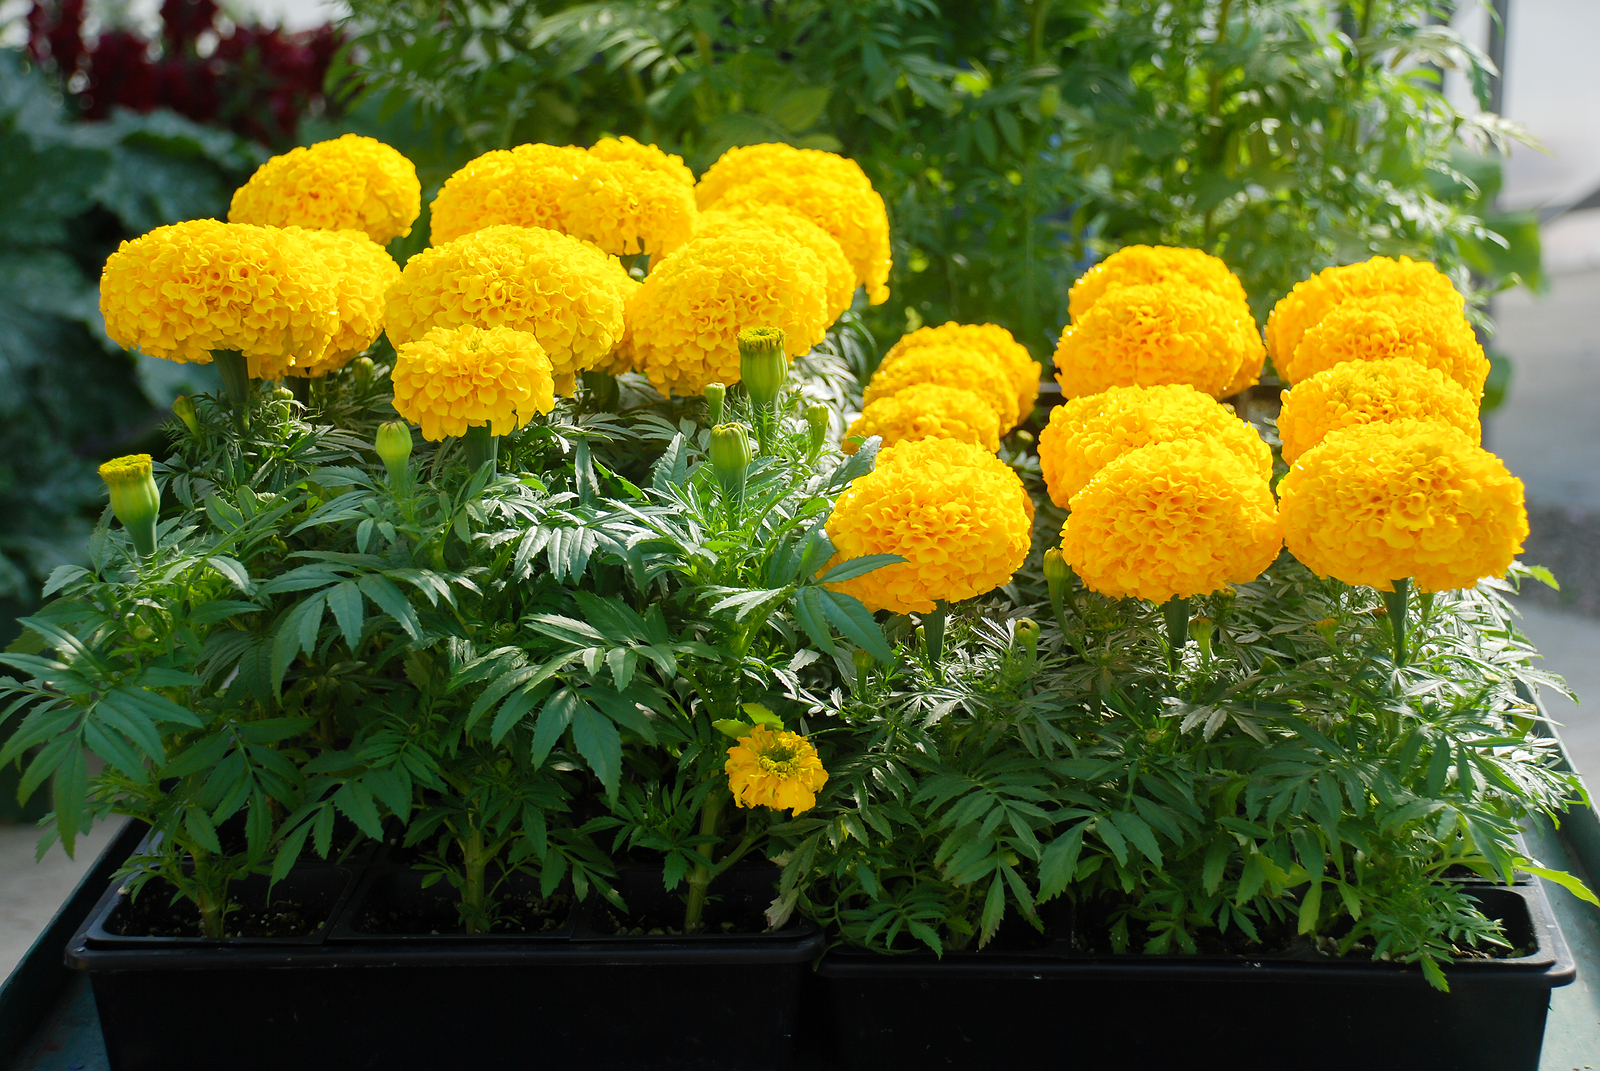
Marigold (Tagetes spp.)

The term “marigold” covers a diverse array of plant sizes and shapes. Plant height can range from 6 inches to 3 feet and flowers can resemble pom-poms, anemones or daisies.

Marigolds grow well in USDA planting zones 2 – 11.

Sunflower (Helianthus annuus)

No list of sun-loving flowers would be complete without mentioning the sunflower. It’s name says it all, right?

Native to North America, the sunflower’s ideal climate is arid with temperatures between 70 and 78 degrees. Yes, you can grow them in the heat of summer, but they won’t be at their best unless given lots of water and protection from burning sun during the hottest part of the day.

Most sunflower varieties are hardy in USDA zones 4 to 9.

While all of these flowers are tolerant of the sun, if you live in the desert southwest or other areas that experience extreme heat in the summer, they may need shade during the hottest part of the day and extra moisture in the soil.

New homeowner? Common home repairs and what they cost

There’s an old saying among boat owners: “A boat is nothing more than a hole in the water into which you throw money.”

The same can be said for some homes, especially older homes that haven’t been updated.

Regardless of how old a home is, it will require some sort of repair during the time you own it. In fact, a Hippo survey found that 77% of new homeowners will experience some sort of “… unexpected issue …” that needs repair during the first year of ownership.

Some repairs will be minor and, perhaps, DIY-able. Others are of the “OMG, I’m going to be sick” variety.

Today we’ll take a look at the less-cardiac-inducing and most common home repairs and how much you can expect to pay for them.

Common home repairs and how much they’ll set you back

We’ve combed the various home repair sites to come up with an average cost for some of the most common repairs.

Remember, we are currently experiencing inflation, supply chain issues and more, so these prices may increase by the time you need to make any of the repairs.

But, at least you’ll have a ballpark figure to work with when it comes to setting up your home repair fund.

Electrical problems

Electrical problems top the list of most common repairs needed after a home purchase. The most common problem seems to be insufficient Ground Fault Circuit Interrupters (GFCI) installed in and around the home.

“A GFCI should be used in any indoor or outdoor area where water may come into contact with electrical products. The National Electrical Code currently requires that GFCIs be used in all kitchens, bathrooms, garages, and outdoors,” according to the experts at the Electrical Safety Foundation International.

Unless you are very familiar with electrical work, you’ll need to hire a professional electrician. Plan on spending between $7 and $25 for the outlet itself.

Then, you’re looking at between “. . . $125 to $250 per outlet depending on if you’re replacing an existing or adding a new location,” claims Lauren Lloyd at forbes.com.

Water heater repair or replacement

Consider yourself lucky if your home inspector finds the water heater problem so that you can negotiate with the seller to make the repair.

Otherwise, you are looking at paying nearly $600 for repair. This is the national average cost, according to HomeAdvisor.com. “The typical range for repairs is between $220 and $958,” they claim.

If you need a new water heater you’ll pay between $600 to $1,800.

Plumbing problems

Leaky, dripping faucets and pipes are one of the most common plumbing problems encountered by the new homeowner. Thankfully, they are also among the cheapest to remedy.

If you feel that your DIY skills aren’t up to the task, however, call a plumber.

“The average cost [nationwide] for labor and parts to repair a dripping faucet is $200 to $330, with most repairs costing $270,” according to research performed by the pros at homeadvisor.com.

Leaking pipes can be a bit pricey to fix, especially if the plumber needs to find the pipe that’s leaking.

According to homeadvisor.com, sleuthing may tack on $100 to the average cost of $150 to $350 to repair the pipe and another $250 to $750 to repair the drywall after the repair.

How will you pay for these repairs?

“Money expert” Clark Howard suggests that you create a Fix-It Fund to help save for unexpected home repair expenses. He urges homeowners to put “. . . the equivalent of two monthly mortgage payments aside in a maintenance and repair fund for your home.”

With the prices of most everything skyrocketing, this is easier said than done. But it’s not impossible. Although Howard suggests that you save this money over the course of a year, right now you may want to be more flexible with the deadline.

Just start saving, whatever you can, every month in a dedicated account and don’t touch it for anything but home repairs.

To learn more about how to start your Fix-It Fund, visit clark.com.

3 Big To-Do’s Before You List Your Home

When it comes to its value, both financially and sentimentally, a home is really in a league of its own. Regardless of size and amenities, a place to live will always carry importance and the process of selling or buying is not to be taken lightly. Instead of starting with no gameplan, make sure to employ the services of a real estate agent to guide you through the process.

It would certainly be ideal to be able to plan a sale beforehand and to give yourself enough time to figure out every detail. Unfortunately, many transactions happen out of need and are caused by an important event in the life of a family, like bringing a child into the world, marriage or in some cases, the death of a family member.

Even without the luxury of premeditating your every move, here are a few pointers in case you want to sell your home:

Make Sure You Really Want To Sell

As stated above, selling a home is a big step. Before starting the process you’ll want to make sure that this is really what you want and that it will have the desired effect for you. Think ahead and plan accordingly. Did you settle on a new home already or at least made sure you have narrowed down your choices? If not, take a step back and think it over.

Without a clear notion of what you want, you might be tempted to just test the waters. That usually involves over-evaluating your home and placing it on the market with a much higher price than it should have. This is something no real estate agent would ever recommend. Since living spaces are expensive, buyers will, much more often than not, be informed and have at least a ballpark idea of how much your home is really worth.

There’s little room for trial and error in real estate, and that’s because you’ll carry your history with you. Even if you later drop the price for your home, the listings will show the previous entries and potential buyers will interpret the change badly, either by assuming there is something wrong with the property or by thinking that the seller is not being straight-forward with them.

Plan Ahead & Know The Market

Some changes sneak their way into your life and compel you to take action, but others give you enough time to prepare. The addition of a new family member or a change in the place of employment are such fortunate cases that allow you to do your research and make the most out of the sale.

Don’t just throw your home out there the moment you realize you’ll have to sell, not unless you have to. There’s always something to be done around the house to increase that property’s value and net you more money once you do sell, from a new coat of paint to replacing bathroom tiles to the shingles on the roof.

A real estate agent can come to your aid in regards to watching the market, see what the competition is up to and when is the ideal time for you to place the home on the market. Keeping an eye on other sellers can also give you a good idea on just how many buyers are out and about looking for a new place to live.

Remember That The Demand Is Always There

While you may dread the idea of moving in the winter, especially if you live in areas with a harsh climate, selling your home then could be more profitable. That’s because the number of buyers does not drop drastically, however there aren’t nearly as many sellers. If able, try to assess the situation and the market as bet as possible. Professional help really comes in handy here. And most importantly, don’t sell in a hurry.

In real estate, slow and steady wins the game. If you rush the sale and don’t get your property in decent enough shape, you will miss an opportunity of getting more money from it.

If you let feelings get a hold of you and dictate the price, you’ll not only miss the chance to sell, but also have that mistake follow you for the future, possible transaction. Be patient and cerebral, make a plan and stick to it, the desired result will be just around the corner.

DIYs for instant impact in your garden

Passionate gardeners wait month after dreary month for spring. But poring over seed and plant catalogs, on and offline, can only help so much.

Now that spring is in full swing, the soil is warm, the temperatures are climbing, it’s definitely time to celebrate your garden.

Today, however, we’ll take a look at some non-plant ideas to consider for your landscaping. Known as “hardscaping,” it can completely (unlike plants that take time to grow to maturity) transform your garden instantly.

Adding hardscaping to your garden can not only be a cheap way to make a statement, but present a creative outlet as well.

Create curiosity with a pathway

Where does it lead? What will I see along the way? These are just two of the questions we subconsciously ask ourselves when we see a pathway.

You don’t have to bust your landscaping budget, however. Pathways can be created from items you may have lying around the home, including wood, pebbles, sand, gravel and mulch. Find cheap pathway ideas online at familyhandyman.com.

If you prefer pavers, “Bluestone, granite, limestone and slate are all popular choices,” according to Jeannie Matteucci at hgtv.com.

Add creative lighting

Consider lighting for your new pathway, as a spotlight on a feature planting, on the patio, strung from a fence or one of the many ideas you’ll find online at apieceofrainbow.com.

Oh, and for a really easy DIY solution, check out solar-powered landscape lighting.

Install a water feature

“Sounds like birdsong and flowing water may alleviate stress, help lower blood pressure and lead to feelings of tranquility,” claims Brian Handwerk, science correspondent with smitsonianmag.com.

What better way to achieve these benefits than in your own backyard? Water features to consider include a birdbath with a fountain, a waterfall, DIY vases and urns turned into bubblers and more. Check out additional ideas (including links to DIY instructions) at earthdevelopment.com.

Separate the lawn from landscape plants

Sometimes, hidden garden edging isn’t enough. If you have a particularly striking tree or other plant in the landscape, consider adding edging around it.

Whether you choose a circle, square or freeform shape, materials for the edging can range from bricks, rocks, ready-made short fences in metal, wood, bamboo and more.

Get DIY tips and inspiration on youtube.com and pinterest.com.

Plant vines on a trellis or arbor

Although the trellis and/or arbor are the workhorses of the garden, they can be as attractive as they are functional.

If what you’ll grow on them will cover the structure, the arbor or trellis’ beauty isn’t a consideration. Get DIY tips for these online at youtube.com.

If functional and gorgeous is your aim, check out these beauties at Pinterest.com.

Garden décor

Patios are the perfect place for garden décor, but do consider letting it spill out onto the backyard as well.

  • Statuary
  • Decorative wind chimes
  • Wall art

Simple ways to save money on cooling costs this summer

Scorching. That’s the type of weather the folks at almanac.com say we can expect this summer. “On average, we’re predicting summer temperatures to be hotter than normal across most of the country, ranging from the Atlantic Corridor south to Florida, across to the West Coast, and almost everywhere in between.”

Add to that the very sad but real fact that in 2021, electricity rates rose faster than they have since 2008. Summer won’t be just hot, but expensive as well.

We scoured the internet for tips from experts on how we can all keep comfortable at home without breaking our budgets. Let’s take a look at a few of these tips.

Tune it up

Every year as we approach late spring, air conditioning contractors ramp up their advertising about the importance of annual maintenance.

They have a point.

“An air conditioner’s filters, coils, and fins require regular maintenance for the unit to function effectively and efficiently throughout its years of service,” explain the experts at the U.S. Department of Energy (DOE)

“Neglecting necessary maintenance ensures a steady decline in air conditioning performance while energy use steadily increases.”

Researchers at homeadvisor.com suggest that you plan on spending between $75 to $200 for a “simple tune-up.”

Sounds crazy but …

Raise the thermostat on your AC system. “The smaller the difference between the indoor and outdoor temperatures, the lower your overall cooling bill will be,” claims our pro at the DOE.

Experiment with various temperature settings to find one that you can live comfortably with all summer. Seventy-eight degrees Fahrenheit while you are at home is what most of the pros recommend and 85 degrees if you’re leaving home and won’t return for at least four hours.

Need some incentive? You can realize a 1% to 3% savings on your energy bill for each degree higher that you set the AC system’s thermostat.

Wind chill in the summer?

Consider purchasing several circulating fans and using your ceiling fans. “These fans create a wind chill effect that will make you more comfortable in your home, even if it’s also cooled by natural ventilation or air conditioning,” say our friends at energy.gov.

Because they tend to amplify the feeling of cooler air, you may be able to bump that AC thermostat a notch or two higher.

In fact, the folks at energy.gov say that “If you use air conditioning to cool your home, a ceiling fan will allow you to raise the thermostat setting about 4°F with no reduction in comfort.” That’s money saved, right there.

Additional tips

  • Turn off the AC and open the doors and windows when the air outside is cooler than that inside the home.
  • Do some gardening. Shrubs and trees in the landscape not only help raise the value of your home, but, if placed strategically, they will shade the home, cooling it off naturally.

Clean energy company Constellation offers a list of ways to cool your home with strategic landscaping. Surprisingly, they claim that “The net cooling effect of a young, healthy tree is equivalent to 10 room-sized air conditioners that operate 20 hours a day” and “Just three trees, properly placed around a house, can reduce energy use by up to 30%.”

  • Consider installing window film and block-out curtains to keep the summer sun from heating up your home. The curtains are available at many retailers, including bedbathandbeyond.com, target.com and amazon.com.

Check out heat-blocking window film at homedepot.com, amazon.com and lowes.com.


A new roof is expensive. Take care of the one you have

As a roof ages, problems with it are inevitable. Even new roofs, however, are susceptible to the forces of nature, whether they include high winds that send trees crashing down, ice dams or pelting hail.

Of course, these roof repair emergencies are unavoidable, but routine maintenance can help stop smaller problems from becoming catastrophic. The experts at HomeAdvisor.com suggest that most roof leaks stem from these common problems:

  • Inadequate roof pitch – low-slope or flat roofs are a bad choice in areas with lots of rain
  • Missing shingles – even heavy material can lift and blow away
  • Ice dams – Snow that melts and refreezes can build up, damming all the water behind it
  • Faulty step flashing – common in older roofs
  • Faulty pipe flashing – rain and snow can corrode the sealant, allowing moisture into the home
  • Valleys – these are the channels that carry rainwater and if they’re damaged, the water won’t flow

“Minor repairs range between $150 and $1,500,” according to Chauncey Crail and Lexie Pelchen at Forbes.com.

Bigger jobs, they go on to say, may cost anywhere from $1,500 and $7,000 and this cost doesn’t include that of any permits you may be required to obtain.

If the roof is beyond repair, plan on forking out “… between $5,434 and $11,151,” for a new one according to Meghan Wentland at Bobvilla.com.

Roof Emergency Prevention

No, you can’t prevent wicked weather, but take certain steps and you’ll prevent ancillary damage.

Roof maintenance is the “single most important factor (after proper installation) for determining the life span and cost of a roof system,” according to the National Roofing Contractors Association (NRCA). William Good, the group’s executive vice president adds that “too often, roofs are ignored until they leak — and often, at that point, they have to be completely replaced.”

Professional roofers offer these maintenance tips:

  • Inspect your roof twice a year, in fall and spring. Look closely at the shingles to ensure none are buckled, curled, cracked or missing. These need to be replaced immediately.

Then, inspect the area around the chimney, pipes and anything else that is attached to and extends from the roof. Look for looseness or wear.

Finally, when you clean the gutters, look for large amounts of shingle granules that have been blown off or worn away from the shingles. These granules add weight to the shingles and finding large amounts in the gutters is a sign that some of the shingles may need to be replaced.

  • Inspect the ceiling in the attic, looking for signs of moisture intrusion. These include a musty odor, mold and damp insulation.
  • Cut back tree branches that extend to within 6 feet of your roof.
  • Routinely remove leaves that fall on the roof. These trap moisture and may rot the roofing material beneath them, according to Werner & Sons Roofing in Grand Haven, MI.

No, the inspection doesn’t sound like fun. But, trust us, it’s a lot more fun than writing a check for the cost of a new roof.

Why is my smoke detector making noise?

Did you know that your chance of dying in a home fire is cut by 55% if the home contains working smoke alarms? According to the National Fire Protection Agency, maintaining the smoke alarm in your home is critical.

Pay attention if the unit beeps or chirps for no apparent reason. Typically, the batteries are dead and need to be replaced. When it’s a hardwired alarm that’s driving you nuts with noises, you’ll need to investigate the cause.

How old is the smoke detector?

The average life span of a smoke alarm is 10 years. If yours is older, it may be chirping to let you know it’s time to replace the entire unit.

There should be a date stamped on it somewhere, sometimes on the back of the unit so you may need to remove it from the ceiling. If it’s older than 10 years, buy a new one.

Dirt and grime are the enemies

Smoke detectors require routine cleaning to remain reliably operable. As well, “Most people don’t realize that the batteries should be replaced TWICE a year,” according to the cleaning pros at maidbrigade.com.

They go on to suggest that an easy way to remind yourself to perform this task is to plan on doing it when “… we change to daylight savings time and daylight standard time.”

You’ll not only want to change the batteries, but clean and test the smoke detector unit as well.

If the detector’s sensor is covered in dust or grime, the noise it’s emitting may be trying to alert you that it needs to be cleaned.

The best way to do this, if it’s just a film of dust, is with compressed air such as that you use to clean your computer.

If it’s grime that is causing the problem, use a microfiber cloth to wipe it clean.

You’ll find a walkthrough of how to clean a smoke alarm online at kidde.com.

Power outage

Even a momentary power outage can cause the smoke detector to chirp. It may also be chirping in response to a power surge. A professional electrician is required to remedy this problem.

When your smoke detector begins chirping, don’t ignore it and don’t put off investigating the cause. The detector is an important safety feature in the home so its maintenance requires immediate attention. If you can’t determine the reason for the chirping, call the manufacturer for assistance.

Additional smoke detector considerations

Safety experts suggest (and some state laws demand) that homes have working smoke detectors on each level of the home and in each hallway and bedroom.

Ceiling mounted detectors should be placed 4 inches from the wall and, “If your alarms are on the wall, they should be 4 to 12 inches from the ceiling,” according to the experts at the Texas Department of Insurance.

They also caution against placement near windows and vents and in areas with lots of drafts.

It may be challenging to figure out why a smoke alarm is all of a sudden making noise. If all else fails, replace the alarm. They aren’t terribly expensive and the peace of mind it will provide is well-worth the price.

You’ll find more help in figuring out why your alarm is chirping online at bobvilla.com.


The 4 basics of spring cleaning

The Washington Post calls spring cleaning “the annual guilt trip.” The tradition traces its history to the days when homes were lit and heated with kerosene, wood, coal and oil. When the weather warmed and the sun shone, women would transfer the home’s entire contents to the outdoors and then attack the grime indoors.

Old habits die hard and the spring cleaning ritual is still very much alive. As with any process with multiple “moving parts,” this one is easiest when you break it down into its most basic components.

1. Dust

All those cozy, warm fires you enjoyed over the winter can leave fine dust and ash on most surfaces in the home, including the walls. Get out the duster and get to work, starting with the ceiling, and working your way down.

Don’t neglect the ceiling light and fan. Hardware stores typically carry either long-handled or extendable dusters which will keep you off the ladder and out from under the falling “gunk.”

You can find them online at Lowe’s, Home Depot and Amazon.com.

2. Windows

The wintry mix really takes its toll on our windows but a quick clean will allow all that glorious springtime sunshine to stream through.

Remove fabric window coverings and wash or dry-clean them. If you have blinds, give them a good dusting, then raise them to get at those windows and then remove the screens.

Use a solution of mild dishwashing soap and a strip applicator to wash the windows. Then, swipe a squeegee across them to remove the dirty water. The pros at This Old House offer a handy walkthrough of their easy and effective window-washing process online at thisoldhouse.com.

Once the windows are sparkling, all that’s left to do is to wipe down the sills, clean the tracks (give each a squirt of lubricant after cleaning) and attack those dirty screens. Use the same type of soap-and-water solution you did for the windows and a soft scrub brush on the latter.

3. Baseboards 

Even though they aren’t within our direct line of sight when we enter a room, clean baseboards can make the entire room feel fresh.

If there is still dust leftover from your dusting session, get rid of that first. A whiskbroom or even a paintbrush works well for this.

Home maintenance expert Bob Vila recommends using a solution of dishwashing soap and water on painted baseboards, but vinegar and water works as well. If your baseboards don’t require scrubbing, use a magic eraser product instead.

4. Floors 

Carpets

The flooring experts at Empire Today recommend a thorough and professional cleaning of the carpets in the home to set the stage for a healthy, happy spring.

Naturally you can DIY this project or, hire pros to do it for you.

Hardwood Floors

Avoid scratching your hardwood floor by getting rid of every last speck of dirt, dust and debris before cleaning it.

Then, use a cleaning solution recommended for the type of finish on your floor. If your hardwood flooring is relatively new, it’s most likely surface-sealed with polycrylic, polyurethane or urethane. Older floors are either not sealed, or finished with oil, lacquer, shellac or varnish.

Surface-sealed hardwood floors are the easiest to clean; just sweep or vacuum and then run a damp mop over them. Floors with other finishes take a bit more work to bring them up to epic spring-cleaning standards.

Depending on the beating the floor took over the winter, this may include stripping the old wax and applying fresh wax and then buffing it. Rent floor buffers at Lowe’s, Home Depot and other home improvement outlets.

Laminate Floors

Popular for their easy-care requirements, laminate floors typically respond well to a damp cleaning with a commercial laminate-floor cleaning product. The experts at Mohawk FloorCare recommend using a microfiber, terrycloth or cotton mop and to avoid wet-mopping (keep it damp) your laminate floor.

Use an acetone-based fingernail polish remover to carefully remove any stubborn stains. Wax or chewing gum will come up by rubbing them with an ice cube and then using (gently) a plastic-edged scraper.

Sure, there are a seemingly-endless number of things that will require a deep cleaning this spring, but focus on the basics first and the rest won’t seem so daunting.

Tips to find amazing used furniture deals online

The real estate industry likes to call homes for sale, if they’re not new-builds, “existing homes.”

In reality, they’re used homes, sometimes gently used and, sadly, other times they’re used and abused.

The same goes for cars and anything else that is on the resale market. Yes, there’s a lot of junk out there, but there are often amazing deals on items in as-new condition.

If you’re thinking of refurnishing a room or two this summer, don’t overlook used furniture and start your shopping online.

We’ve rounded up some tips to get you started and to keep you safe while making your purchases.

You’re not alone

Nearly half of Americans shopped for resale items during the pandemic last year, according to OfferUp.com’s Recommerce Report. The category producing the most growth was home goods.

“The average American saved $400 in 2020 by shopping for furniture and home goods on resale marketplaces, and just shy of one in ten saved over $1,000,” according to the report.

Although many Americans have reverted back to in-store shopping, others have stuck to their pandemic routine of shopping online and opting for curbside pickup or having items delivered.

Whether your goal is to save money or you’re looking for something that you can’t find in local furniture stores, online resale shopping is fun, convenient and thrifty.

Where to point your browser

To get the most bang for your buck, visit local platforms and apps that offer in-person transaction service. Even with the price of gas what it currently is, you’ll still pay less to pick up a piece of furniture from the seller’s home than to have it shipped from across the country.

Some of the resale platforms that offer local search include:

  • OfferUp.com (easiest way to shop is to download the app. Set search parameters to “Local pickup only”)
  • Facebook Marketplace
  • NextDoor.com
  • Craigslist.org
  • Ebay.com (click on the word “Advanced” next to the blue search button on the right side of the page. Scroll down the page to the “Location” box and set your parameters)

Other sites offer resale furnishings and accessories and, depending on the seller, you may get free shipping.

Tips for buying home furnishings online

Unfortunately, cybercrime is real. Fortunately, online shopping scams aren’t high on the list of crimes. Investment and romance scams take the top two spots.

It’s still important to protect yourself while shopping online. Look closely at the photos of any item you’re interested in. If you’d like additional photos, contact the seller. If you have questions, get them answered to your satisfaction before committing to the purchase.

When working with local sellers, be mindful of online buying etiquette and safety. Plan to meet in a busy, public spot.

Show up on time for your appointment. If you can’t make it, give the seller as much advanced notice as possible.

Shopping online for furniture and home décor accessories can save you a lot of money. Be smart, stay safe and happy decorating!

Meet 2022’s Plants of the Year

It’s that time of year when the National Garden Bureau (NGB) releases their “Year of the” plant list.

On this list you’ll find “… one annual, one perennial, one bulb crop, one edible, and one shrub,” according to the editors at the NGB.

How did the plants make this prestigious list? By being “… popular, easy-to-grow, widely adaptable, genetically diverse, and versatile.”

Today, we’ll take a look at 2022’s indoor plant, outdoor plant and edible plant of the year.

Year of the Peperomia

(Peperomia spp.)

The genus Peperomia offers a wide variety of choices for both indoor growing and outdoor (depending on climate). From the succulent, trailing string of turtles (Peperomia prostrata) to the spicy scent of the cilantro peperomia (Peperomia maculosa), choosing just one is challenging.

Their popularity extends far beyond scent and novelty, however. Native to tropical forest understories, peperomia doesn’t require a lot of light, so they make ideal office companions or to add a spot of life to a shady corner of the home.

In addition to the two previously mentioned, popular species include (Peperomia elongata), watermelon peperomia (Peperomia argyreia) and the baby rubber plant (Peperomia obtusifolia).

Species considered “rare” can be pricey but you’ll find less expensive peperomia online and at nurseries and gardening centers.

Although most commonly grown indoors in the U.S., some species are fine outdoors and hardy to United States Department of Agriculture (USDA) zones 10 through 12.

Year of the Gladiolus

Plant the corms in spring and have gorgeous spikes of blooms by summer. What could be easier?

Along with their grandeur and beauty, however, glads have a lot to offer the landscape. The grandifloras (Gladiolus grandiflora), the most popular hybrid, can grow to 4-feet in height, “… 12 to 20 blossoms per stem,” according to the editors at the National Garden Bureau, online.

If you crave fresh flower bouquets, this is the plant for you.

These beauties are hardy to USDA zone 7.

Year of the Salad Greens

Ever feel particularly amorous after eating a salad? There’s a reason for that. Salads, at one time in history (the 1500s), were considered aphrodisiacs, according to the editors at the National Garden Bureau.

The editors’ choice of salad greens as their edible plant of the year, by the way, isn’t restricted to lettuce. The group also includes:

  • Arugula (Eruca vesicaria): Fast-grower. Plant in early fall or early spring.
  • Dandelion greens (Taraxacum officinale): Get to those leaves early because they develop bitterness once the plant flowers.
  • Endive (Cichorium endivia): This plant’s favorite temperature range is 60 to 65 degrees Fahrenheit.
  • Kale is formally known as Brassica oleracea. This is one plant you won’t have to worry about in winter as the leaves actually become tastier after a cold snap.
  • Mustard greens (Brassica juncea; B. rapa): These plants grow quickly, so you’ll be populating your salads with them within four weeks of planting.
  • Radicchio (Cichorium intybus var. foliosum), also known as Italian chicory, offers a pop of deep, rich red to the vegetable garden. It thrives in the fall and spring garden.
  • Spinach (Spinacia oleracea) is a cool-season crop. From planting to harvest is typically within 45 days of planting.
  • Lettuce (Lactuca sativa) is considered a cool-season crop but it’s easy to grow and you’ll have fresh salads all winter long.

To read the rest of the list, visit ngb.org.