4 tips to transform that spare room into a home gym

There are gym rats and then there are those of us who feel intimidated by them. Can you blame us? As we sweat and toil, we’re surrounded by effortless iron pumping, bench pressing and simulated bike riding, stair climbing and running.

It’s enough to make you wish you could work out at home. And, you can. Creating a home gym doesn’t have to bust the budget or take up an entire wing of your home.

You can remain committed to your fitness goals right in your own home.

1. Choose the room

Even if you have a room that is currently not being used for much more than storage, think carefully about whether it will work as a gym. The main thing to think about is ceiling height. You’ll need at least 8 feet, according to Scott McGillivray at YouTube.com.

If the ceilings are substantially lower, consider swapping (steal the kids’ room!). If you don’t have an extra room, you can still create a gym by partitioning off a larger space, such as the living room.

No, you won’t need to build a wall. Hang curtains to use as a divider. We found these very cool and extra-long tension rods online at RoomDividersNow.com. Or, check out Home Depot’s assortment of screens.

Once you have the required space set aside, clear the entire area. Will you add a mirror or two? Now is the time to do so.

2. Consider the floors

If the room is carpeted or covered with a textured vinyl floorcovering, you’re good to go. Hardwood, laminate, tile or other hard surfaces may be a bit more challenging.

Remember that you’ll be using heavy equipment and accessories. When dropped, they may damage the floor. Ceramic tile is especially prone to fractures and breakage. Consider as well that some of these materials may become slippery when wet.

No carpet? Consider rubber matting. Home Depot carries interlocking gym floor matting and you’ll also find solutions online at Amazon.com and AmericanFloormats.com. The beauty of these tiles is that you can lay them right over existing hard flooring materials.

3. Determine the layout before spending money on equipment

The square footage of the room will be the main factor when determining the equipment you’ll eventually choose.

Window shop for the equipment online, jotting down the height, length and depth of each piece. Then, draw out a placement plan. Keep in mind that you’ll need to allow extra room for some pieces, such as a bench press.

Hold one arm out to your side, as if you were holding a weight. Measure the distance from fingertip to shoulder, double that and add the result to the width measurement for the bench press you have your eye on.

The same holds true for extra-long dumbbells. If you use them, measure their length and add it to the width of the bench press.

You don’t need to spend a lot of money on high-end equipment. If your fitness routines are simpler, all you’ll need is room for some yoga props, a medicine ball, foam roller, Pilates equipment or whatever suits your simple workout style.

No room for a step machine? Check out these space-saving and affordable stackable aerobic steppers at Amazon.com, DicksSportingGoods.com and Walmart.com. We also like the Dual Action Swivel Stepper at SunnyHealthFitness.com.

4. Where to shop for equipment

Gym equipment can be pricey, but not if you shop carefully. Did you know that Amazon.com has an entire fitness “store” online? Indeed, they do and you can find inexpensive workout accessories and even machines.

If your budget is a bit tight, consider buying used equipment. Check out the inventories at:

  • Play It Again Sports (you can also shop online)
  • Garage sales and yard sales
  • Second-hand and consignment stores

Prefer to shop online?

Ok, you’re all set to get buff in the privacy of your own home gym.


Asbestos: Does your home have it?

Does your home have asbestos?

The word “asbestos” strikes terror into the ears of homeowners. It sounds like a big problem, and it often is.

But, how do you know if it’s an issue in your home? What should you do about it? And can it affect the sale of your property?

What Is Asbestos?

Although you may think asbestos was cooked up in a laboratory, it wasn’t. It’s a naturally occurring mineral that’s still quarried in some countries.

When it was found to have insulator and fire-retardant properties around the 1940s, asbestos was put into large-scale use. It’s often found as insulation in ceilings, floors, walls and around pipes.

Sadly, it was only later that researchers discovered it also posed a serious health risk, including severe types of respiratory cancer. In the 1980s, there was a movement to remove asbestos from public buildings such as schools and hospitals to make it safer for communities.

Private property owners were mostly left to handle the situation on their own.

How Do You Know If You Have Asbestos in Your Home?

If your house was built between the 1940s and the 1970s, it’s entirely possible that you have some form of asbestos insulation lurking somewhere.

But, don’t panic yet.

Asbestos only creates a problem for homeowners if it’s disturbed. Left intact, the micro-particles don’t enter the air and, therefore, won’t get into your lungs.

The trouble comes when you plan to build an extension or do heavy renovations.

So how do you know whether you have it and whether you should be concerned?

The only way to safely determine whether asbestos is present in a structure is to have it professionally tested… and then professionally removed while the home is unoccupied.

If you are buying or selling a home that was built before 1980, it’s likely that there is some level of asbestos unless you have a certificate regarding its removal.

But checking for this mineral is usually not part of the home inspection process unless specifically requested. And, the onus is on the buyer to check for asbestos, especially if renovations are in the cards after purchase. Naturally, the buyer will need permission from the seller to perform these tests.

All in all, it can become complicated if you are contemplating structural changes to the home, but it’s not a deal breaker in most cases.

Learn more about asbestos in the home and how to protect yourself and your family at the U.S. Environmental Protection Agency’s website.

Time to get your home ready for fall and winter

September 23 is the first day of fall for 2019, which doesn’t give us a whole lot of time to get our homes ready. But, if you do just one or two fall home maintenance tasks each weekend, you’ll have it done before you know it.

It’s home fire season

Almost 40 percent of deaths in home fires occur in homes without smoke alarms, according to the National Fire Protection Association (NFPA). Having smoke alarms with dead batteries is just as bad, by the way, as not having them at all.

Make your first fall home maintenance task one that saves lives: Do a check of all the smoke alarms in your home.

Can’t remember when you last changed the batteries? Change of all them now.

Fire experts say that we need one smoke alarm outside of each bedroom and on all levels of the home. The exception to this rule comes into play if you sleep with your bedroom door closed. If so, experts suggest you install a smoke alarm inside the room as well.

If you don’t have enough alarms, or if any of them are 10 years of age or older, make it a point to buy and install more.

Did you know that there are two types of smoke alarms? The ionization alarm detects flaming fires while smoldering fires are picked up by a photoelectric alarm. The NFPA suggests you use both types within the home.

Keep the warm air in and the cold air out

Even newer homes can have leaky doors and windows. Trying to regulate the air in a home when the heat is escaping and the cold air is invading is tough on your HVAC system. It’s expensive as well.

If it’s been some time since you’ve checked the weather stripping around the doors and windows in your home, do so now, before the weather turns nippy.

The pros say that if you can rattle your windows, it’s time to head to the hardware store for weather stripping.

Then, stand back and look at the doors to the exterior of the home. If there’s daylight penetrating around the frames, you’ll want to weather strip the doors as well.

Need weather-stripping tips? Learn how to choose it at the U.S. Department of Energy’s website and how to install it at TodaysHomeowner.com.

Need some incentive? The Department of Energy calculates a 10 to 15 percent savings on your winter energy bill from just this one fall home maintenance task.

Tune up that workhorse

One of the most expensive-to-replace systems in the home is the heating, ventilation and air conditioning system (HVAC). The average lifespan of a system is between 15 and 20 years, if it is properly maintained.

Then there are all those smaller components that make up the system, each with its own lifespan. The HVAC system is the most used system in the home, making it the home’s workhorse. And, fall is the perfect time to have it tuned up so that it serves you well through the winter.

You’ll need to call in a pro for an inspection, but it’s well worth the money.

Oil heating systems often leak and the cost of cleaning up such a leak can run between $20,000 and $50,000.

Forced air HVAC systems require annual inspections as well and don’t forget to stop by the hardware or home improvement store for a supply of filters (they should be replaced monthly).

Inspect the home’s exterior

You want to keep all that wet, winter weather outside, right? Step outside and do a quick inspection of the home’s exterior to ensure it will shelter you from it.

  • Clean out clogged gutters and run water through them to ensure they don’t leak.
  • Are the downspouts taking water away from the home? Redirect them if they aren’t.
  • Check the siding for signs of wear. Add new caulking if necessary.
  • Wrap the home’s exterior water pipes and blow out the irrigation system.
  • Check the trees for cracked branches and trim them off.

Sure, there is a lot more fall home maintenance that you can do, but the basics will help you stay safe, warm, dry and save money.

5 garden bloggers you should get to know

One of the best parts of the internet is how easy it is to find advice on just about anything. It’s also one of the worst parts of the internet.

It seems as if everyone considers themselves an expert, handing out sometimes faulty advice and, when it comes to gardening. “old wives’ tales” that often do more harm than good.

Just as you wouldn’t rely on your hair stylists for medical advice or your next-door neighbor for expert real estate advice, so should you not rely on amateurs for gardening advice.

Which is why we’ve scoured the internet to find true professionals who blog consistently about gardening. Here are five of our favorites.

Garden Myths

Canadian Robert Pavlis authors the posts at GardenMyths.com, busting gardening myths left and right.

Pavlis, with a “background in chemistry and biochemistry,” has gardened for more than 45 years and owns a 6-acre botanical spread, Aspen Grove Gardens.

When you read online that a mixture of Dawn dish liquid and water will cure just about anything that ails your plant, or eggshells kill slugs, do yourself a favor and check with Pavlis first. The chances are good that it’s a gardening myth.

One of our favorite posts: Anecdotal Evidence – Not Worth The Screen It’s Displayed On.

Pavlis also admins a Facebook group, Garden Fundamentals.

Gardenologist

Although not devoted to the topic, you’ll find myth busting at Gardenologist.org as well. We like the blog for the variety of information, from tips for new gardeners to how to deal with pests and diseases and basic “how to grow” type of posts.

You’ll also find a list of every Cooperative Extension office in the U.S. and Puerto Rico and a handy “Find Your Growing Zone” tool. Just enter your ZIP code and out it pops.

Gardenologist is hosted by “a group of over-educated dirt-farmers who love nothing more than puttering around outdoors — planting, pruning, fertilizing and even pulling weeds.”

What we like best about this blog: It contains affiliate links to products for sale on other sites, such as Amazon.com and Bootstrap Farmer. The group donates 15% of their commissions to helping extremely low-income women across the globe to set up small agriculture businesses via Kiva.org.

They even introduce you to some of the women that they’re helping.

You’ll find Gardenologist on Facebook and Pinterest.

A Way to Garden

If you’re seeking “horticultural how-to and woo-woo” and “the source of organic gardening inspiration,” do seek out Margaret Roach’s blog, A Way to Garden.

She has also written a book by the same name, which went on to be named the Garden Writers Association of America’s best book of 1998.

We like her composting advice. It’s scientific yet explained in a way that’s easy to understand as well as puts to rest some common myths about compost creation.

You’ll also find a brilliant seed-starting calendar, podcasts, webinars and more.

Visit A Way to Garden on Facebook and Pinterest.

Garden Rant

Garden Rant promises it is “uprooting the gardening world,” and we agree. Online since 2006, Garden Rant is considered a “team blog,” co-founded by Susan Harris, a certified Master Gardener, a gardening coach and a nationally-known garden writer.

Amy Stewart is the second of four Garden Rant co-founders and the author of seven books, including four New York Times bestsellers.

Michele Owens is the vegetable gardener in the bunch and is also a national garden writer. Additionally, although it has nothing to do with gardening (but we find it highly impressive), Michele was also a staff speechwriter for former Governor Mario Cuomo of New York.

Elizabeth Licata gardens in Buffalo, N.Y. That right there gives her major gardening cred, as far as we’re concerned. She’s also a nationally-published garden writer and does radio segments for the local NPR affiliate.

That’s a whole lot of experience for one garden blog and it shows in each and every amazing post. Check out the nav bar to get an idea of what you can learn at Garden Rant:

  • Shut Up and Dig
  • Science Says
  • Crrritic
  • Ministry of Controversy
  • Feed Me

Engage with Garden Rant on Facebook.

Dirt Simple

If you’re not afraid to take on big projects (such as buying a home simply for the backyard and the landscaping dreams that surround it), Deborah Silver’s Dirt Simple blog is right up your alley.

A landscape and garden designer by trade, Silver operates Detroit Garden Works, selling garden ornaments and specialty plants. But it’s her landscape design knowledge that inspires her blog readers.

Silver began the blog in 2009 and offers up advice and examples of garden and landscape design, gorgeous container plantings, seasonal advice and more.

Follow Silver on Facebook and check out her inspirational boards at Pinterest.

The bugs of summer and how to deal with them

Right about now, many of us are feeling as if summer is one big bug fest. If you’ve spent any time at all outdoors, you know what we’re talking about.

From grilling to hiking to even walking the dog, summer bugs are everywhere. Yes, they’re pesky, but even more important is that they put us at risk for bug-borne diseases.

Fleas, ticks and mosquitoes are the biggest culprits. Known as “vectors,” these insects spread the pathogens that cause West Nile Virus, Lyme disease and other “vector-borne” diseases.

“Disease cases from mosquito, tick and flea bites more than tripled in the U.S. between 2004 and 2016,”

according to the Centers for Disease Control (CDC).

So, how can we avoid these pests while enjoying summertime in the great outdoors? Read on.

Protect yourself

When hiking, it’s easy to be distracted by a view or wildlife and common to want to blaze your own trail to get a better look.

It’s not wise, however. Experts recommend that you remain in the middle of trails when hiking or jogging. Ticks are especially notorious for hiding in tall grass and other vegetation.

Don’t use perfume, cologne or lotions and soaps with fragrance before heading out to enjoy the outdoors (these scents may attract mosquitoes). Wear the appropriate, protective clothing This includes:

  • Shirt with long sleeves
  • Long pants
  • Socks (that can be tucked under the pants to protect the skin from ticks)
  • Boots

Consider spraying your outdoor wear with a permethrin-based insect repellent. The CDC does not recommend that you use repellent on babies younger than 2 months old.

Before entering your home after a day outdoors, check all family members and pets for ticks. If you find one, remove it right away. Learn how to safely remove a tick and aftercare instructions at CDC.gov.

Right in your own backyard

Deer are the favorite host of the deer tick (Ixodes scapularis), carrier of the dreaded Lyme disease.

“More than 14,000 cases [of Lyme disease] are reported annually,”

according to the experts at National Geographic. “Adult deer ticks, they continue, “are about the size of a sesame seed.”

If deer are common visitors to your neighborhood, discourage them from coming into your yard. You can do this by removing vegetation that is attractive to deer. Some of the plants that are popular among deer include:

  • Honey locust
  • Plum, apple, pear, persimmon and crabapple trees
  • White and red oak
  • Hickory and pecan trees
  • Eastern red cedar
  • Raspberries or blackberries

Plant fragrant plants (deer avoid anything highly fragrant) such as lavender, sage and salvia. “Daffodils, foxgloves, and poppies are common flowers that have a toxicity that deer avoid,” according to Catherine Boeckmann at Almanac.com.

Ticks may also take up residence in the lawn, so keep it debris-free by raking up dead leaves and mowing the lawn to keep it as short as possible.

If you’re still finding ticks and mosquitos in your yard after taking the previous steps, consider spraying it with a tick and mosquito control product.

Following these tips can help keep mosquitoes, ticks and other insects away for a bug-free summer.

Summer home maintenance projects you can knock out in 10 minutes or less

Summertime isn’t exactly when we feel most compelled to perform home maintenance tasks.

Getting the easier ones out of the way now, however, will lighten the “honey do” list you’ll face in fall.

To make it even easier on you, we’ve put together a list of projects that will take you only 10 minutes or less to perform.

Let it slide

Squirt some lubricant on anything that slides, such as sliding glass doors, windows and doors once a year. But, first, clean out the “gunk” that’s accumulated in and around the tracks.

If you have vinyl windows, use caution, warns the Family Handyman. Oil lubricants can damage the vinyl, so he recommends using a dry PTFE (Polytetrafluoroethylene) spray lubricant (such as WD-40® SPECIALIST®) “. . . on the contact points and wiping it off with a rag.”

Out of commercial lubricant? Use a small dab of petroleum jelly on door hinges. Again, this will attract and hold dust and dirt, so don’t use the oily substance on the window tracks.

 Channel your inner Sherlock Holmes

Some of the annual inspections that the experts recommend can be knocked out in less than 10 minutes. Do one every weekend and you’ll have this part of your home maintenance chore list whittled down to where you’ll have more time for fun on the weekends.

  • Dust and test your smoke and carbon monoxide detectors, according to the user’s manual instructions. Change the batteries, if needed.


  • Check the water heater for rust. Open the burner chamber and look for rust flakes. Also take a look at the flame – it should be blue. If it contains yellow coloring, the jets may need cleaning.


  • Test the ground fault interrupter outlets by pushing the “test” button. The “reset” button should pop out. Push it and you’re finished.


  • Check the garage door opener for safety issues. Bob Vila recommends pulling the handle to put the system into manual mode and lifting the door three feet from the ground. It should remain open. If it doesn’t, call a garage door professional. Put the system back into automatic mode and open the door completely. Place an obstacle under it, such as a garbage can and press the button to close the door. If it doesn’t stop when it meets the obstacle, call a garage door professional as soon as possible.


  • While you’re lubricating the windows and doors, inspect the weather stripping for signs of wear.


  • Scale can build up on the water valves under your sinks and behind the toilets and you can prevent this by turning each one off and then back on at least twice each year.


  • Open the breaker box and check to ensure there are no scorch marks around the fuses or breakers.

Only you can prevent home fires

Most home fires are preventable, so including safety maintenance chores on your list may save lives. All of these tasks take just a few minutes.

  • Check the clothes dryer ducts for lint buildup. Unplug it and move it away from the wall. Disconnect the ductwork and examine the opening in the wall for lint. Use a vacuum to clean out any buildup you find. For step-by-step instructions on how to thoroughly clean your dryer vents, visit bobvila.com.


  • Inspect the fire extinguishers. The experts at All State Insurance recommend that you inspect them at least once a month. First, check to ensure the safety and tamper seals are intact. Check the pressure gauge to ensure it has the proper pressure. Some extinguishers have a test button. Press it and watch the gauge to ensure the pressure is adequate. Finally, check the tank for signs of corrosion or leaking.


  • Check each electrical outlet in the home by touching them. If they feel hot to the touch, call an electrician.


  • Frayed wires are fire hazards so take a few minutes to check the cords on appliances, electronics, lamps and other electric products. Don’t run extension cords under rugs, by the way.


  • Inspect the fireplace flue for blockages, such as bird nests. Open the damper and use a flashlight to look for obstructions. According to Bob Villa, “You should be able to see daylight at the top.”

Take 10 minutes to perform each of these tasks and over the course of a few weeks you will have considerably shortened your home maintenance to-do list.

Summertime and the outdoor living is easy

If you’ve ever watched home and garden TV shows you may be dreaming of your own backyard makeover.

With a truckload of dirt, the outdoor designer transforms backyards into cozy relaxation areas, resort-like pool areas or elaborate outdoor kitchens.

Backyard design techniques are similar to those used when designing interior spaces, with the emphasis on function, comfort and style.

So, toss out the dinky, grease-stained charcoal barbecue and plastic lawn furniture and bring those backyard transformation dreams to life.

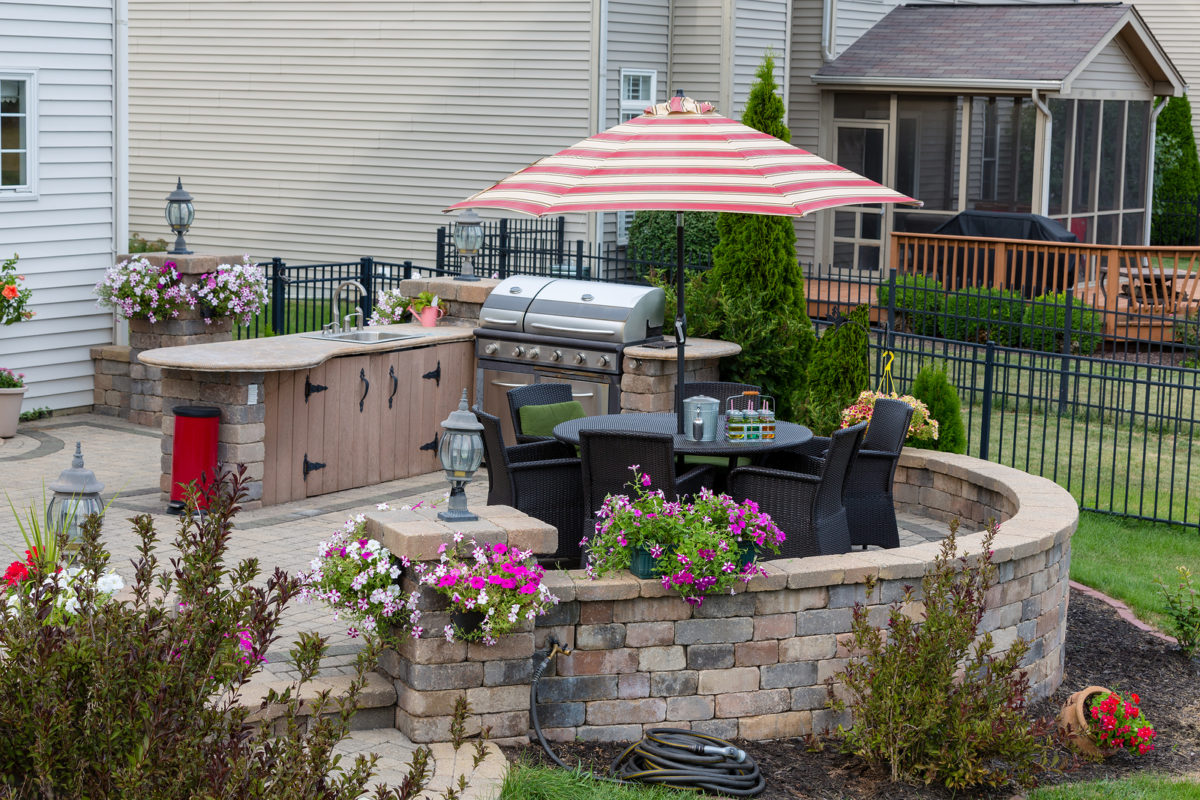
Dreaming of an outdoor kitchen?

Outdoor kitchens became popular a couple of years ago and the trend sees no end in sight. Sure, we’re still barbecuing, but now we’re an arm’s reach away from smaller versions of our kitchen appliances.

Along with those appliances, many homeowners are demanding a sink with running water, food prep areas and, quite often, a large stone oven.

Where will we eat?

Remember outdoor furniture from when we were kids? Picnic tables or plastic chairs to match a cheap plastic table were the norm.

What a difference a couple of decades makes! Today’s backyard might feature a dedicated dining area complete with gorgeous furniture. Perhaps you long for a weatherproof gazebo to top it off?

Outdoor dining areas are the star of the show when it comes to dinner al fresco. Twinkly lights in the trees, crackling fires in the outdoor fireplace and candles scattered strategically are just some of the lighting options we’ve seen.

Water features

A water feature in the garden can transform even the smallest space into a serene oasis. Fountains, waterfalls and ponds are just a few of the features homeowners are adding to their backyard retreats.

Find inspiration for your backyard water feature at Pinterest.com, BHG.com and CountryLiving.com.

Landscaping

Some elements of gardens have always lent themselves to outdoor living. Large shade trees can be a focal point in a garden, providing cool shade during the summer and interesting silhouettes during the winter months.

A carefully positioned shade tree also helps cool the home’s interior during the summer, saving you money on your power bills. The experts at Colorado State University claim that shade trees planted on the east side of the house prevent morning heat and, when planted on the west and southwest side of the house, they prevent heat buildup from afternoon sun.

While gardens and yards have always played an important role in American homes, more folks today see them as much more than play areas for the kids and dogs.

Yards are becoming an extension of the house – and furnished as if they were another room. What better way to lure you into relaxing while you’re at home?

Hey Boomer: Can you retire here (and not starve)?

An estimated 10,000 U.S. baby boomers turn 65 every day. While many are choosing to continue to work, others retire, or at least contemplate it.

Have you considered what you’ll do on that day that you take down the shingle, hang up the work clothes and leave the rat race behind?

If you’ve spent most of your adult life here, working, raising a family and building a life, the thought of leaving may be intolerable. This is especially true if you have grandkids in the area.

Although the optimal time to begin planning the end game may have happened long ago, plan you must, if it’s this city that anchors your heart.

Can you afford to remain here?

Regardless of why you want to stay, the bottom line is always money, right?

You’ll need to estimate not only your expenses during retirement but determine your income stream as well and if it will support you down the line.

“I believe it’s critical that each person take the time to determine what their lifestyle plans are and do a little research to determine what the cost of that lifestyle may be in retirement,” financial wellness expert Frank Wiginton explains to the Toronto Star’s Lisa Wright.

Yes, lifestyle considerations are important, but they mean nothing if you can’t even afford the basics.If on the other hand you spent a lifetime building and nurturing your nest egg you’ll have a comfy landing when it comes time to go wheels down on the work world. And that landing strip can be anywhere you like.

Although the Internet is full of retirement calculators that are free to use, it’s important to depend on accurate and personalized information when planning for retirement.

See a financial planner who can analyze your current situation and let you know what to expect and counsel you on your options.

“ … what the government gives it must first take away”

Ok, let’s get the tax issue out of the way upfront.

The reality is that yes, Uncle Sam will still be digging into your pocketbook even during retirement. Of course, how much you’ll pay depends on a number of factors.

In addition to all of the taxes you’ve grown accustomed to, plan on paying taxes on your IRA withdrawals, pension income and annuity distributions.

If you have income other than social security, you’ll likely pay taxes on social security income as well.

The tax picture must be considered carefully if you hope to stay local during retirement because taxes will eat a major portion of your monthly income.

Learn more about taxes in retirement at TheBalance.com and Kiplinger.com.

Trim your expenses

With relocation to a cheaper area out of the picture and knowing that it’s going to cost you dearly to remain here in town after you retire, consider now how you can lower your cost of living.

This may include postponing retirement for a few years, working part-time during retirement, paying off your mortgage and downsizing your home.

Your biggest nut every month will be your house payment. Get rid it, if you can, by paying off your mortgage.

Of course your financial advisor may tell you we’re crazy for suggesting this, so run it by him or her before giving it serious consideration.

If you can’t swing the amount of money it will take to pay off the house, consider refinancing to lower your interest rate and, thus, your monthly payment. If all else fails, sell the home and buy a cheaper one.

It’s all about the budget

Getting those numbers out of your head and onto paper (or an Excel spreadsheet) can help you figure out where you are financially and whether or not you can afford to live here (or close by) when you retire.

A budget is the best way to do this. Check out retirement budgeting tips at Investopedia.com, U.S. News and QuickenLoans.com. You’ll also find a worksheet online at TIAA.com.

Again, we urge you to consult with your financial planner before making major changes and feel free to run your real estate-related questions by us. We’re happy to help.

5 Tips for keeping your pool sparkling throughout summer

Summer is a busy time, what with trying to keep the kids entertained, work, and often, out-of-town visitors dropping in.

The pool is most likely the home’s focal point right now and getting lots of use. While you may not have time to give it a routine, thorough cleaning, break it down into smaller tasks to keep your pool sparkling all summer.

Use the skimmer

When was the last time you cleaned the skimmer basket? Allowing debris to build up in the basket is a lot like allowing your HVAC filters inside the home to accumulate too much “gunk.”

What happens in the pool is that the debris blocks water flow which, in turn, strains the pump and the filtration effectiveness plummets. Effectively, it shortens the life of the pool’s pump.

Routinely using a long-handled leaf skimmer will help take some of the pressure off the pool skimmer. Skimming leaves and other debris from the surface of the water is the ideal job for the older kids in your family.

How’s the water level?

As pool season wears on, you’ll notice that the water level in the pool decreases. This is due to a number of reasons, chief among them is the activity in the pool (splashing, etc.). Evaporation also occurs, especially during hot weather.

Now that you’ve skimmed the pool, check the water level and, if needed, bring it back to the proper level with water from a hose.

If the water is suspiciously low, check the pump to ensure it’s working correctly and shows no sign of damage.

“To make sure a leak is not the culprit, fill a plastic bucket three-quarters full of water and mark it; place the bucket in the pool, then mark the pool’s water line on the outside,” suggests the pros at NCRealtor.org

“Let it float for three days, and if the pool water level has gone down past the bucket’s, you have a leak,” they conclude. If this occurs, call a pool professional.

Additional cleaning tasks

Even with the most conscientious skimming, stuff may end up at the bottom of the pool. This is when a pool vacuum comes in handy.

Clean the filter before each use. Then, turn your attention to the pool’s walls, looking for algae growth and calcium deposits. Us a stiff swimming pool brush to remove these substances.

Don’t neglect the filter

It’s always a good idea to leave a bit of dirt in the filter. Sounds crazy until you understand that it acts as a trap for other particles.

Too much dirt, however, and the water isn’t filtered properly. Check the pressure gauge and flow meter. When it reaches 10 to 15 pounds per square inch, there’s too much dirt and it’s time to clean the filter.

The pool’s pH level

The pH scale determines the level of alkalinity or acidity and it runs from 0 to 14. Pure water is considered neutral and has a pH of 7. Higher pH values are alkaline while those lower than 7 are acidic.

The ideal pH level for pool water is between 7.2 and 7.8. Most DIYers use test strips that can be purchased at pool supply stores or at some of the large home improvement stores. Within seconds, you’ll know what you need to add to the water to adjust its pH

Perform basic pool maintenance routinely throughout the summer to keep your pool sparkling all season long.

7 Plants That Provide Summer Color in Shady Gardens

Shade gardens can be such a pleasant surprise. In that spot where you think nothing will grow, there are plants that will not only grow, but flower and thrive as well.

Depending upon climate, there are tropicals, perennials and annuals that will flower throughout the summer in a shady location.

Astilbe

If you are looking for plumes of color for that shady spot, consider planting astilbe (Astilbe x arendsii). These perennials are quite easy to grow and will bloom from late spring and through the summer.

Astilbe flowers are white, pink, lavender or red, and are striking when grown in bunches or along a shady walkway. Give the plant rich soil and water to keep the soil moist. Astilbe is hardy to USDA zones 4 to 9.

Camellia

The only problem with choosing a camellia shrub (Camellia spp.) for your shady garden is trying to figure out which variety to grow, which color to grow and which flower form.

The Japanese camellia (Camellia japonica) is the most popularly-grown species in the home garden. With more than 2,000 cultivars, gardeners can choose those that bloom in double, semi-double or single flowers, in shades of white, pink and red.

Although the young camellia will thrive in deep shade, as it ages it will need a bit of morning sun to produce the gorgeous flower show.

Camellia is hardy from USDA zone 6 or 7 (depending on variety) to 10. Watch the Grumpy Gardener’s Guide to Camellias video for additional tips.

Heuchera

The National Gardening Association’s “Perennial of the Year” in 2012, Heuchera (Heuchera spp.) is commonly known as coral bells (Heuchera sanguinea).

Heuchera is popular not only because it’s so easy to grow, but for its mind-boggling diversity in form and color – with nearly 50 different species.

Dainty flowers provide color to the shade garden, in white, pink and red hues. Learn more about Heuchera and get tips on choosing the right one for your garden at wimastergardener.org.

Hosta

Don’t discount the value of brilliant foliage in your shade garden. Hosta (Hosta spp.) is a favorite, across the country. Although they die back in winter, the gorgeous foliage appears again in spring.

Check out ‘Autumn Frost” to provide a pop of color along a walkway or wall in the shade garden.

Grow the hosta in well-drained soil amended with lots of organic matter. It’s hardy in USDA Zones 3 to 9.

Hydrangea

Is there a flower lover on earth who isn’t impressed with hydrangea blooms? The mopheads, with their huge, round flowers or the panicles that drip from the shrub – what’s not to like?

Best of all (at least for the shade gardener), is that too much sun is brutal on the hydrangea. In fact, a spot that receives morning sun and afternoon shade is ideal.

Hydrangea is a deciduous shrub and, depending on variety, may grow from four to 12 feet tall. Learn more about the different types of hydrangea and their care at Clemson University’s website.

Impatiens

This African native is, according to horticulturists at the University of Maryland, the top selling bedding plant in the country. The reason: it’s very easy to grow.

Impatiens come in 15 colors, from white to bright and will grow quite well in the shade. They do require moist soil at all times to keep blooming.

Impatiens are also lovely in containers and hanging baskets. This cutie is hardy in USDA Zones 6b to 11.

Lungwort

If you prefer to carpet the soil with in your shady gardening spot, choose a groundcover. Lungwort (Pulmonaria spp.) is one worth considering.

Flowering in shades of purple, red, white or pink, lungwort is a clumping perennial. Most varieties grow nine to 10 inches in height and spread two to three feet wide.

Lungwort prefers slightly moist soil at all times. If the roots get too dry the plant will wilt and it will rot if the roots get too much moisture. The experts at Iowa State University suggest watering it every week to 10 days if there’s no rain.

Lungwort grows best in USDA hardiness zones 3 through 7.

Happy summer gardening!