How to Fix a Stuck Garbage Disposal: A Step-by-Step Guide

The garbage disposal is the workhorse of the kitchen. Yet, it’s a device that we assume will always be at our ‘disposal’ at the flip of a switch.

Sadly, that isn’t always the case. I think most of us have, at one time or another, flipped that switch and heard the dreaded humming sound.

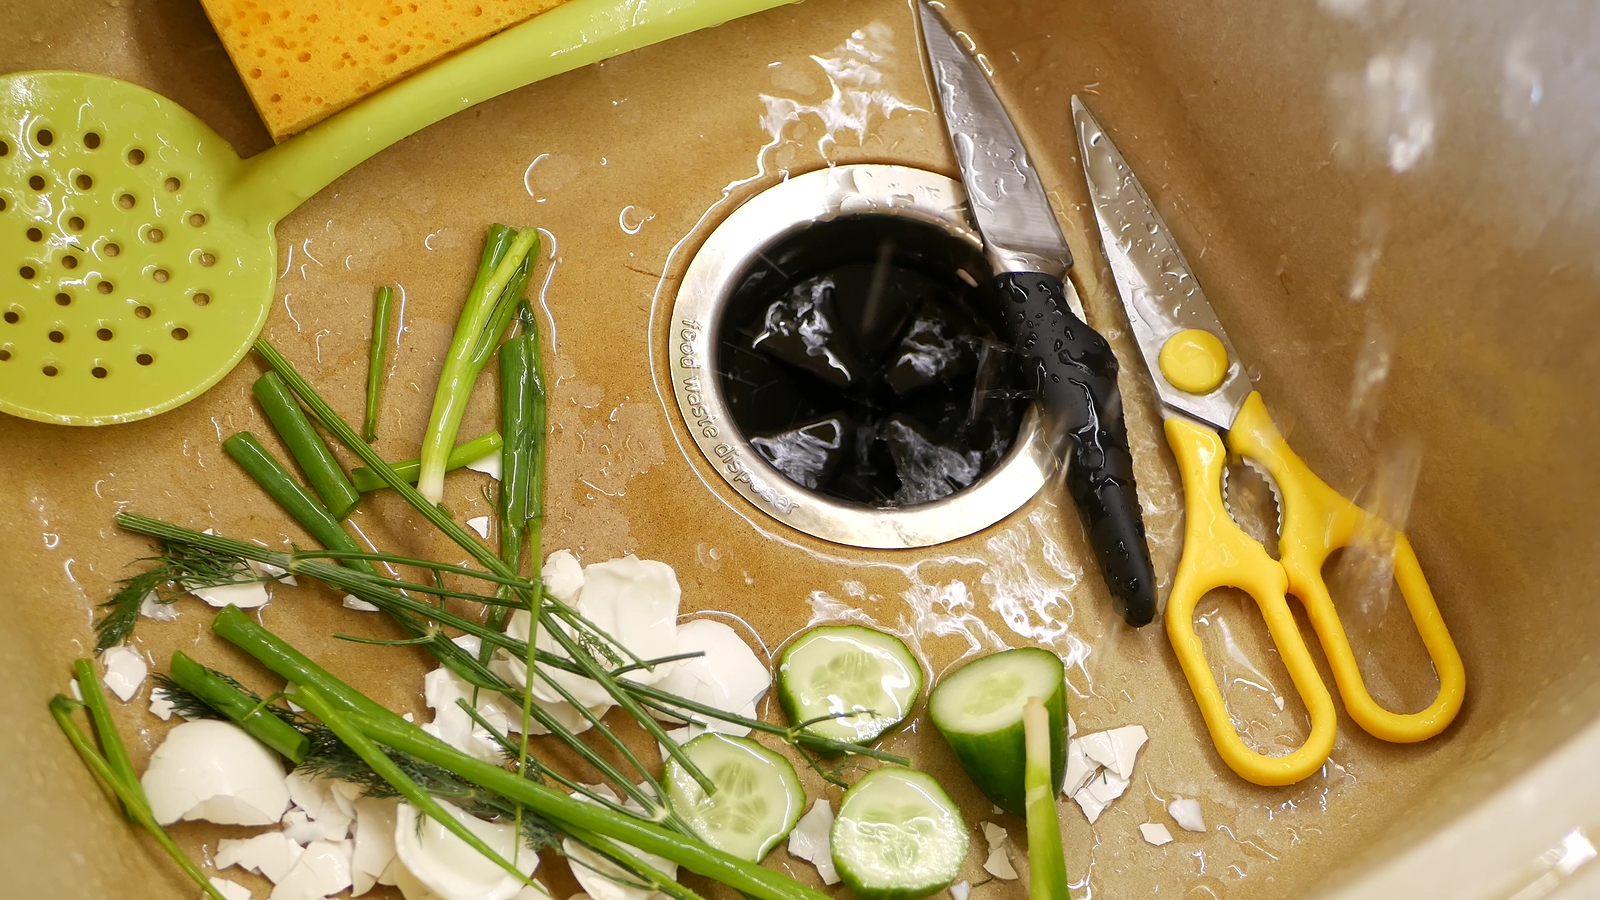
How a garbage disposal works 

Before diving into the troubleshooting and fixing process, it’s important to understand the basic functionality of a garbage disposal.

These units are installed under your kitchen sink and are designed to shred food waste into small particles that can safely pass through your plumbing. Here’s a simplified breakdown of how they work:

  • When you turn on the disposal by flipping a switch, it activates an electric motor.
  • The motor rotates a grinding chamber containing impellers or blades. These blades shred and break down food waste into smaller pieces.
  • Water from your faucet is used to wash the shredded particles down the drain, ensuring they are carried away through the plumbing.
  • The ground-up food waste is carried away to the sewage system or septic tank, depending on your home’s setup.

What causes a jammed garbage disposal?

Several factors can lead to a jammed garbage disposal:

  • Foreign Objects: The most common cause of jams is foreign objects, such as utensils, small bones, or non-food items, accidentally falling into the disposal.
  • Overloading: Putting too much food waste into the disposal at once can overwhelm it and lead to jamming.
  • Improper Use: Running the disposal without enough water or not letting it run long enough after grinding can cause clogs. Not understanding what can and cannot be put into the disposal is also a common cause of jams.
  • Dull Blades: Over time, the blades in your disposal can become dull, making it less effective at grinding food waste.

Safety considerations before working on the disposal

Before attempting to fix a stuck garbage disposal, ensure your safety.

Turn off the Power: Always disconnect the power to the disposal to prevent accidental starts. Locate the circuit breaker or power switch for the disposal and turn it off.

Cut the Power Cord: If your disposal doesn’t have a dedicated switch or breaker, you may want to unplug it. If it’s hardwired, consult an electrician.

Use Protective Gear: Wear gloves and eye protection to safeguard against any potential debris or sharp objects.

Never Reach In: Avoid putting your hand into the disposal, even when it’s disconnected. Instead, use tools for retrieval.

Tools needed to get the job done

To fix a jammed garbage disposal, you’ll need a few essential tools:

Hex Wrench (Allen Wrench): Most disposals come with a hex wrench for manually turning the disposal’s flywheel to free obstructions. If you’ve misplaced yours, use a ¼-inch Allen wrench.

Needle Nose Pliers: Long-nose pliers are useful for extracting objects that may be causing the jam. You can also use kitchen tongs.

Bucket: To catch any water or debris that may lead while working on the disposal.

Flashlight: This helps you see inside the disposal for a better view of the problem.

Let’s get to it: Fixing a a stuck garbage disposal

Follow these steps to troubleshoot and fix a jammed garbage disposal:

Turn Off the Power: Ensure the disposal is completely disconnected from the power source.

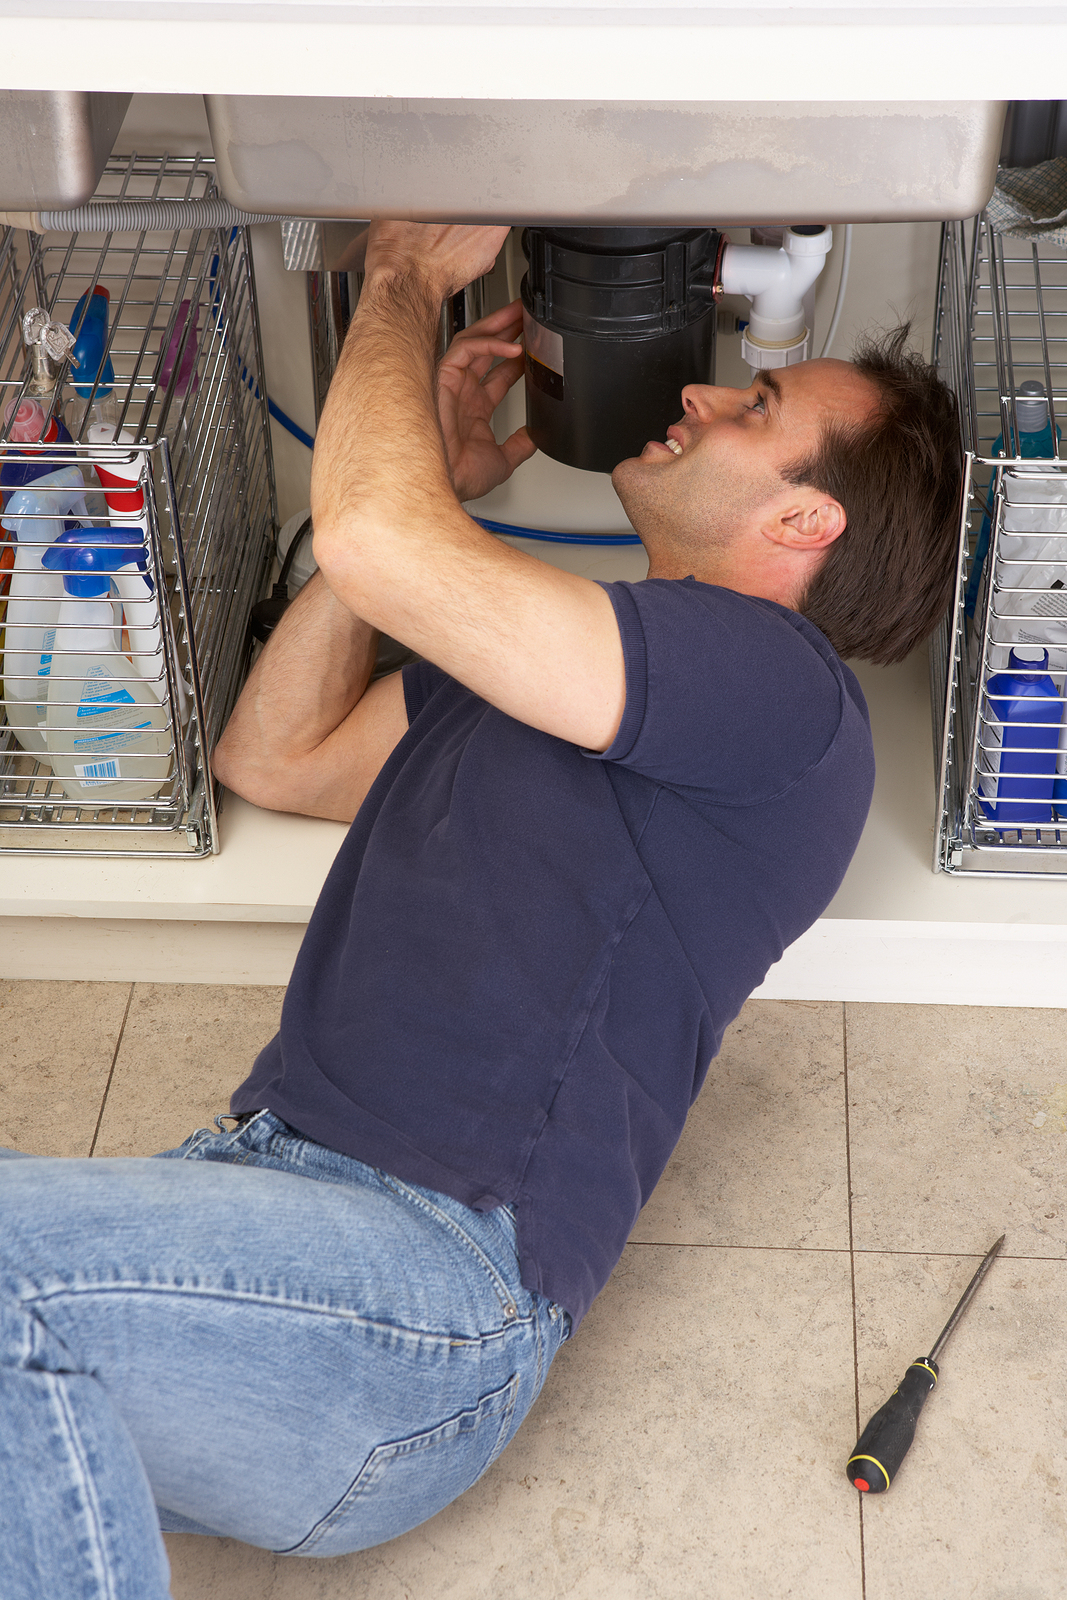
Inspect the Jam: Use a flashlight to look inside the disposal and identify the cause of the jam. If you see any foreign objects, carefully use tongs or kitchen pliers to remove them.

Use the Hex Wrench: There is an area on the bottom of the disposal where you can insert the hex wrench. Yes, you will need to lay down under the sink to see it. Manually turn the flywheel back and forth to free any obstructions. This may require some effort, so be patient.

Reset the Disposal: After clearing the jam, press the reset button, typically located on the bottom or side of the disposal. This will reset the safety mechanism.

Turn the Power Back On: Reconnect the power and test the disposal with a small amount of food waste. Ensure it’s running smoothly before using it for larger loads.

Avoiding future jams and keeping your disposal clean 

Preventing future jams and maintaining a clean garbage disposal is crucial for its longevity and efficiency. Here’s how to do it:

Always use cold water when using the disposal: “Hot water may cause fats to congeal. When congealed, fats and oils can stick to the blades of your disposal and cause the system to work harder than necessary, impacting the motor,” cautions the pros with Smith & Keene.

Snake the drain: Smith & Keene pros also suggest snaking the drain every two years. Snakes are inexpensive at the big home improvement stores.

Be mindful of what you put in the disposal: Avoid putting hard or fibrous items like bones, fruit pits, potato and apple peels, and corn husks into the disposal. Avoid pouring grease down the drain and never throw rice, pasta or bread into the unit.

Regular Cleaning: Clean your disposal every two weeks to prevent odors and buildup. Pour ice cubes into the disposal and run it with cold water for a few seconds. This helps clean the blades and dislodges debris.

Use a degreaser: Occasionally use a degreaser to help keep down the amount of fat that can build up and cause even more problems.

Getting rid of what’s jamming a garbage disposer is a super easy DIY project. Remember to follow the safety precautions and use the right tools and your disposal should run like a champ!


DIY: Clean out that dryer vent

If you’ve ever seen those photos of the nastiness that comes out of a dryer vent, and you love DIY projects, you’ll love knowing that it’s not that difficult of a job.

You don’t have to hire a vent cleaning company because it’s a simple (and satisfying) DIY project.

You’ll need some tools, but other than that, the job is a snap.

Why clean it?

All that stuff in the vent is a safety hazard. Between “… 2014-2018, U.S. fire departments responded to an estimated average …” of 13,820 home fires involving clothes dryers, according to Marty Ahrens with the National Fire Protection Association (NFPA).

“One-third (32 percent) of dryer fires were caused by a failure to clean. This appears to be mainly lint build-up,” Ahrens concludes.

Aside from the safety issue, all that rubbish in the vent causes the dryer to work harder and, thus, less effectively, wasting energy.

Gather your tools and get to work

You will need a dryer vent cleaning brush and a vacuum cleaner with a crevice attachment.

  • Disconnect the dryer from the power supply or, for a gas dryer, turn off the gas supply.
  • Drag the dryer away from the wall to give yourself enough room to get behind it.
  • Disconnect the duct connected to the back of the dryer.
  • Insert a vent cleaning brush (available at Amazon.com, HomeDepot.com and Lowes.com) into the opening at the back of the dryer and “… gently twist it around, pulling out any lint,” suggests Jenny McFarlane and Sarah Warwick at RealHomes.com.
  • By this point, you should have a nasty pile of lint on the floor which you can then vacuum up.

Next, move on to the vent duct (the part that connects to the wall).

  • Disconnect the duct from the wall.
  • Use your hands to remove the lint.
  • Use the vacuum with the crevice attachment to carefully clean inside the vent.

There may be some lint stuck in the dryer vent tubing. Insert the brush into the tubing and push it forward and pull backward. Repeat this several times, at both ends of the tubing,

Don’t neglect the exterior vent

Do you know where your dryer’s exterior vent is? “For most dryer models, you can’t run the exhaust duct more than 25 feet from the dryer to the exhaust port,” according to the experts at MrAppliance.com.

They go on to suggest that if you can’t find it nearby, “… check the basement wall or the attic/roof.”

  • Remove the vent cover
  • Use the brush to loosen the lint inside the duct, and the vacuum to remove it.
  • Replace the cover and you’re finished!

Before you call it a day and a job well-done, check behind the dryer to ensure you’ve cleaned up all the lint off the floor. Otherwise, a fire hazard still exists.

Test your handiwork

  • Reconnect the dryer to the power outlet or turn the gas back on.
  • Push the dryer back into place.
  • Run the dryer for about 15 minutes on the air cycle (often called the “fluff” cycle) to ensure everything is working as it should.


It’s storm season: Protect yourself and your home from lightning strikes

Here we are, smack dab in the middle of storm season and the time when electrical storms are most likely to occur. “About 25 million cloud-to-ground lightning strikes occur in the United States each year,” according to the National Weather Service.

These lightning strikes resulted in 51 fatalities, on average. This is why they call lightning “The Underrated Killer.”

It’s time to take it seriously and learn what to do, from the experts, during a thunderstorm.

Protect electronics

With the advances in technology, we’ve come a long way from the days of looking at the sky to determine if a storm is coming. Today, we often learn days ahead of a coming hurricane or tropical storm.

As it looms closer, however, we have work to do. First, if you lack a whole-home surge protector, buy one now.

Otherwise, unplug your electronics, such as televisions, computers, routers, etc. Why?

“… an average [lightning] stroke carries about 30 million volts,” according to the experts at StrikeCheck. Our electronics are accustomed to receiving 120 or 240 volts.

This excess voltage, when it hits a tree, power line or other structure, then travels to nearby homes (plural, if they are connected).

Back to that surge protector we mentioned earlier. There are two types, according to the editors at Dell.com. The most common device contains a metal oxide varistor (MOV) which absorbs all that overflow of voltage and redirects it to the ground.

The second type of surge protector contains a gas discharge arrestor (GDR), which is a bit harder to describe. Check out the description at Dell.com. Both, by the way, work just as effectively.

And, no, that power strip is not a surge protector. You’ll need one surge protector for each device you are going to protect.

When shopping for surge protectors, “… check the joule rating, which tells you how much energy the surge protector can absorb before it fails … The higher the rating, the better,” according to the editors at Progressive.com.

They go on to caution that we should “Avoid joule ratings under 1,000.”

OK, so there was no strike, but you lost power

This is another situation you should get out in front of. Do you know anything about your home’s circuit breakers? Do you know where they are located, for instance? What it looks like when a breaker is tripped?

The first step is to locate the box, which is typically on an exterior wall, near the garage, but not always.

Open the box. Are the breakers labeled as to which breaker controls which circuit? You may see a numbered list on the interior of the box’s door. The number typically refers to the circuit breaker (they are numbered, if you look closely) and which circuit it controls is typically written next to the number.

If the power goes out during an electric storm, you will need this information to determine if a circuit breaker was tripped or if the problem is more extensive, such as at the substation, with the transformers or because of downed power lines.

You’ll find a walkthrough of how to reset the circuit breakers in this YouTube video.

Do you need backup power?

Backup generators have been all the rage in the past few years and, if there is someone who uses medical equipment in the home, a generator may be a lifesaver during an outage.

At the very least, a generator will run essential appliances, such as the refrigerator. “A generator with 2000 watts of power will be sufficient to operate the freezer and refrigerator without any difficulties,” according to Erik Watson at PowerAll.

When lightning strikes your house

“It may start a fire. In some cases, the fire may start in areas that aren’t immediately obvious, such as in your attic insulation,” according to the pros at PennyElectric.com.

They go on to say that, to avoid being electrocuted, you should not use a landline phone during an electrical storm. Other ways to protect yourself include:

  • Avoid using a desktop computer (you unplugged it, right?). Use a tablet or laptop instead.
  • Avoid bathing (shower or bath) or swimming in a pool during an electrical storm.
  • Stay away from any windows that have metal frames.

It may be tempting to leave the home, but it’s not wise unless you are in danger, such as a fire or even if you smell smoke. “You are safer in your house in the center of a room than outdoors,” say the folks at Penny Electric.

Do call the fire department as soon as possible if lightning strikes your home. They will come out and look for fire in areas of the home not visible to you.

While severe electrical storms can occur any month of the year “September is the month during which most storms strike the U.S.,” according to research from NOAA’s Atlantic Oceanographic and Meteorological Laboratory.

Stay safe this storm season!


Get Your Wood-burning Fireplace Ready for Fall

While slogging through a snowy commute, is there anything more comforting than envisioning your cozy home, complete with a crackling fire?

Now, imagine that picture also includes a cup of hot cocoa or a glass of your favorite wine. It’s something to look forward to, isn’t it?

There are just a few things you need to do to make that dream a safe winter reality.

Before You Call a Chimney Sweep

Chimney sweeps handle one of the dirtiest, most unpleasant home maintenance tasks. But, (usually) they only work with fireplaces that don’t need other maintenance or repairs. You don’t want to call out a chimney sweep if what you really need is a mason … or pest control.

Before calling a sweep, check for:

  • Cracks in your fireplace, or on the exterior of your chimney. You’ll need a powerful flashlight and possibly a ladder. If you notice any cracking, call a licensed mason as fireplaces need special materials. If you suspect that faulty flashing is causing leaks, call a roofer.
  • Branches hanging over your chimney. These become dangerous if a spark flies out the top. It’s unlikely that your fireplace has a steel cap. Even then, branches can restrict the chimney draft causing problems inside.
  • Animal nests inside the chimney. If critters have moved into your chimney, there’s a good chance you’ve heard them arranging their nest. But you should still take a look from both sides (inside the fireplace and down the chimney). If you spot the tell-tale signs of birds or animals, you may need to call animal control.

Get the chimney cleaned

Over time, creosote, a flammable substance, can accumulate inside the chimney, increasing the risk of a chimney fire.

Hire a professional chimney sweep to clean out any creosote and ensure that your chimney is clear of debris and obstructions.

Most experts recommend a professional cleaning of your chimney about once a year (or every 80 fires). The Chimney Safety Institute of America offers advice on how to hire a chimney sweep. Also, be sure to check reviews on Yelp.com and similar review sites.

Clean the firebox

The firebox is the area where the fire burns. A clean firebox not only improves the aesthetics but also provides a better surface for the wood to burn efficiently.

Remove the grate and scoop out the burnt wood chunks, ash and other debris. Use a small hand broom to sweep down the walls and floor of the firebox.

Finally, use a vacuum cleaner or shop vac to suck up any remnants that remain.

Don’t light that fire yet!

Take a tour of your home to test your smoke detectors and, if you have them, carbon monoxide detectors.

“You should always check the manufacturer’s instructions for the proper method of testing your smoke detector and fire alarm,” cautions the editors at AllState.com. Use Google to search for the model number, which is listed on the alarms.

Now all you need to do is stock up on firewood. And, during the winter, don’t forget to clean out the ashes about once a week, or whenever they’re about an inch thick.

If you’re up for it, why not store those ashes in a bucket until summer? They make a delicious treat for flower and vegetable beds, according to the Oregon State University Extension Service.

Avoid these 7 common mistakes when hiring an exterior home painter

When it comes to giving your home a fresh new look, few things can make a bigger impact than a fresh coat of paint on the exterior. Hiring a professional exterior home painter can save you time, avoid the hassle of doing it yourself and give you peace of mind that the job was done right (or a warranty in case it wasn’t!).

However, not all painters are created equal, and making the wrong choice can lead to costly mistakes and disappointment. Here are some common mistakes to avoid when hiring an exterior home painter to ensure a successful painting project and a beautiful, long-lasting finish.

Mistake #1: Not researching the painter’s reputation

One of the most critical steps in hiring an exterior home painter is to research their reputation. Don’t simply hire the first painter you come across. Take the time to read reviews, ask for references from friends or neighbors, and check their online presence.

Look for a painter with a track record of positive customer experiences and a portfolio showcasing their past projects.

A reputable painter should be fully insured and licensed, giving you peace of mind in case of any unforeseen accidents during the job.

Mistake #2: Choosing the cheapest option

We all love to save money, but going for the cheapest painting contractor is often a recipe for disaster. Low-cost painters may cut corners on materials, use inexperienced labor, or lack the necessary insurance.

While it’s essential to find a reasonably priced painter, prioritize quality and reputation over a discounted price tag. Remember, a quality paint job can enhance your home’s curb appeal and protect it from the elements for years to come.

Mistake #3: Not getting multiple quotes

Getting quotes from multiple painters will help you gauge the average cost of the project and identify any potential red flags. Each painter may have different techniques, timelines, and material choices, so comparing quotes will give you a better understanding of what to expect.

Aim for at least three quotes from different painters, and don’t be afraid to ask questions about their process and recommendations for your home.

Mistake #4: Ignoring the contract details

A written contract is a crucial safeguard when hiring an exterior home painter. It should outline all the essential details, such as the scope of work, timeline, paint colors, specific materials to be used, and payment terms.

Be cautious of any painter who hesitates to provide a written contract or avoids discussing important details. Review the contract thoroughly before signing and seek clarification on any unclear points.

Mistake #5: Paying the painter up-front

Some painters may require a down payment. If the amount they are asking seems high, either try to negotiate or don’t hire the painter.

Never pay for the entire job up-front.

Mistake #6: Not asking what type of paint will be used

The type and quality of paint used can significantly impact the longevity and appearance of the paint job. Ask for the brand and type of paint that will be used on your home. Get that information in writing.

Make sure the pain that he or she will use is high-quality exterior paint that is appropriate for your specific climate and conditions.

Cheaper paints may save you money upfront, but they are more likely to fade, crack, or peel over time. A reputable painter will be knowledgeable about different paint options and recommend the best one for your home.

Mistake #7: Not asking about warranties or guarantees

A professional exterior home painter who stands behind their work will often provide warranties or guarantees on their services.

Inquire about the painter’s warranty policy and what it covers. A reliable painter will be willing to fix any issues that arise due to their workmanship or the quality of the paint used.

Oh, and don’t forget to obtain a copy of the warranty for your records.

The national average cost of an exterior home painting job is $3,000, according to Brionna Farney and Lowe Saddler at Forbes.com.

For many, that’s a huge amount of money, making hiring an exterior home painter a decision that should not be taken lightly.

Do your research, get multiple quotes, prioritize quality over cost, and make sure to have a detailed contract in place.

By paying attention to these essential factors, you’ll be well on your way to transforming your home’s exterior and boosting its curb appeal for years to come.

How to pay off a 30-year mortgage in 15 years

The news of quite possibly yet narrowly escaping a nationwide recession was eagerly accepted by most Americans. The problem is, however, that while the S&P is up and jobs are being added, “… millions of individual recessions are playing out all across America,” according to Andrew Lisa at Yahoo Finance.

These mini “recessions” include the nearly-17 million folks who have lost their jobs since the beginning of 2023, according to research at Statista.com.

Then, there are those Americans who were on the margins financially, now paying inflated prices at the gas pump, facing huge grocery bills and paying skyrocketing home energy bills.

Suffice it to say that these folks probably aren’t in a position to begin the journey to paying off their mortgage early.

If you are among those who can, read on for some tips.

It’s all about financial freedom now, not in 30 years

If you’re looking to gain financial freedom faster, paying off a 30-year mortgage (or however many years are left on yours) in 15 years, there are several strategies from which to choose.

Refinance to a shorter-term loan

One of the most effective ways to accelerate mortgage repayment is by refinancing to a shorter-term loan, such as a 15-year fixed-rate mortgage. If you bought when rates were low, however, you may be shocked by what you’ll be asked to pay for even a 15-year mortgage.

Consult with your financial adviser to determine if this is a good route to follow, financially.

Increase your monthly payments

Paying more than the minimum monthly requirement can significantly speed up your mortgage payoff. Even a small increase each month can make a big difference over time.

Make bi-weekly payments

If, like a lot of us, you can’t stomach a bigger chunk of money going out, consider cutting it up into bite-sized bits. This is especially helpful for those who get paid bi-weekly.

Divide your monthly mortgage payment in half and pay that amount every two weeks instead. By doing this, you’ll make 26 half-payments each year, which equals 13 full payments. This extra payment each year can cut years off your mortgage term and all that interest you’d end up paying on it.

Take Advantage of Windfalls

If you receive any unexpected windfalls, such as an inheritance, work bonus, or a sizeable tax refund, consider using a portion of it to make an extra mortgage payment. Remember, every additional dollar you put toward your principal reduces the amount of interest you’ll pay in the long run.

Cut unnecessary expenses

Review your monthly expenses and identify areas where you can cut back. It may mean cooking at home more often, canceling unnecessary subscriptions or finding cost-effective alternatives for entertainment. Redirect the money saved into your mortgage payments.

Consider mortgage recasting

Mortgage recasting is a lesser-known strategy that allows you to make a substantial lump-sum payment to your lender, which in turn reduces your monthly mortgage payments.

This can be useful if you come into a large sum of money but want to maintain a lower monthly payment for flexibility.

Learn more about mortgage recasting and its amazing benefits at RocketMortgage.com.

Refinance if interest rates drop

Keep an eye on interest rates and consider refinancing your mortgage if rates significantly drop below your current rate.

Refinancing can help you secure better terms and potentially lower your monthly payments, which can be redirected toward your principal.

Seek professional advice

If you’re unsure about which strategies suit your financial situation best, consider consulting with a financial advisor or a mortgage specialist. They can provide personalized advice and guidance based on your specific circumstances.

Remember, the journey to becoming mortgage-free requires patience and perseverance. Celebrate your milestones along the way, and don’t be too hard on yourself if unexpected expenses arise. Keep your eye on the prize, and you’ll soon enjoy the peace of mind that comes with owning your home outright.

We are not attorneys, accountants or financial advisors and the information in this blog post is not a substitute for professional advice. It is for educational and informational purposes only.

Watch out for the latest scams!

It’s no secret that the internet has become an integral part of our lives, offering convenience, connectivity, and a wealth of information.

However, along with its many benefits, the online world is also rife with scams and fraudulent activities that can pose a significant threat to unsuspecting Americans. Today, we’ll take a closer look at some of the more common tactics used by scammers.

If you have been a victim of a scam, at the end of this post, we’ll offer up a list of assistance organizations you might want to contact.

Student Loan Forgiveness Scam

By late 2022, about 43.5 million Americans held student loan debt (Federal Reserve). “The average federal student loan debt is $37,338 per borrower,” says Melanie Hanson at Educational Data Initiative.

Those with private loans owe nearly $18,000 more.

Scammers take advantage of this by offering bogus student loan forgiveness programs. They often promise to eliminate or significantly reduce your student debt in exchange for an upfront fee or sensitive personal information.

Although President Biden’s student loan forgiveness program has been blocked by the Supreme Court, legitimate loan forgiveness programs do exist. These are typically offered by the government or reputable financial institutions.

Be cautious of unsolicited offers and always research before providing any personal or financial information.

Tech Support Scam

Tech support scams prey on individuals’ concerns about computer security and technical issues. Scammers may reach out via phone, email, or pop-up ads claiming to be from reputable tech companies.

They create a sense of urgency by warning you of a virus or malware on your computer and offer to fix the problem for a fee.

“They often ask you to pay by wiring money, putting money on a gift card, prepaid card, or cash reload card, or using cryptocurrency or a money transfer app because they know those types of payments can be hard to reverse,” cautions the experts with the Federal Trade Commission.

They suggest, “If you get a phone call you didn’t expect from someone who says there’s a problem with your computer, hang up.”

In reality, they are only after your money or personal information. Remember, legitimate tech support companies do not proactively contact customers unless there is an ongoing support agreement.

Romance Scams

This scam is so common that entire YouTube channels and even companies are devoted to rooting out the scammers.

Romance scams, also known as ‘catfishing,’ exploit the emotional vulnerabilities of individuals seeking love or companionship online. Scammers create fake profiles on dating websites or social media platforms and build relationships with their victims.

They start out trying to gain trust and affection before the relentless requests for money start rolling in.

You may recognize these scammers, both male and female, on Facebook. These are the people who show up in a thread unrelated to romance or dating and flattering a person in the thread before asking for permission to private message. This is where the hook is set.

If you are involved in one of these scams, the experts agree that you should cease contact immediately. Don’t send any additional money and close accounts to which the catfisher has access.

Please also visit SocialCatfish.com to learn more about this scam and what to look out for.

It is crucial to remain cautious when engaging in online relationships, especially if someone you’ve never met requests money or personal information.

Puppy Scam

If you’re in the market for a puppy, you may just meet up with a puppy scammer. Many of the websites that sell puppies are run by these crooks.

“In one instance documented by the BBB [Better Business Bureau], a woman paid $850 for a Dalmatian puppy, only to receive additional requests for money — first $725 for travel insurance for the dog, then $615 for a special crate,” says Patrick J. Kiger and Sari Harrar at aarp.org.

“In the end, the buyer lost $2,200 and never got the puppy — which didn’t actually exist,” they warned.

Of course, we always recommend to our friends and clients that they get their puppy from an animal shelter, rescue, or a reputable local breeder. If you do fall in love with a puppy online, do a reverse image search to ensure it isn’t a photo taken from another site. Insist on seeing the puppy and having a vet check it before you give the person any money.

Read more about puppy scams and how to recognize them at AARP.org.

Victim Assistance Resources

If you or someone you know has fallen victim to a scam, there are resources available to provide assistance and support. Here are some organizations and agencies that can help:

Federal Trade Commission (FTC): The FTC offers resources for reporting scams and provides guidance on how to recover from identity theft or fraud.

Better Business Bureau (BBB): The BBB’s Scam Tracker provides scam alerts, consumer tips, and a platform to report fraudulent activities.

Internet Crime Complaint Center (IC3): Operated by the FBI, IC3 accepts online scams and cybercrime complaints.

Local Law Enforcement: Contact your local police department to report scams and seek guidance on legal action or further investigation.

Remember, if you encounter a scam or suspect fraudulent activity, report it to the appropriate authorities and seek assistance from victim support organizations to help you navigate recovery. Stay safe and protect yourself from online scams.

Finding Your Property Line: A Guide for Homeowners

Here’s a scenario. You receive a notice of violation from your HOA regarding weeds in your front yard. Since your property lines aren’t clearly delineated with fencing or anything else, how are you to know that the property on which these weeds are growing is yours and not your next-door neighbor’s?

The answer can most likely (but not always) be found in that big packet of documents from the closing process. You still have that, right?

For many homeowners, trying to decipher closing documents is akin to attempting to get a sip of water from an open fire hydrant. That’s ok. We’ll walk you through practical methods and resources to help you identify your property lines.

Start with your deed and survey

Your property’s legal description can be found in the deed or survey documents. The deed provides a written description of the property’s boundaries, while a survey is a precise land map. Start by reviewing these documents, as they often include measurements, landmarks, and other relevant information to guide you in identifying your property lines.

Andie Huber, with This Old House, suggests, “Most mortgage lenders require prospective homeowners to have a current survey, and your title insurance also depends on it. If you bought your home recently but don’t have the survey, contact either company to see if they have a copy on file.”

What happens if you still can’t get your hands on the survey and can’t make heads or tails of the deed’s description?

Look for boundary markers

Boundary markers, such as metal stakes or concrete monuments, surveyors use to demarcate property lines. Begin by exploring your property’s perimeter and watch for any visible markers.

These markers may be buried underground, so gently probing the soil around the suspected area can help you locate them.

Be careful when digging. Utility lines are often buried as well. If you fear hitting a gas line or something else, dial 811 on your phone. This is a national number created by the Federal Communications Commission (FCC). There is no charge to call; they will help you from hitting these hidden, underground hazards while digging.

Talk to your neighbors

A friendly conversation with your neighbors can be surprisingly helpful. They might know about the property boundaries or have conducted a past survey.

Sharing information and experiences can provide additional insights and help you understand your property lines.

Check local records and government offices

Local government offices, such as the county clerk’s or assessor’s office, often maintain property records. These records may include maps, plats, or previous surveys that can assist in identifying property lines.

Visit these offices or check their websites to access relevant information. Some counties even have online databases that allow you to search for property records using your address.

Use online mapping tools

Advancements in technology have made locating property lines easier than ever. Several online mapping tools, such as Google Earth, can roughly estimate your property’s boundaries.

While these tools may not be as accurate as professional surveys, they can give you a general idea to start with. Additionally, some counties have online mapping systems offering more precise boundary information.

Hire a professional surveyor

Hiring a professional surveyor is the way to go if you need precise and legally binding information. Surveyors use specialized equipment to accurately measure and map property boundaries.

The national average cost to hire a surveyor is Homeowners report that the average land survey costs around $516. The low end of the price range is $200, and the high end is $1045, according to HomeAdvisor.com.

The surveyor will conduct a thorough survey of your property, locate existing markers, and may even install new markers if necessary. While this option incurs a cost, it provides the highest certainty regarding your property lines.

Ensure that the surveyor you hire is licensed and insured.

Locating your property lines is crucial for understanding your land clearly and avoiding potential conflicts with neighbors or your HOA.

While some methods can give you a rough estimate, consulting professional surveyors and relevant local authorities will provide the most accurate and legally binding information.


Understanding Umbrella Insurance Policies: Who Needs Them and Why?

So, you’ve got your car insurance, homeowners insurance, and maybe even a little something for your beloved furry friend. You’re feeling pretty confident that you’ve got all your bases covered.

But have you ever heard of umbrella insurance? No, I’m not talking about that handy accessory that keeps you dry in a downpour. I’m talking about an insurance policy that can provide you with an extra layer of protection and peace of mind.

Let’s dive into the details to help you learn if umbrella insurance is something you need.

What is umbrella insurance?

Think of it as an extra shield that extends beyond the coverage limits of your existing insurance policies, such as auto or homeowners insurance. It kicks in when the limits of those policies are exhausted, providing additional liability coverage.

For example, “An idle remark can get you sued for slander. A car accident can land you in court,” explains Richard Koreto at HouseLogic.com.

While none of these are covered under the typical homeowner’s insurance policy, you can obtain this coverage with umbrella insurance.

In a nutshell, umbrella insurance offers the advantage of extending the liability protection on your home and auto policies. It’s like having an insurance safety net to catch you when unexpected events or accidents exceed your other coverage.

Now, you might be wondering who exactly needs an umbrella insurance policy. There are a few situations where umbrella insurance becomes particularly crucial:

High-Net-Worth Individuals: If you’ve accumulated substantial assets, whether it’s a luxurious home, valuable investments, or a fat savings account, you become a potential target for lawsuits seeking large sums of money. An umbrella insurance policy can shield your hard-earned assets from being wiped out in case of a lawsuit or judgment exceeding your primary insurance coverage.

Homeowners: While your homeowners insurance policy covers you for many unforeseen events like property damage or theft, it may not be sufficient to cover certain liability claims. For instance, if someone were to slip and fall on your property and decide to sue you for medical expenses and damages, your homeowners insurance might fall short. An umbrella policy can step in and provide the extra coverage you need to protect your assets.

Drivers: We all know that accidents happen, and sometimes they can lead to costly lawsuits. If you cause a severe accident that results in significant injuries to others, the liability limits on your auto insurance might not be enough to cover medical expenses, legal fees, and potential damages. An umbrella insurance policy can help fill that gap and save you from a financial nightmare.

Pet Owners: As much as we love our furry friends, the truth is that accidents involving pets can happen. If your pet were to bite or injure someone, you could be liable for their medical expenses and any resulting damages. An umbrella insurance policy can offer that extra layer of protection in case your pet’s actions lead to a lawsuit.

So, you might be wondering, “Why can’t I just increase the limits on my existing insurance policies?” Increasing your primary coverage limits can be an option, but it has limitations.

Insurance companies often have maximum limits they can offer, and those limits may not be enough to cover you adequately in high-stakes scenarios. Additionally, umbrella insurance isn’t just about increasing the limits; it often covers claims not covered by your primary policies, like slander or libel lawsuits.

Why umbrella insurance might be worth considering

Now that we’ve covered who might need umbrella insurance let’s talk about the reasons why it’s worth considering. Here are a few key benefits:

Increased Liability Protection: The primary purpose of an umbrella insurance policy is to give you peace of mind by providing additional liability coverage. It acts as a safety net, ensuring you’re financially protected in the face of unexpected lawsuits or claims beyond your primary insurance limits.

Affordable Coverage: Umbrella insurance policies offer substantial coverage at a relatively low cost. Considering the potential financial devastation that can result from a lawsuit, the annual premium for an umbrella policy is often a small price for the protection it provides.

Broader Coverage: Umbrella insurance policies often include coverage for various liability situations that might not be covered by your primary policies. This can include things like defamation, false arrest, or even worldwide liability coverage for certain situations. It’s like having a safety net that catches you in various scenarios.

Peace of Mind: Let’s face it; life is full of uncertainties. Accidents happen, and lawsuits can arise from unexpected situations. Having an umbrella insurance policy in place lets you sleep better at night, knowing you have an extra layer of protection to shield your assets from potential financial ruin.

Before you rush off to purchase an umbrella insurance policy, it’s important to note that there are typically requirements for eligibility. Insurance companies often require you to have certain minimum levels of primary liability coverage on your existing policies before you can purchase an umbrella policy. This ensures that you have a solid foundation of coverage in place.

When it comes to choosing an umbrella insurance policy, it’s crucial to work with a reputable insurance provider. Shop around, compare quotes, and read reviews to find a company that fits your needs and has a track record of excellent customer service.

DIY solutions to a sticking sliding glass door

Sliding doors have been around longer than most of us think. In fact, archaeologists say that they were somewhat common in “… Roman houses as early as the first century CE,” according to Martin Whitmore, President of US Window and Door.

In those days, however, the doors hung from the ceiling, so they “… were able to move freely …,” Whitmore concludes.

Fast-forward to post-World War II, glass sliding doors became “the most popular type of door in the world,” according to Whitmore.

Americans have a love-hate relationship with these sliding doors.  Many homeowners claim that they aren’t attractive, like French doors. Others dislike dealing with the common problems of these doors, such as a lack of security and the multiple malfunctions they have faced over the years.

The fact is, however, millions of homes offer this feature.

The most common malfunction is when the door no longer slides as well as it once did. Fighting with it just to get it closed is beyond frustrating.

The good news is that you don’t always need to call a professional to fix the problem. Let’s explore some simple do-it-yourself (DIY) solutions to help you quickly get your sliding door back on track.

1. Clean the tracks

One of the most common reasons for a sliding door sticking is dirt, dust, and debris accumulating in the tracks. To resolve this issue, start by thoroughly cleaning the tracks.

sliding glass door repair

Begin by removing any loose debris using a vacuum cleaner or a brush. Next, mix a mild detergent with warm water to wipe down the tracks. Scrub gently with a soft or old toothbrush to remove any stubborn grime.

Finally, rinse the tracks with clean water and wipe them dry. This simple cleaning routine can work wonders in restoring smooth operation to your sliding door.

2. Lubricate the tracks

Lubrication might be the key if your sliding door is still sticking after cleaning. Applying lubricant to the tracks can significantly reduce friction and improve the door’s sliding action.

Begin by selecting a silicone-based or Teflon-based lubricant specifically designed for door tracks. “Although they may feel slippery when they’re first applied, grease and oil-based lubricants eventually become sticky and will attract dirt that clogs your sliding glass door tracks,” cautions the pros at GlassDoctor.com.

If you’re unsure when purchasing a product, check the ingredient label.  “If you see ‘petroleum’ listed, don’t use it—the lubricant has an oily base,” the Glass Doctor pros conclude.

Apply a small amount of the lubricant to a clean cloth and wipe it along the entire length of the tracks. Make sure to cover both the top and bottom tracks. Move the door back and forth a few times to distribute the lubricant evenly. This simple step can often make a noticeable difference in how smoothly your sliding door operates.

3. Adjust the rollers

Another common cause of a sticking sliding door is misaligned or worn-out rollers. The rollers are located at the bottom of the door and help it glide along the tracks.

To adjust the rollers, locate the adjustment screws on the bottom edge of the door. Using a screwdriver, turn the screws clockwise to raise the door and counterclockwise to lower it. Make small adjustments and test the door’s movement after each turn.

If the rollers are worn or damaged, they may need to be replaced. Consult the manufacturer’s instructions or seek professional assistance to ensure proper replacement.

4. Check the door alignment

Sometimes, a sliding door can stick due to misalignment. Check if the door is properly aligned within the frame. Inspect the top and bottom edges of the door to see if there are any noticeable gaps. If the door is misaligned, you may need to adjust the frame.

Loosen the screws holding the frame in place and gently tap the frame using a rubber mallet until the door aligns correctly. Tighten the screws once the alignment is satisfactory. Remember to make small adjustments and test the door’s movement after each step to ensure proper alignment.

A sticking sliding door can be frustrating, but with a few DIY solutions, you can restore its smooth gliding action without needing professional help. By following these simple steps, you can save time and money and enjoy the convenience of a sliding door that operates effortlessly.